

General Information
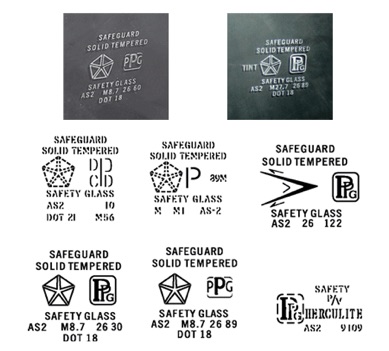
DATE CODED GLASS
-
If you want date codes on your replacement glass, various companies can apply your exact dates to the glass for you. Otherwise all new seals and plastic parts can be replaced with correct factory appearance from many reproduction part suppliers.
-
There are available FACTORY EXACT Date Coded Glass for ‘68 thru ‘69 A body vehicles. You’ll get the correct logos and print styles, according to your vehicles build date and manufacturing plant.
-
Front Windshield for a Fastback
-
The Barracuda coupe (notchback) and fastback have identical windshields. But not side glass (other than vent windows), and obviously not rear glass.
-
Max Heim - ’67 FB
-
According to NAGS (National Auto Glass Specifications) the part #DW690GTY for a Barracuda front windshield is the same size from 1967-1969 is the same even for convertible measurements 22x58.
Aftermarket Front Windshield
-
Vintage Glass carries the front windshield. (888) 282-8789
-
-
Metro Parts Market
-
Try: http://www.metropartsmarket.com/glass/classicautoglass-c6s1.html
-
-
AMD windshield (with the Pentastar).
-
Sanders Repro Glass
-
They have the AS1 markings.
-
Windshield Gasket Seal
Front Windshield Gasket
-
There are several groups of windshield trims/gaskets for A-bodies, that are NOT all interchangeable. So, as far as Barracuda owners are concerned, the only models of interest are hardtops & coupes, and only of certain years and models. Excepting convertibles, which are their own thing entirely.
-
Windshield gaskets for A-bodies ’67 - ’76 break down like this:
"Group 1" Hardtops, fastbacks, and coupes (Sedans)
-
A. 1967 Dart & Valiant sedan, 2dr & 4dr
-
1967 Barracuda & Dart - same glass, same gasket, same plastic trim with
-
metal corners.
-
-
B. 1968+ Dart & Valiant sedan, 2dr & 4dr
-
1968-69 Barracuda, 1968-76 Dart & Dart Swinger, ’71 - ‘76 Scamp - same glass as above; different gasket, stainless trim with clips. Both can be retrofitted to 1967 hardtops by drilling the holes for the clips.
-
It is easy to drill and install the reveal clips. The clips worked fine. The rubber gasket does seal up but has the gap in each corner at the top.
-
Kirby
-
‘67 FB, ‘68 Conv
-
"Group 2" (2dr sport hardtops (late) )
-
E. Duster, Demon, Dart Sport
-
’70 - ‘76 Duster, Demon, Dart Sport - this is a completely different windshield glass, gasket and trim, NOT interchangeable with the preceding models.
"Group 3" Sedans, 2dr and 4dr (2dr sport hardtops (early) )
-
C. 1967 Dart, Valiant hardtop & Barracuda coupe, Barracuda fastback
-
1967 Valiant, Dart - another different glass, gasket, and plastic trim.
-
-
D. 1968+ Dart, Valiant hardtop & 1968-9 Barracuda coupe, Barracuda fastback
-
1968-76 Valiant, Dart - same glass as above, different gasket and stainless trim with clips.
"Group 4" Convertibles
-
1967-69 Barracuda & Dart - unique glass, gasket and plastic trim.
-
F. 1967-9 Barracuda & 1968+ Dart (don't know when they stopped making Dart convertibles; guessing it was ‘69)
Front Windshield Gasket Cross Use
-
So that's 6 different gaskets, just for windshields. The only ones that are interchangeable are A & B, and
-
C & D, and that is only if you get the appropriate lock strip or trim pieces & clips.
-
Max Heim - ‘67 Fastback
-
-
You can use a ‘68 front windshield gasket in a ‘67 fastback. Also the stainless moldings. Just about any '68+ A-body trim works. Convertible trim is different.
-
Max Heim posted this image to show you where to drill holes for the clips. Windshield has to come out.
-
In switching a ‘67 FB over to a ‘68 trim, there is a gap at the top of the rear window at each corner. I bought my rubber from RT specialties and used their clips which worked fine. When comparing it to another car switched from 67 trim his did not have the gap.
-
Kirby Holden - ‘67 FB, ‘68 Conv.
-
You can use windshield trim from a Dart or Valiant HT from 68 all the way to the end of production. Sedan is a different shape. So is Duster/Demon/Dart Sport. Convertible is a bottom strip only, same ‘67-’69.
-
Max Heim - ‘67 FB
Aftermarket Front Windshield Gasket
-
From YearOne: Part Number: WCRD690
-
Reproduction windshield gasket for ‘68-’69 Barracuda fastback models and all ‘68-’72 A-body coupe models.
-
Steele Rubber makes the ‘68+ windshield gasket for the 4dr.
-
Paddock lists them for $115.
Front Windshield Installation
-
Replace front windshield after dash installation.
-
Put on clips. When putting on glue for windows, use rubber gloves.
-
Put on glue, mount window without disturbing clip
-
Rear Window
Rear Window for a Fastback
-
The ‘67-’69 Barracuda Fastback rear window have the same glass.
Aftermarket Rear Window for Fastback
-
Metro Parts Market carries the rear window.
-
http://www.metropartsmarket.com/glass/classicautoglass-c6s1.html
-
-
You can get ASI windshields in clear, green, or solar grey tint.
-
Go to Sanders Reproglass
Aftermarket Rear Windshield
1968 Window Information
-
Plymouth - 1968 (Fastback) BARRACUDA - Model BH29-7, BH29-8, BH29-9 Parts
-
CURVED GLASS PARTS
-
Back (Curved Glass) 38" x 52"
-
Pattern: DB4076
-
Tint: CLN - Clear
-
$304.00
-
-
Back (Curved Glass) 38" x 52"
-
Pattern: DB4076
-
Tint: GTN - Green tint
-
$315.00
-
-
-
Back (Curved Glass) 38" x 52"
-
Pattern: DB4076
-
Tint: YTN - Solar Gray tint
-
$327.00
-
-
Michael Mosley - ’68 Cuda
-
-
Rear Window for a Notchback
-
The ’67 and ’68 notchback rear windows are the same.
-
Rear Window Trim Clips Moulding
-
The rear window trim clips on a ’67 and ’68 notchback are the same. The trim clips are made different in ’68. My understanding is you have to add them after you measure a ‘68 for spacing and use a ‘68 seal and trim but the window glass is supposed to be identical.
-
Window Moulding
‘67 Window Moulding
-
‘67 used a different gasket and different trim than ‘68-’69. The difference is the ‘67 used a gasket/seal which utilized a (chromed) plastic lock strip. The ‘67's have a different type of molding, which is held in place by a center strip, rather than clips. The ‘67 fake "chrome" plastic "locking strips" tucked into a groove in the gasket. Snapped-on stainless corner pieces are required to cover the gaps in the corners.
-
The ‘67 gasket and lock strip was problematic as the lock strip shrunk and the corner moldings would fall out and leave gaps. The ‘67 center strip gets damaged by the elements, the ‘67 corner trim pieces are hard to find as they were one year only. -
Many people with ‘67's convert to the ‘68-’69 self locking gasket w/reveal moldings as these gaskets are readily available. However the stainless steel reveal moldings are not being reproduced at this time and are becoming harder to find.
’68 - ’69 Window Moulding
-
‘68-’69 used a different gasket, with solid metal stainless trim all around, held in place by a few dozen screwed-on clips. It was self locking and used a stainless steel reveal molding.
’67 Alternative Window Moulding
-
Many ‘67 owners think the ‘68-69 molding looks better, so most ‘67 owners replace the ‘67 molding with ‘68-69 molding. That's why ‘68-69 molding is so scarce and expensive. The screws have the sealant on them.
Ron Evans - ‘67 Coupe -
So, you have some choices here:
-
1. Original ‘67: keep the old gasket (if they can save it), or buy a replacement ‘67 gasket from the one outfit that stocks it. Buy the corner pieces and repro lockstrip from the same outfit.
-
Pro: simple, works.
-
Con: lockstrip will shrink within months, crack and discolor in a year or two (just like the original).
-
2. "CBC" option: use Ramcharger lockstrip instead of the expensive repro ‘67 lockstrip. Doesn't look quite the same, but is cheap enough that you can replace it when it cracks (and it will). Still need the gasket and corner pieces. Ramcharger part # 04467329.
-
3. Convert to ‘68-’69: the problem here is finding the donor trim (not available repro). Start with ordering a ‘68-’69 gasket, and a set of repro molding clips. Use the pattern (attached, and available in the "Files"
-
Section of the BOG site) to drill the holes for the clips while the windshield is out. Acquire the stainless molding from a ‘68-’69 Barracuda coupe or fastback (not convertible), or any ‘68-and-up Dart or Valiant
HARDTOP (not 4dr or 2dr sedan, not Duster or Dart Sport). This will be an attractive, permanent solution, if not "concours" correct. -
The back window is basically the same story, except that obviously you can only use the trim from a Barracuda fastback. Good luck if you have a coupe... you're getting into the realm of the ultra-rare...
-
Sources:
-
Max Heim - ’67 Fastback, ’67 Conv.
-
Window Moulding Removal
-
During disassembly make a note on how the factory rubber seals were put on with the profile as seen. Many shop manuals do not show you this and it can mess up the fit of your doors and deck lid if incorrect.
Window Moulding Restoration (Stainless Steel)
-
Remove the waterproofing gunk from the bottom trim piece that is used to seal the windshield. Use a buffing wheel and compound to start restoring the trim for the windshield and rear window. The wheel and compound can be bought from Eastwood. After about 15 minutes, it will look nice and shiny. Not mirror quality, but very nice.
-
Jeff Ramin - ’67 Coupe
-
While working on this piece: wet sanding is the key. Using dry 600 grit sandpaper doesn't have much of an effect, Spraying a little WD40 on the paper made a world of difference. Doing that before starting with the coarse wheel make this piece much easier to restore.
-
Jeff Ramin - ’67 Coupe
-
Another trick that can help install this trim is to give the molding a twist (while off the car). This creates a slight “preload ” causing the corner to pull down and keeping it from popping up. This is especially helpful with manhandled molding that was difficult to get off because of Chrysler’s sometimes-liberal use of sealer compound.
Aftermarket Stainless Steel Window Moulding
-
You would need to find the stainless molding, which shouldn't be that hard. It's a lot more common than the hardtop molding, or at least it spans more years of production (’68 - ‘76, rather than ’68 - ‘69).
-
-
Or you could just run it "black". Unlike ‘67, the molding doesn't have any structural function. It's just dress-up.
-
Max Heim - ‘67 Fastback
-
Window Weatherstrip and Lock Strip
-
The ‘67 Barracuda convertible and ’68 fastback had the windshield weatherstrip rubber and chrome locking strip (plastic).
Aftermarket Windshield Lock Strip
-
You can get the rubber lock strip from Steele, or from YearOne, part #CM-8. It's the closest to the original as you can get. (part #CM-8). It's the closest to the original as you can get.
-
Darwin
-
-
I have the Steele '68-up gasket in my '68 fastback. Our '67 convertible has the Soft Seal windshield gasket and lock strip in it. I didn't like how the corners fit and am much happier with the Steele in the '68.
-
Rob McCall - '68 Fastback, ’67 Conv.
-
Window Clean-Up
-
Clean all the old sealant off the perimeter of the windshield and rear window. It is just a bunch of tedium, scraping the glass with a razor blade and then removing what was left with paint thinner. Takes the entire night.
-
Jeff Ramin - ’67 Coupe
Windshield Leaks
-
The major problem a window leaks is that the gaskets were incorrectly installed or sealed. You also need the trim clips for both windows -- holes for mounting these will need to be drilled while the glass is out of the car.
-
Max Heim - ‘67 Fastback
Rear Window
Rear Window Removal for a ‘69 Fastback
-
If you are not replacing the gaskets and the glass, then follow this procedure:
-
-
obtain two "glass sticks", nylon tools available from a friendly auto glass shop, here is an eBay listing: http://tinyurl.com/yafq3v2o.
-
you'll need some diluted dishwashing liquid or similar slippery soap solution
-
a razor knife, razor scraper, or similar tool
-
A helper is nice
-
I wear an old pair of running shoes, and also wear safety glasses.
Procedure:
-
1.Of course, remove the metal trim first
-
2.unlock the gasket--you'll find a seam on the face of the gasket, one half of the gasket sort of "unfolds" from the other half, or maybe "untucks" might be a better description. Use the nylon tools to get the "untuck" started and continue with the soap solution as lube;
-
3.use the nylon tools to loosen the gasket from around the glass, all the way around. Just stick it in under the rubber and pull along the glass, making sure the rubber isn't stuck to the glass. Sometimes people will have used windshield sealant to install the glass if it was fixed after a crash, or silicone seal or whatnot when they were trying to cure a leak, and you may need careful use of the razor knife to loosen up that stuff if there is any. Again, make sure the lip of the gasket isn't stuck at all to the glass.
-
4.get in the car, front seat or back seat as appropriate for the glass you are removing. Put the front seat all the way back if you are working on front glass, or all the way forward if working on rear glass. Put your running shoes/sneakers on and your eye protection. Lay back and put your feet on the glass, at the middle top. CAREFULLY press to start the glass out of the gasket. Once you've got a little initial movement, move your feet a bit further apart and press again, and work your feet out to the upper corners. It will take several times of starting in the middle and working out to the corners, using the minimum pressure you can to obtain a bit of movement of the glass. You should reach a point in which the glass bumps out at the top, kind of pushing the seal out into a bulge.
-
5. Now is where a helper is good to have. The glass should be easier to push now that the top is unlocked so to speak. Work your feet down each side at the same time. Once the upper corners are pretty much out of the gasket, get out of the car and with your helper, each of you take one side of the glass and gently pull it on out of the gasket. You'll then lift it up and out of the bottom of the gasket--careful! it often has the gasket sticking to it-- and walk it over the hood and to wherever you are going to store it while you do your other work.
Rear Window Installation for a ‘69 Fastback
-
To reinstall, put the gasket in place using some specific windshield gasket sealing material particularly on the bottom where the gasket sits on the flange and in the corners where it just sits right on more or less flat body metal, I've used the Permatex brand. It is black, and has kind of a course appearance and feel.
-
-
1. Put the windshield bottom into the bottom channel of the gasket.
-
2. Rub the rest of the edges of the glass with your soap solution and begin working the lip of the gasket up and over the edge of the glass using the nylon sticks, while gradually pressing the glass further into the gasket sides (again, the helper is good here, doing both sides at once.
-
3. You'll reach the top edge and again, just work the gasket up and over the edge of the glass.
-
4. Once the glass is fully surrounded by rubber on its outside edges, you have to push the top and upper corners back to fully seat again in the gasket. The glass will sort of pop back in as it fully seats.
-
-
Put the gasket in then soap the inside then I work the glass in with plastic tools.
-
-
Because with the sealer and the way the zipper works, it is a bear to get centered, supported and in place. You actually install the gasket first, using masking tape to hold to body, then the glass sits in place and then the seal is “zipped” in place. Word of warning, use a ton of sealer both seal to body, and glass to seal. Otherwise you will have significant leaks. OH, all the window clips and the headliner needs to be in place before installing glass.
-
-
I ended up inside of the car supporting the glass from underneath as the glass guy worked the seal.
-
Rob Robinson - ’68 Fastback
-
-
Steele Rubber Products on the East coast makes an aftermarket strip that will fit your windshield.
Aftermarket Rear Window Gaskets for ’69 fastback
-
Avoid the RT Specialties back window rubber because it leaves said gaps at the top corners.
-
-
That said, the gaps may be an installation issue, when we went to install the rear window on my fastback the gasket looked to be wrong and have funny fitment issues but once it was in everything looked fine with some adjustments.
-
Alan
-
Layson's has them.
-
Steele Rubber has them, and they have the locking strips in chrome and black.
-
Soft Seal also makes windshield gasket and lock strip. The corners don’t fit well.
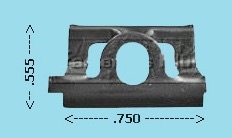
Window Clips
-
Window clips hold the glass to body. They also hold the stainless steel trim around the window. The tab on the side doesn’t do anything. It's just a remnant from the manufacturing process. Front clips are the same as the rears.
Clip Removal
-
Screws sometimes are too difficult to get to and remove. Many are rusted in place, especially the lower ones from rain. You might strip some of them during removal. You cannot remove or replace the clips without removing the glass. You may have to drill to relocate holes due to rust.
Angel Garrido - ’69 FB -
-
If you pry the molding off, it may bend the two lips down and outward and it will be hard to get off.
Jim Conner - ’68 Cuda -
-
Bottom clips may be rusted beyond recognition. You may have to drill to relocate holes due to rust.
-
Jim Conner - ’68 Cuda
-
Replacement Clips
-
Get the clip from MrMoparts for $20. The MrMoparts P/N is 270051.
-
The MrMoparts kit does not have the sealant. I also bought a front window clip set, and the front clips are the same as the rears.
-
-
Classic Industries set is MA9871, and their clip picture looks the same, too. Some vendors sell the sets with body sealant already applied under the screw heads.
-
-
Listing has the clips as Chrysler P/N #6002263. Information from R/T gives the part nos. 6002206, 6002615, and 6002615a.
-
http://www.ebay.com/itm/200566430926?ssPageName=STRK:MEWAX:IT&_trksid=p3984.m1423.l2649
-
Jim Conner - ’68 Cuda
Re-attaching Clips
-
I am about to drill holes in my ‘67 for the clips, and have the clip spacing templates from the Michael Mosley and the BOG files, but I don't see any dimensions from the edge of the mounting surface. A quick measurement looks like it should be somewhere around 1/4" to 5/16". Some measured and they all came up with 20/64 or 5/16", to center of hole.
-
Ron Evans - ‘67 Coupe
-
-
The hole size is 1/8 and centered in the rail.
-
Daty Rogers - ’67 Conv.
-
Go to the Files section of the Yahoo Groups site. There are some documents with instructions, and images showing the clip locations.
-
Max Heim - ‘67 Fastback
Door Window
Window Removal & Installation Advice
-
A carburetor or just about anything is easier to service than a window assembly. Save the door gut surgery nightmare until the diagnosis says that surgery is req'd. Or... take it all apart now, build the door guts after the door is hung and aligned on the car. Either way plan to spend a lot of time and money doing a lot more than “cleaning".
-
-
If you don't want to cover all the sharp edges with duct tape, wear sleeved gloves. Don't want to bleed to death. Or get Kevlar Sleeves from eBay.
Window Completion
-
You can just assemble door handle and door opening mechanisms now and do the window assembly later. One is not really in the way of the other.
Michael Mosley - ’68 Coupe
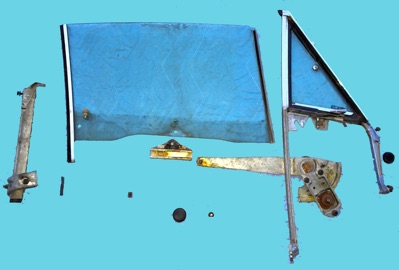
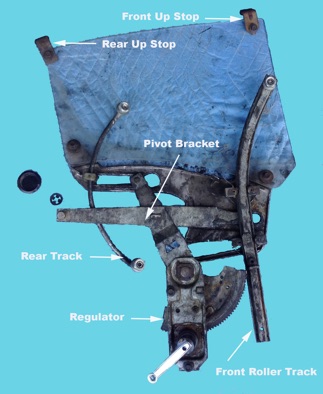
Door Window Sub-Assemblies
There are 3 parts to the complete Door Window Assembly.
1. Vent Window Assembly
2. Door Window Glass Assembly
3. Door Parts Assembly
Vent Window Assembly
Door Window Glass Assembly
-
Use the service manual as a guideline and then adapt what you learned from removing the first one to modify the procedure for removing the second.
Vent Window Assembly
-
I would *highly* recommend getting all new window hardware at this point, most of it is very cheap. Plan on spending a full weekend installing and adjusting all this.
-
-
This assembly has to be removed as one piece! That means the side window and the vent window frame have to come out together at once because they are attached. The glass won't slide out alone through the door. The only way to separate the two is out of the door. Once out, the assembly must be inverted to slide apart because the track is only open on the bottom! It is easier to pull the door glass and the regulator first, then the glass, then the vent assembly.
Vent Window Assembly Removal
-
Taking the assembly out of the door frame really involves some hide-and-seek to find all the attaching points and adjustments. There are bolts or screws that attach the vent window frame to the door. Most are located on the inside of the door frame towards the top.
-
-
The following has to be removed before taking out the vent window assembly:
-
Before removing the vent wing assembly, remove the window lift mechanism, door handles, latches, and seals. Remove the bump stop on the door glass and roll the window down completely. This exposes the window wipes and “fuzzies” for removal.
-
-
Remove lower nut to front track, nut to upper front of door, pinch allen bolt & fastener under the plastic plug on the inner door panel.
-
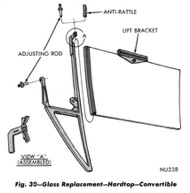
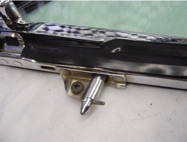
From the glass remove the rear up stop and lift bracket.
-
Lastly the regulator.
-
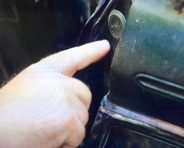
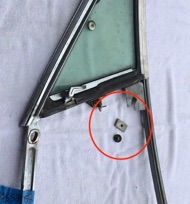
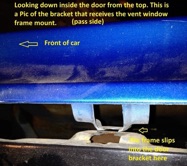
On the front of the door frame there are two large plastic flat plugs. They need to be removed to access two nuts holding the main chrome leg of a triangular mounting bracket inside the door. In addition to these, there is another flat plug underneath the door towards the front, to access the lower adjustment bracket.
-
-
-
Here is the small plug that provides access to the Allen head bolt that secures the back of the vent assembly frame. It looks like the seal in the end of a Bic pen. People who have never removed the vent wing assembly usually overlook this bolt. The small plug hides the Allen- head bolt. This bolt goes through the door inner frame into a small threaded rectangular keeper and is not attached. Under the door, the nut is 1/2 inch. Be sure to spray a lubricant on the bottom nut and threads, and take your time removing this stud. It turns loosely inside an angular bracket attached to the bottom of the vent assembly by two small welds. Often these welds are already broken and the bottom of the assembly is loose.
-
Vent Window Assembly Removal Order
-
The regulator needs to be separated first.
-
1. First roll down window
-
2. Remove the 3 bolts holding the regulator.
-
3. Slide the regulator off the window lift bracket. Now remove the regulator from the door. At this point the side glass is moving freely so be careful.
-
-
4. Before you can remove the vent wing assembly, you need to remove the window lift bracket. A plastic plug holds the bottom of the window to the bracket that engages with the roller lift mechanism. After disengaging the regulator from the window bracket, remove the bracket by tapping the center plastic rivet fastener (plug) out of the bracket mount. You can remove the window with the bracket attached and then remove the mount if you want. Inspect the regulator (lift mechanism) now since many of these are worn out or non-functional
-
and will need to be replaced.
-
-
Replace the clip and secure it by lightly driving the center pin into place, which spreads the clip and secures it to the bracket. Then lubricate the channel with grease.
-
-
-
5. Remove the vent window frame bolt at the top of the front.
-
-
-
-
-
-
-
-
-
-
-
-
6. Remove the vent window frame nut and the washer from the adjuster on the front.
-
-
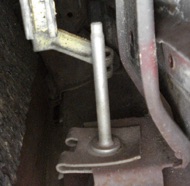
-
7. Remove the lower adjustment nut. Push the lower adjuster stud you removed the nut from up to disengage it from the door bottom. That lower stud has anti-rattle material wrapped on it and may be real tight. There is a hex on the top of the stud you can get a wrench or socket on to loosen it so it can be raised.
-
-
-
-
-
-
-
-
-
8. Remove the drive screw and block.
-
-
9. Remove the plastic rivet from the rear of the side glass that acts as the up stop to the frame.

-
-
-

-
-
-
-
-
-
-
-
10. Remove the pinch allen bolt under the plastic plug for the vent frame.
-
’67
-
The '67 has a long chrome rounded oval Phillips head on the surface of the inner door. It is about three inches long. A phillips screw driver will go through the slot on the inner door into the vent window mount.
Catfish.
’68 & ’69
-
The '68 and ’69 uses a hidden allen head screw. That screw goes through the slot on the inner door into the vent window mount. hidden by a little rubber plug, up by where the mirror adjust knob is.
Nathan Nutthall - ’67 FB -
-
-
11.The Allen head bolt goes through the door’s inner frame into a small threaded rectangular keeper, and is not attached. Then, under the door, the nut is ½-inch. Be sure and spray penetrating lubricant on the bottom nut and threads, and take your time removing this stud. It turns loosely inside an angular bracket attached to the bottom of the vent assembly by two small welds. Many times these welds are already broken and the bottom of the assembly is loose.
-
-
-
-
-
-
-
-
12. Remove the rubber door jam seal.
-
-
-
-
-
-
-
-
-
13. Remove the top and lower bolt from the rear guide.
-
-
-
-
-
-
-
-
-
-
-
-
-
-
14. Remove the guide track from the door.

-
-
-
-
-
-
-
-
-
-
-
-
-
15. You should be able to tilt the vent frame and side glass rearward at an angle and remove the whole assembly with some twisting to get that lower stud bracket to clear the space at the top of the window channel.
-
-
-
-
-
-
-
-
-
-
-
16. After removing all the attaching hardware, the entire assembly comes out.
-
-
17. Slide the window to the top position.
-
18. Holding the side glass and vent window frame lift the assembly up and back simultaneously at a 45 degree angle.
-
19. Just before you remove the assembly you'll need to twist the window glass to clear the lower adjusting mount at the foot of the frame.
-
-
20.Lift the door glass and vent window assembly out of the door together.

-
-
-
-
-
-
-
-
-
-
-
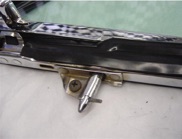
21. After the assembly is removed you can see where the lower “hook” bracket attaches to the frame of the assembly. There should be an anti-rattle piece of foam inserted where the rod and the “hook” bracket meet. This upside down view shows the anti-rattle foam.
-
-
-
-
-
-
-
-
-
-
The complete assembly is now out of the car. Label, bag and tag all the hardware and store them for now. Pay special attention to the parts that attach the assembly and to how they function. This way when you re-install the unit it will go much smoother.
Vent Window Frame Disassembly
-
The vent window assemblies are the same for ‘68-’69.
-
-
You have to take the vent window assembly out just to replace the door window. They do that as a design “feature”. Now that you have the vent window assembly out of the car door and on a workbench do this:
-
-
1. slide the glass assembly down the channel and off the vent wing assembly.
-
2. remove the upper window rubber bumper by removing the Philips screw behind the bumper
-
3. remove the Philips screw at the top of the vent frame to separate chrome main leg from triangle
-
4. remove the lower vent wing pivot bracket screw and clamp
-
5. remove the upper vent wing pivot screw and bracket
-
6. push out the vent glass from the triangle
-
7. remove the vent wing rubber gasket from the triangle
-
-
The two frames are joined by three small posts that have been bent and spread to secure the two together. After you remove the vent wing rubber seal you will be able to see where the part of the frame that has the stainless is attached to the chrome main leg. There are three pairs of the pegs. The factory only used 1 on each of the pair. The unused peg will be used to re-attach the frame. With a Dremel or drill, carefully grind the edges of the posts until the frames can be separated. You will do this to all three used pegs.
-
-
Once the pegs are drilled you can rock the frame back and forth and you may even have to gently pry the frame with a blade screw driver to separate the two parts of the assembly.
-
-
The vent wing latch has to also be removed so you can re-plate the glass base.
-
-
Drive the pin out of the shaft and loosen the screw. Disassemble the pivot; the glass and base easily comes out. You must cut out the old glass mounting tape that holds the glass in the base. Use a liberal amount of penetrating spray. Remove the catch lever by driving out the small pin.
-
Take care not to lose the special washer.
-
-
-

-
-
-
-
-
-
There is another small pin that has to be driven out. It goes all the way through the latch and is accessible from both sides. Save this pin! Behind the latch is a flat spring washer that also must be saved.
-
-
Disassemble the pivot and the glass and base will come out. You must cut out the old glass mounting tape that holds the glass in the base. Liberal use of penetrating spray is needed. Remove the catch lever by driving out the small pin. There is a special washer so take care not to lose it.
-
-
Vent Window Frame Chrome Plating & Polishing
-
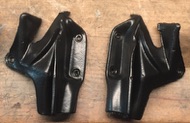
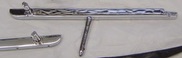
The frame of the vent wing assembly is made up of two distinct units, the front chrome frame and the angled metal and stainless frame. The chrome frame should be re-chromed and the stainless on the other frame buffed.
-
-
The vent wing assembly needs to have the vent wing glass and chrome channel removed.
-
-
There are three basic areas included in the vent wing assembly that need to be re-plated or polished.
-
-
The first is the chrome main leg of the assembly should be removed and re-chrome plated.
-
-
The pivot seen here also needs to be placed or re-chromed.
-
-
-
-
-
-
-
-
-
-
Then you have the base of the vent glass that needs to be re-chromed. It must be removed from the vent assembly and then the glass must be removed from the base. It is held in place through the use of glass setting tape.
-
-
The stainless steel part of the vent assembly must be polished and not chrome plated. The stainless part of the vent assembly is attached to the frame that attaches to the chrome main leg.
-
-
-
-
You could also re-chrome the upper pivot bracket and screw.
-
After you get the frames back from the chrome shop protect the chrome at all costs.
Vent Window Assembly Restoration
-
Restore all the stainless steel pieces by removing scratches and polishing. Take care buffing the stainless since it is part of frame and can be caught by the fast moving buffing wheel.
-
-
To continue the restoration process, do the following:
-
Replace or clean the glass as necessary. Either use glass setting tape from your local glass shop or use black silicone to secure the glass into the base, and trim when dry.
Vent Window Glass Restoration
-
1. You will need several tools to clamp vent frame to vent post: vise grips or clamps and paint sticks.
-
2. Try a trial fit to adjust the vise grips using paint sticks to protect the chrome.
-
3. Apply 3/16”to 1/4” bead of adhesive to the post. A recommended adhesive to bond frame to post is Loctite E- 120HP available at Fastenal or Internet or Panel Bond available at local body shop supply.
-
4. Clamp the frame to post at each end, be sure not to clamp on top of alignment pins, allow to adhesive cure over night
-
5. Cut 8” long piece of 1/16th x 1 1⁄2” window setting tape available at local glass shop or internet. Or Either use glass setting (butyl) tape from your local glass shop or you can use black silicone to secure the glass into the base and trim when dry.
-
6. Press glass into channel with set material centered, this can be done with rubber mallet and a block of wood. Trim excess set material with razor.
-
7. Install gasket
-
8. Install travel limiting roll pivot pin and tension screw, insure glass is properly aligned and functions properly; many adjustments may NOT be made after assembly is installed in the door. Use a small hammer with a small punch to install the pin, & a use little dab of grease on the post as well. The vent window handle slides over the post along with a wavy washer, & is held in place with a roll pin.
-
-
-
9. Install pivot to glass assembly. Be sure and use the round gaskets between the pivot and the glass or breakage may occur. (Do not tighten pivot screw) lock vent window and insure glass remains in proper position and then tighten pivot screw. Note: in some cases pin may need to be adjusted. Buff and polish the pivot or replace as needed.
-
-
-
-
-
-
-
10. Install vent glass assembly in frame to check for necessary adjustments to center glass and proper seal to gasket.
Vent Window Lower Adjusting Pin Restoration
-
At the bottom of the frame is the lower adjusting/attaching pin. In most cases this bracket is busted or missing. Re-welding the bracket to the frame is tricky. If you re-weld it inside the channel it will interfere with the sliding glass. Spot weld it on the outside edges and dress with a grinder.
Vent Window Assembly
Vent Window Run Channel Reattachment
-
The vent window run channel holds the door window glass frame. This is the piece connected to the rear part of the vent window frame. These channels get attached at the top with a special threaded screw, & riveted at the bottom. The rivets should have been drilled out for disassembly prior to chroming.
-
-
There are "nubs" inside the pot metal frame that are peened over that attaches the "V" piece. There are extra ones used as locators. We'll use those as the new attaching posts. A thin chisel & small hammer is used to peen over the posts, in an "X" pattern.
-
-
WARNING! Be careful! You must properly support the pot metal piece while you are tapping with the hammer or else you will leave dimples on the other side! (Don't ask me how I know this, past experience over the years has taught me lessons).
-
-
Use a flat metal body dolly with a rubber squeegee taped to it for support. Don't use wood, please. The rubber is just enough cushion not to mar the surface, & the metal is strong support.
-
-
Use 1/8" rivets with a backing washer to reattach the vent window run channel to the rear part of the vent window frame. You want the rivet head to be in the vent window channel, it must sit flush to clear the gasket. For added strength, sand/scuff the mating surfaces & use 3M's panel bond adhesive so as not to rely on just the old posts alone.
Door Window Glass Assembly
-
There are several parts to this assembly:
-
Door Glass, Door Glass Guides & Slide, Rear Door Window Frame (Quarter Window Trim), Regulator Lift Bracket and Rivets.
-
Door Glass Guides & Slider
-
The slider attaches to the front of the door glass and allows the glass to slide inside the vertical slot of the vent wing assembly channel. This slider is very fragile. They are made of a flocked mylar. They are mainly to keep the glass from rattling and block wind whistle.
-
-
The original plastic strip was clear in ‘67 and black after that.
-
Ron Evans - ‘67 Coupe, ’67 Conv.
-
-
Under the slider, on the leading edge (front) of the door glass, there are 2 sets of plastic or nylon guides that hold the mylar slider to the door glass. The captured, traveling guides, run in the vent wing run channel (part of the vent window assembly). These little piece of plastic keep the glass in alignment so it can go up and down. Those guides have a tiny steel pin in the middle which go through holes in the front edge of the glass.
-
-
In handling, the weight of the glass could crack the glides in half at their pin hole. Those glides are part of a "channel run" kit (not sold separately).
-
-
Door Window Glass Disassembly
-
On the second side glass, you can adapt what you learn from removing the first one to modify the procedure for removing the second.
-
-
The door glass will not slide out of the top of the door. The door glass comes out with the vent wing frame assembly. The only way to separate the two is out of the door. The door glass and vent wing frame assembly come out of the door together at once because they are attached. Once out, the assembly must be inverted to slide apart because the track is only open on the bottom!
-
Alan Erland - ’67 FB
-
-
To take out the window assembly refer to the Vent Window Assembly Removal process above. After you have removed the total assembly, you can begin to disassemble the Door Window Glass Assembly.
-
-
1. Slide the door glass assembly out the vent wing channel toward the bottom.
-
2. When you slide the door glass out of the vent wing assembly you will see the slider on the front of the door glass.
-
3. Separate the guides & slide
-
4. Remove the rivet fastener from the regulator lift bracket.
-
5. Remove the rivet up stop from door glass if you haven’t already done so.
-
6. Carefully remove the Rear Door Glass Channel (Quarter Window Trim) from the rear of the door glass.
-
-
Door Window Glass Restoration
-
Door Window Glass Guides & Slide Replacement
-
You may need to replace the plastic slides that go on the front edge of the door glass, which then slide up and down in the vent window channel.
-
-
That is the slide that goes on the front of the window and attaches with the white plastic pieces. You will find that most of the time this slide has deteriorated and needs to be replaced.
-
-
-
-
-
It might be possible to reuse the guide clips if the plastic is not destroyed. The two plastic halves pull apart. The two halves friction fit over the center steel pin.
Aftermarket Door Glass Guides & Clips
-
It used to be hard to find correct Mopar part. 2932230 It used to only be available through Chrysler but it is now reproduced. You won't be happy with some non-mopar reproductions. You won't like the price of the real discontinued mopar parts if you can find them.
-
Randy Dalmas
-
-
You can find them at Just Mopars. Pricey at $75 each. Just Mopars calls them Vent Frame Division Bar Liners. The Just Mopars guy, Fran Bishop, said this product is licensed by Mopar, and made for Just Mopars.
-
Ron Evans - ‘67 Coupe, ’67 Conv.
-
-
Just Mopars’ came with the new 2 piece sliders and pins that go through the glass.
-
Gerald Drury
-
-
MrMopar has them. The shape is a little different but doesn't matter as it isn't seen. http://www.mrmopar.com/1967Barracuda/800/2008-06-05_02.jpg
-
-
These guides are available from Layson’s. There are two different kinds, you want the flatter one. Contact Dave at Layson’s and see which one to get.
-
-
The window slides and the channel are available new from Mopar.
-
Part #1-02932230 for the set, somewhere about $65. The window felts direct from Mopar are for less than they wanted for the ones on ebay.
-
Michael Mosley - ’68 Coupe
-
-
Jim's Auto Parts #MC-6772AFRT
-
Classic Industries
-
AMD B body kit
-
R/T SPECIALTIESwww.rtspecialties.net/
-
-
You can use a replacement guide from another year Dart or Charger.
-
-
-
Rear Door Glass Channel (Quarter Window Trim) Restoration
-
While you have the door glass and vent assembly out of the door go ahead and restore the rear glass channel trim piece.
-
-
First, remove any old rubber or seal from the channels of the trim. Next, polish and buff the stainless steel trim.
-
-
With that done, the trim has two parts. Half the door glass frame has a rubber seal that butts up against the quarter window. Carefully guide the quarter window rubber seal onto the correct side of the track. It’s a slow process but with care and lots of patience the seal can be coaxed into the track. You might be tempted to try starting at the end of the frame and sliding the seal into the track. This works for a short distance but the friction between the track and the rubber seal is too much to overcome. Again use a lubricant to get the seal into place. You can secure the metal channel within the frame that the weatherstripping slides into JB Weld so it doesn’t separate from the frame.
-
-
The other half of the trim clamps against the door glass. It uses a “U” shaped seal that is made of rubber like soft material called setting tape. It seems hard on our cars because it is 50 years old and dried out.
-
-
-
-
-
-
-
-
-
-
-
-
Proper installation of the glass into the rear door glass channel requires the use of setting tape sizes and techniques.
-
-
Setting Tapes
-
-
-
Setting Tapes is a butyl rubber piece that goes between the trim and the glass on the trailing edge of the window. It’s called tape because of its shape but it actually has no adhesive on it. It takes up the gap between the glass and frame and cushions the glass insulating it from damage. This is a must for properly sealing the glass into the channel frame. Unlike the local glass shop types, ours is a special "all rubber" formula designed to look and perform like the original factory type. It creates a water tight bond as it cushions the glass.
-
To determine the thickness you need
-
A variety of thicknesses of setting tape are needed to install glass into the track of a windshield or window frame. To figure out the thickness, measure the width of glass, then the width of the channel that glass fits into. Subtract the width of glass from the width of channel and divide this figure by two. This will be tape thickness. For best results, the tape should be slightly larger than the gap. For use on our cars there is 3/64" glass setting tape.
-
Determining Tape Size:
-
Selecting the correct size tape to use is the first step in the process. Size of the gap will vary from vehicle to vehicle so the process is one of trial and error. Select a sample piece of tape and trial fit it in the track with the glass pane or a small scrap segment if you have one to work with.
-
Fitting the Tape to Glass:
-
The tape has no adhesive so it needs to be secured around the edge of the glass before fitting into the frame. The installation in the track is much easier and uniform if it is trimmed to go around the corners and secured to the glass with electrical tape.
-
Installing Glass in the Track:
-
Get the new seal warm so it will fit around the frame and glass.
-
Omar Lehr
-
-
Fold the tape over the glass edge and insert glass into the frame. The glass with the tape held in place is pushed into the track. If the correct thickness of tape has been selected it should go into the track with moderate pressure. Some liquid dish soap, like Dawn or Palmolive, can be used as a lubricant to ease this process. Force the glass onto it firmly, tap a bit. .. tap gently with a mallet with a block of wood, let it set up and dry overnight, If it takes too much muscle to force it in, then a thinner tape should be used. Too little and the tape needs to be thicker.
-
-
It takes a little practice.
Trimming the Tape:
-
Once the glass is seated in the track, excess setting tape is trimmed with a razor knife or razor blade. The electrical tape remains in the track and is used because it is so thin that it has no effect on the seating of the glass. Make the cut with a slight angle away from the frame so that there is a clean edge around the glass without tape showing along the edge of the frame. A small detail but it creates a cleaner looking installation
Video
-
View this video as a basic how to:
Aftermarket Setting Tape
-
Buy a roll of the 3/64" glass setting tape from Bob Drake Restorations. www.bobdrake.com
-
-
Layson’s sells glass tape by the foot.
-
-
Door Window Glass Reassembly
Door Window Glass Guide & Slider Installation
-
The three pieces have to be pressed into place at the exact point where the hole in the glass is and where the slider fits at the correct depth. They are difficult to get installed correctly. Take your time and upon reassembly make sure you get the seal to slide freely in the vent wing channel.
-
-
1. Drill or punch out the holes for the pins to attach the slider.
-
2. Using pliers, squeeze the new plastic guides and pins through the hole in the glass and the slider.
-
3. Trim the slider to length.
-
-
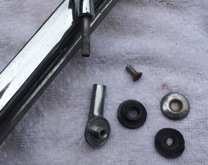
Door Rivets
-
There is one door rivet that holds the lift bracket to the glass. There is also one that is used as an up stop.
-
-
The door rivet that is used on the lift bracket, originally had a nylon pins that expanded the rivet to hold it in place on the glass. That is located in the bottom center of the glass.
-
-
The door rivet that is used as an up stop, had a screw that expanded the rivet to hold it in place through the glass. That is located on the bottom rear of the glass.
-
-
Aftermarket Door Rivets
-
The rivet is available through Layson’s. There are two different kinds, you want the flatter one. Contact Dave at Layson’s and see which one to get. You may want to rig it up with a screw, washers, and a nut so it doesn't keep popping out.
-
-
-
-
330-40332 ’63-’72 A-Body
-
’66-’70 B-Body
-
390-40381’68-’72 A-Body
-
$ 4.50 ea
Door Glass Assembly to the Vent Window Attachment
-
The door glass assembly slides into track of vent window assembly from the bottom up.
-
Use 1.5-2" blue tape in all areas so glass won’t chip.
-
-
Using a soft rubber or plastic mallet, gently tap the glass back into the channel. Us a lubricant to help slide the glass in better.
Vent Window Main Leg
-
Install the Philips screw and the rubber bumper from the front main leg to the triangle.
-
Slide the door glass assembly into the vent window frame.
Vent Window Frame Assembly Installation
Installation Advice
-
The Door Glass Assembly and Vent Window Frame Assembly, go in the door together as a unit. You have to insert the window from the bottom of the track and insert assembly and glass at the same time. Best to install with 2 people. If not, when putting the vent window ass'y back in, use clear packing tape on both sides of the glass to hold it in the frame while dropping the frame in. Basically, it’s the reverse of the disassembly. All seals and weatherstrip go in AFTER the glass. All adjustments are done after. For more info, follow the instructions in the FSM.
-
-
You could install the windows without the weatherstripping / metal that runs next to the headliner by the doors (the area that the windows seal against when rolled up). You just wouldn't be able to adjust them.
Jeff Ramin - ’67 Coupe
Installation Procedure
-
1. Be sure the vent window channel is clean.
-
2. Run the glass all the way up. Some people tape the window glass to the channel rail in the up position.
-
3. With help, get the window assembly in the door. With the rear moulding gasket off the door, starting at the back of the door and with the assembly rotated 90 degrees, insert the bottom of the vent window frame assembly into the window opening, rotate the windows back to parallel, then slide them forward. Then drop the assembly down into the door.
-
-
4. There are 2 spot welds brackets, inside the door, that the vent wing frame slide between. The vent wing assembly slides into the bracket at a 45 degree angle.
-
-
-
-
-
-
-
-
-
-
5. Have the rear window run channel in place and attached loosely with the bolts. Alternative Method: You could take the rear window run channel and put it on after you put the window in.
-
6. Lay the regulator in the bottom of the door
-
7. Separate the track and the frame enough to slip the window with the plastic slippers into the front track and down into the rear run channel
-
8. Wedge the glass part way up in the door
-
9. Install the regulator with the roller in the glass track.
-
10. Bolt the rear window run channel in the door, and. It’s not adjusted yet, but the passenger door glass is now back in the car!
-
11. At the bottom of the door frame, put in the lower adjusting/attaching pin. Make sure you have the anti-rattle foam installed. Put on the retaining nut.
-
11. Put the Allen bolt and square retainer in place. Access the bolt thru a small hole in the upper inner door frame. Part of the vent window slides between the square washer and the door frame. The leading edge of the vent window frame at the bottom has like a C looking shape that the Allen bolt and retainer holds onto.
-
Lube Vent Window Assembly
-
Clean and lube the 45 year old parts, even if I don’t really like it. It’s easier to lube the tracks and the regulator while you have them apart.
-
Don
-
-
Use high-temperature wheel bearing grease or white lithium on the roller guides, the channel edges, and the regulator pivot points.
-
-
Lube vent window channel with some white lithium, then slide the door window into the vent window channel. Put some grease on the vent window pivot as well. Clean and grease the window channel and the regulator. Bolt the regulator loosely in place.
John Balow - ‘68 Coupe
Vent Window Gasket
-
The vent window gasket is supposed to meet the door with the flaps on the gasket along the lower edge fit over the lip of the door.
-
Paul
Door Parts Assembly
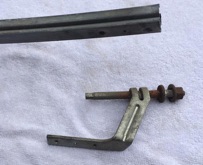
Vertical Window Run Channel Assembly
-
The vertical window run channel holds the door window frame. There is one connected to the rear part of the door on each side. There are right & left sides. These channels get attached at the top with a threaded bolt, & at the bottom to an L-bracket with a nut. The L-brackets adjusts in and out.
-
-
First, install the mohair liner into the channel. When you install the vent window assembly, the run channel will be inserted into the door after you position the assembly in the door.
-
-
The vent window glass frame will slide inside the run channel. No grease is necessary.
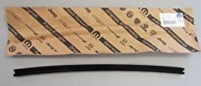
Run Channel Mohair Liner
-
The liner is made of mohair. It has a rubber backing and is 2 5/8” wide. Apply with adhesive to division bars and channels. It also helps reline Run Channel Guide Bars on the lock side of hardtops and convertibles.
Aftermarket Run Channel Mohair Liner
-
Part Number: 70-2863-58
-
Price: $6.39 per ft.
-
Steele rubber.com
Regulator
-
Looking at the regulator, it has a single "arm" coming off the regulator. The regulator has four 1/4" bolt holes in it. One little blue plastic fastener (roller) attaches the door glass to the regulator. It slides in the lift bracket channel.
Regulator Restoration
-
With regulator out of the car, clean, re-grease etc. The spring will be a little rusty, so clean it. Use mineral spirits to release the grease.
-
-
The blue plastic roller that attaches the regulator to the door glass tend to break. Replace if necessary.
Regulator Installation
-
Raise the window holding the glass at the top of its travel. Slip the blue roller at the end of the arm into the small lift bracket channel at the bottom of the glass. All the while, locate the four holes in the doors sheet metal, and install.
-
-
If you degreased the regulator, put fresh grease on it.
Regulator Troubleshooting
-
Sometimes the window is too hard to roll the window down and so very easy to roll it up.
-
-
It maybe possible that the wound spring is too tight. If you were to undo the spring, let it go 1 rotation backwards, that would give you less tension on the roll down, and also make it a little slower to roll back up.
-
-
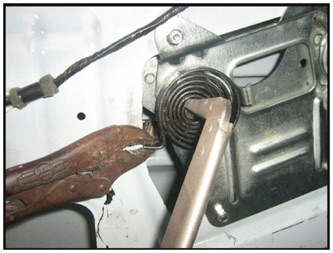
-
-
Here is the pic of the window reg in the all the way up position. You can see that all the way up means least amount of tension, and the spring is still tight to one side.
-
Troubleshooting Window Handle Wobble
-
Sometimes the drivers window regulator has major wear in the drive bearing assembly. The winder handle may wobble.
-
-
If you'll find someone parting a later model and get the bearing assembly from a rear regulator, you can use those parts to renew yours. The seller wouldn't need to pull the entire regulator either. Just pull the interior panel and drill out the rivets gets the parts needed.
Door Window Felt (Cat Whiskers)
-
These felt pieces fit over the edge of the window. Original equipment from Mother Mopar was a "V" shapes felt that doesn't bend over when the window is rolled down.
-
-
They may fall apart when you disassemble the window from the door.
-
Stephen Parker - ’67 Conv.
Cat Whiskers Removal
-
To remove the ancient “cat whiskers” window weather stripping, use a right angle pick tool will make it easy. Just stuck the pick under the prong on the clips that fit in the door holes and lifted up.
Aftermarket Door Window Felt
-
Correct Window Fuzzies and other glass trim is available from RPM Restorations at 770-426-4660. Ask for Randy and tell him Famous Frank sent ya! The window felts I carry are great reproductions with the proper clips and original factory design, not the bending rubber against the window where someone used a Chevy felt and made it fit. Those were fine when nothing better was available but the ones I carry are excellent.
Frank Filicicchia (Famous Frank) - ‘67 Conv
(770) 863-1345 -
-
The window felts are also available from Classic Industries and
-
Layson’s, http://www.laysons.com/mould.htm
-
Restoration Specialties should have it (www.restorationspecialties.com; 814-467-9842 or 814-467-9282), and it will be cheaper per foot than Laysons.
-
Incorrect Window Fuzzies are the squeegee type that presses against the outside of the window and makes the window hard to operate and will soon crack. Beware of these $60 sets. Most of these sets were put together over the past years since there was nothing else available at that time. They are IN-CORRECT in the construction.
Door Window Moulding (inside)
-
Weather stripping / metal runs next to the headliner by the doors (that’s the area that the windows seal against when rolled up). You can in fact install the windows first, but you wouldn't be able to adjust them.
-
Jeff Ramin - ’67 Coupe
-
Door Window Stop
-
The glass stop keeps the door glass from being raised too far and binding or, at worst, breaking when the door is closed. If it is missing it must be replaced.
-
Vent Window Assembly Adjustments
Vent Window Assembly Alignment
Window Alignment
-
Be patient:
- Align the door!!!!
- put the vent frame together without the glass in it , ie: get the upper screw in tight
- slide the frame in, making sure that the frame catches the above 3 points.
- push the frame in as much as you can
- start tapping it in with the hammer
- shut the door, check the frame alignment with the weatherstripping, repeat until the door shuts good
- put the vent window in, make sure it opens and closes correctly
- if your lucky, it will be fine, if not, keep adjusting the frame to door alignment and the vent glass to
frame alignment
- when you get it close, the bolts that hold the leading edge of the frame can be used to fine tune
- tighten it up
’67 Window Alignment
-
Read through the adjustment instructions in the FSM. Figure out how the windows should mate with the roof rail weatherstrip.
-
Jeff Ramin - ’67 Coupe
-
I used the adjustment procedures in the Factory Service Manual.
-
Jim Conner - ’68
’68 Window Alignment
-
If your quarter window is too far inboard, the top of the glass needs to be tipped out a little. Both can be adjusted by working with the front window channel until the door glass seals tightly against the leading edge of the quarter window. As you are doing this, keep an eye on the top of the glass to be sure that a good seal is maintained against the top weatherstrip. Don't be afraid to move the door glass inboard a little if necessary. You also need to check the vertical alignment between the windows. Rotate the quarter window if this is off. Expect to do some fiddling to get everything just right and don't forget to roll each window up and down a couple of times to check for smooth operation. It's also a real good idea to run a hose around the windows to check for leaks before you replace the door panels.
-
-
You'll use a stud at the end of the vent window frame to tilt the whole assembly to the front or back to align the vent window with the A-pillar.
-
-
At the very front corner of the vent window, this slot allows vertical placement of the window frame. Leave the bolt a little loose for now and lower the window into the door watching out for the regulator on the way down.
-
-
A slotted tab supports the back half of the vent window frame. You'll loosen the bolt through this access hole in the inner door frame so you can adjust the rotation, and rise and fall of the vent window.
-
-
Side-to-side and fore-and-aft placement of the bottom of the front window channel is set by accessing this stud through a hole in the bottom of the door. You'll use this mostly to tip the top of the glass in or out.
-
-
You'll need to unbolt the regulator to slide the roller onto the window channel. Roll the window all the way up when you are done.
-
-
With the window up, install the rear channel. The two bolts on either end of this channel allow you to move the glass side to side and tip the top in or out. Before you begin adjusting your windows it is critical that the door first be properly aligned and that any new weatherstripping is in place.
-
-
Start your adjustments by setting both the angle and the height of the vent window to the A-pillar. The door window should now match up pretty close to the top weatherstrip but it's possible that you may need to slightly rotate the entire assembly. Next, adjust the rear channel so the top edge of the glass is even, front to back, with the weatherstrip. Set how tight the window fits against the weatherstripping by tipping the top of the window in or out. You can check this by closing the door on a new dollar bill. You've got it right when the bill will pull out but not easily.
-
John Balow - ‘68 Coupe
-
Adjustments to the angle of the glass can be made front to back or in and outward using a 1⁄4” extension as shown
-
-
Adjustments up and down can be made by properly supporting frame assembly as shown on a hard rubber pad or block of wood to prevent scratching and then striking with rubber mallet.
-
-
Check pivots fit to pin if pivot does not slide completely onto pin then it will need to debured this can be done as shown with a small drift for leverage and a 3/16” drill clamped in a vise, several rotations may be required.
-
-
If adjustment needs to be made to pin alignment it can be done as shown with 1/4” deep socket and extension.
How to Align the Door vent window frame
-
When this "like new" door goes back on the car, the wind noise and water leak fine tuning begins. If its a hardtop, getting the door glass to quarter glass mating and proper operation can take days.
-
-
My ’69 barracuda passenger door vent window frame is preventing my passenger door window from going all the way up to meet the convertible top roof rail weatherstripping. The top of the vent window frame prevents the door window from going up because the window slides up in the vent window frame. There is more room at the top of the vent window frame to adjust it go up higher. I need to raise the vent window frame upwards.
-
-
Try the regulator stop first. Next, if you remove the inner door panel, next to the splined shaft the window crank fits to, you'll see a jam nut and screw driver slot adjustment. This has a cam like dohicky, on the inside, that adjusts the up travel of the window regulator.
-
-
To adjust the vent up, you have to adjust the window track up with it. There’s an adjusting nut at the side of the door which has a plug over it. Take the door panel off and have a lot of time and patience.
-
-
The vent frames are all the same, Dart/Barracuda hardtop/convertible/Fastback. "67-"69 are a little different than previous ones.
-
There are no adjustments on the frame. The only thing you can try is to loosen the bolt at the front and the bottom and see if rotating the frame will help, you will not get any lift out of it, that is fixed.
-
-
The door may be out of alignment, maybe it needs to be lifted. I ended up lifting the front of the door to fix it.
-
Alan Erland - ’67 FB
-
-
There is a screw inside the top of my frame and if it was sticking out, it might prevent glass from going all the way up.
-
-
There is nothing that moves the vent frame up, because the vent frame is fixed. You can only pinwheel the vent & door window assembly. Or you can roll the top in or out. That is it.
-
You can also set the window roll up/down stops. When rolled up the top of the glass should be flush with the top of the frame. If not the up stop may need adjustment. If it is and you still have a gap that is most likely a door adjustment.
-
Alan Erland - ’67 FB
-
-
The "A" frame is secured in four places.
-
The front of the main frame is secured by one bolt and one nut (which is also an adjustment) in the front door jam area. The adjustment here "tilts" the "A" frame to mate with the front weatherstrip.
-
There is also a screw behind a rubber plug just below the vent window that must be loosened during adjusting and will secure the assembly in the adjusted position.
-
-
Then there is a bolt securing the bottom of the track on the bottom of the door (may have a rubber plug over it) which not only holds the assembly in place but is responsible for adjusting the "in and out" tilt of the top of the "A" frame. There is little adjustment to go "up and down" with the whole assembly. If the door is properly adjusted, then the weatherstrip (in your case, the top) needs to be shimmed to match.
-
The door glass has its own "up" stop that can be adjusted independently.
-
-
My top of the vent window frame is flat for a Convertible.
-
-
Yes. Window glass is up snug to the top inside of the vent window frame, but the vent window frame has a gap at the top...So I'm thinking both need to go up to the vert. top weatherstrip at the roof rail.
How do you adjust the vent window frame
-
In the FSM there are adjustment procedures. Note: The vent frames are all the same, Dart/Barracuda hardtop/convertible/Fastback.
Alignment
-
FIRST; Door hinges and door to body alignment. Get that perfect. Fully tighten all that hardware.
-
-
SECOND; Align vent window frame and door glass to body seals. Glass rolls easily. (You may return for very minor adjustments here before you're done)
-
-
THIRD; Align quarter window to door glass seal and body seals.
Convertible Alignment Problem
-
My ‘69 barracuda passenger door vent window frame is preventing my passenger door window from going all the way up to meet the convertible top roof rail weatherstripping. There is more room at the top of the vent window frame to adjust it go up higher, therefore I'm allowing the passenger door window to go higher. The top of the vent window frame still would prevent the door window from going up because the window slides up in the vent window frame. I need to raise the vent window frame upwards.
Solution
-
If you remove the inner door panel, next to the splined shaft the window crank fits to, you'll see a jam nut and screw driver slot adjustment. This has a cam like dohicky, on the inside, that adjusts the up travel of the window regulator.
-
-
When you adjust the vent up you have to adjust the window track up with it. There’s an adjusting nut at the very of the door that may have a plug over it. Take the door panel off and have a lot of time and patience
-
-
There are no adjustments on the frame. I had an alignment issue and looked. The only thing you can try is to loosen the bolt at the front and the bottom and see if rotating the frame will help, you will not get any lift out of it, that is fixed.
-
The door may be out of alignment, so maybe it needs to be lifted. All body styles (not sedans) have that notch in the glass.
-
Alan Erland
-
-
There is a screw inside the top of my frame and if it is sticking out, this might prevent glass from going all the way up.
-
-
Did the glass seal correctly ever and what if anything have you done to change it?
-
-
Nothing moves the vent frame up, that is fixed.
-
You can pinwheel the vent & door window assembly.
-
You can roll the top in or out.
-
That is it.
-
You can set all the window roll up/down stops.
-
-
With the door open, the door glass should go to the top of the frame. The glass should be flush with the top of the frame. If not the up stop may need adjustment.
-
If it is and you still have a gap that is most likely a door adjustment.
-
Alan Erland
-
-
"67-"69 are a little different than previous ones. The "A" frame is secured in four places.
-
1. The front of the main frame is secured by one bolt and one nut (which is also an adjustment) in the front door jam area. The adjustment here "tilts" the "A" frame to mate with the front weatherstrip.
-
2. There is also a screw behind a rubber plug just below the vent window that must be loosened during adjusting and will secure the assembly in the adjusted position.
-
3. Then there is a bolt securing the bottom of the track on the bottom of the door (may have a rubber plug over it) which not only holds the assembly in place but is responsible for adjusting the "in and out" tilt of the top of the "A" frame. There is little adjustment to go "up and down" with the whole assembly. If the door is properly adjusted, then the weatherstrip (in your case, the top) needs to be shimmed to match.
-
4. The door glass has its own "up" stop that can be adjusted independently.
-
Murray
-
-
Yes. Window glass is up snug to the top inside of the vent window frame, but the vent window frame has a gap at the top...So I'm thinking both need to go up to the vert. top weatherstrip at the roof rail.
Lube
-
It probably has not been lubed since it left the factory, and over the years, the little lube they put on it has dried up. Lots of window problems can be solved by this simple task.
-
Dave - ’67
-
-
Remove your door panel, and check for lubrication, oil/grease all the rollers, and the tracks the rollers ride in. Get some lube on all the pivot points, and the big gear. Work it back, and forth gradually, till You get full travel, oiling it as you go.
-
-
So what does everyone use to lubricate their window regulator runners?
-
-
Mine were caked in old yellow grease that was full of dirt and fibers (from the carpet?). I was wondering if there was a better product that wouldn't get gummed up with so much rubbish. Presumably a low temp grease is best for remaining soft as well.
-
-
Had the same dried up stuff when I replaced door panels over the summer. I'm trying some marine grease I had laying around. Don't know how well it play over time but it made windows roll up much easier.
-
CITGO SUPERGARD Marine Plus Grease is a smooth but tacky blue grease with outstanding water resistance. It is designed to provide excellent lubrication for greased chassis points and other wet-environment applications. It combines an anhydrous calcium thickener, special polymer, and proprietary additive system to ensure superior performance in freshwater marine applications. Recommended for marine applications including greased chassis points, boat lifts, etc. Lubricates well over a wide temperature range up to 250° F. It is not recommended for automotive disc brake wheel bearings. It is also an excellent choice in non-marine applications where a general purpose EP grease with outstanding water resistance is desired, such as water pumps, fifth wheels and other equipment operating in wet conditions.
-
-
When I clean mine up and painted them I just used white lithium grease, even used it on the back side of the new felt glass channel.
-
-
x2 white lithium
Vent Window Seal
-
If you are trying to get rid of "whistling", try:
-
-
1. WD40 on the rubber (it causes it to swell),
-
2. silicone grease on the glass to rubber mating surface areas.
-
Steve Toth
-
Quarter Window Assembly
Quarter Window Restoration Advice
-
If you don't want to cover all the sharp edges with duct tape, wear sleeved gloves. Don't want to bleed to death. Or get Kevlar Sleeves from eBay.
-
Don't remove the quarter window assemblies unless you absolutely have to. They are a major challenge. Convertibles aren’t so bad.
Quarter Window Removal
-
(With the window approx. mid way up)
-
-
1. Removed the spring clips per the service manual.
-
2. Removed the up stops per the service manual.
-
-
(This is where I improvised)
-
3. Remove the rubber door jam seal.
-
4. Removed the bolt that holds the front guide top rollers to the frame.
-
5. Loosened the front and rear guide adjuster retaining nuts
-
6. Turned the adjusters clockwise to pull in the guides
-
7. Removed the mounting bolt on the bottom of the front guide.
-
8. Separate the regulator studs from the rollers freeing the window frame (hold/support the window).
-
9. Remove the window /w the frame. (tip it back down into the quarter raising the front while working out towards the cabin. (It takes some wiggling.)
-
10. Unbolt and remove the front and back guides.
-
11. Unbolt and remove the regulator.
-
-
Remove the bump stop on the door glass and roll the window completely down. This will expose the window wipes and fuzzies for removal. Loosen the rear window channel nuts but do not remove the assembly.
-
’67 Removal
-
The FSM may not be much help; You may have to do things by trial and error.
-
First step is to remove the glass, which is held by 2 bolts.
-
Then unbolted the regulator from the inner door metal. The regulator could only be removed by partially disassembling it inside the door!
-
Not much fun.
-
Jeff Ramin - ’67 Coupe
’68 Removal
-
You'll have a regulator, the rear and front run channels, three rollers (one is bolted to the other side of the frame), and the quarter glass.
-
-
Do not attempt to remove the glass from its holder. If your glass is bad, you'll be replacing the whole assembly.
-
John Balow - ‘68 Coupe
1969 Quarter Window Regulator
-
window regulator in a ‘69 Dart
-
-
Lubricate everything because my window is a little tough to roll up and down
-
1. Take the back seat out.
-
2. Take the arm rest and window crank off before trying to remove the soft trim panel.
-
3. Pop off the vinyl covered panel and then you will have access to inside the quarter where the regulator is.
-
4. The soft trim is held in place by spring clips the pop out of their locating holes.
-
5. The metal clips over the top and is held in place by screws under the soft trim panel under the metal panel on top of it.
-
6. Remove the metal interior trim panel that sits below the window, or the whole panel below the window.
-
7. Remove Philips head screws from the metal panel right under the window.
-
8. You’ll find the upper metal interior piece has another screw hidden under rubber gasket around in the door jamb area. You may not need to remove that part just to squirt grease at the regulator stuff below.
-
9. Just be aware... There are some weird little rollers assemblies with a ball socket over a ball stud in them that aren't easily lubricated or replaced when they break.
Restoration
-
Broken guide rollers are not uncommon. New ones are available from YearOne, Classic and others
-
-
Use high-temperature wheel bearing grease or white lithium on the roller guides, the channel edges, and the regulator pivot points.
-
John Balow - ‘68 Coupe
-
’68 Installation
-
Insert the single roller into slot number one and slide it to the rear. Now unbolt the regulator and move it so you can insert the regulator roller into the same slot. With that done, insert the lower regulator roller into slot number two. Note the fixed guide roller just above this slot. You'll be slipping the forward run channel into it during the next step. Lastly, slide the third regulator roller into the run channel that's welded to the body and rebolt the regulator in place.
-
-
The front window channel is next. Slide the roller guide into slot number three and then lower the window. Now take the channel and slide it through the fixed roller guide and into the one you just placed in slot number three. There is a tab in the channel between the rollers—it will later bolt to a slot on a bracket that will allow the bottom of the window to be moved side to side.
-
John Balow - ‘68 Coupe
-
The stud at the top of the track goes into this slotted hole. You'll use the small nut and stud to move the channel in or out to adjust the front of the window.
-
-
The rear window channel is next. You'll need to roll the window up until you can see the single roller in this hole. Slide the channel over the roller and line up the two adjusting studs; spin on their nuts and tighten in place. These studs are for the side-to-side adjustment of the rear of the window.
-
-
With the window still in the up position, bolt in this brace and attach the tab mentioned earlier at the bottom of the front run channel. The slotted hole in the brace allows side-to-side adjustment of the bottom of this channel.
-
-
There is a window-up stop at each end but these can only be roughed in until the door glass and all of the weatherstripping is in place.
’68 Adjustment
-
Here are the different adjustment points for a '68 Barracuda quarter window. Most other cars will be similar.
-
- Points A and B allow you to move the front run channel side to side, which will adjust the leading edge
-
of the window left or right if you move them in the same direction or tip the top of the window in or
-
out if you move them opposite one another.
-
- Point B will have a greater tipping effect.
-
- Point C and D work basically the same for the rear channel.
-
- The regulator pivots at point E, so moving the bolts at F will rock the window front to back. Because the
-
pivot point is near the front, this effectively allows you to raise or lower the rear corner of the glass.
-
- Point G and H (not installed yet) are the window-up stops that prevent over-raising the window.
-
John Balow - ‘68 Coupe
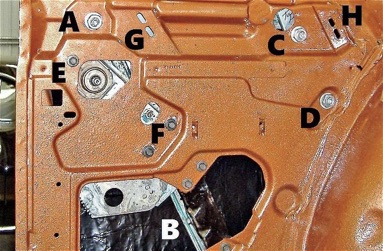
-
The two lower regulator bolts are in slotted holes that will allow you to rotate the glass front to back.
-
How do you adjust the vent window frame
-
In the FSM there are adjustment procedures. Note: The vent frames are all the same, Dart/Barracuda hardtop/convertible/Fastback.
Alignment
-
FIRST; Door hinges and door to body alignment. Get that perfect. Fully tighten all that hardware.
-
-
SECOND; Align vent window frame and door glass to body seals. Glass rolls easily.(You may return for very minor adjustments here before you're done.)
-
-
THIRD; Align quarter window to door glass seal and body seals.
Convertible Alignment Problem
-
My 69 barracuda passenger door vent window frame is preventing my passenger door window from going all the way up to meet the convertible top roof rail weatherstripping. There is more room at the top of the vent window frame to adjust it go up higher, therefore i'm allowing the passenger door window to go higher. The top of the vent window frame still would prevent the door window from going up because the window slides up in the vent window frame. I need to raise the vent window frame upwards.
Solution
-
If you remove the inner door panel, next to the splined shaft the window crank fits to, you'll see a jam nut and screw driver slot adjustment. This has a cam like dohicky, on the inside, that adjusts the up travel of the window regulator.
-
-
When you adjust the vent up you have to adjust the window track up with it. There’s an adjusting nut at the very of the door that may have a plug over it. Take the door panel off and have a lot of time and patience
-
-
There are no adjustments on the frame. I had an alignment issue and looked. The only thing you can try is to loosen the bolt at the front and the bottom and see if rotating the frame will help, you will not get any lift out of it, that is fixed.
-
The door may be out of alignment, so maybe it needs to be lifted. All body styles (not sedans) have that notch in the glass.
-
Alan Erland
-
-
There is a screw inside the top of my frame and if it is sticking out, this might prevent glass from going all the way up.
-
-
Did the glass seal correctly ever and what if anything have you done to change it?
-
-
Nothing moves the vent frame up, that is fixed.
-
You can pinwheel the vent & door window assembly.
-
You can roll the top in or out.
-
That is it.
-
You can set all the window roll up/down stops.
-
-
With the door open, the door glass should go to the top of the frame. The glass should be flush with the top of the frame. If not the up stop may need adjustment.
-
If it is and you still have a gap that is most likely a door adjustment.
-
Alan Erland
-
-
Yes. Window glass is up snug to the top inside of the vent window frame, but the vent window frame has a gap at the top...So I'm thinking both need to go up to the vert. top weatherstrip at the roof rail.
Door Lube
-
It probably has not been lubed since it left the factory, and over the years, the little lube they put on it has dried up. Lots of window problems can be solved by this simple task.
-
Dave - ’67
-
-
Remove your door panel, and check for lubrication, oil/grease all the rollers, and the tracks the rollers ride in. Get some lube on all the pivot points, and the big gear. Work it back, and forth gradually, till You get full travel, oiling it as you go.
-
-
So what does everyone use to lubricate their window regulator runners?
-
-
Mine were caked in old yellow grease that was full of dirt and fibers (from the carpet?). I was wondering if there was a better product that wouldn't get gummed up with so much rubbish. Presumably a low temp grease is best for remaining soft as well.
-
-
Had the same dried up stuff when I replaced door panels over the summer. I'm trying some marine grease I had laying around. Don't know how well it play over time but it made windows roll up much easier.
-
CITGO SUPERGARD Marine Plus Grease is a smooth but tacky blue grease with outstanding water resistance. It is designed to provide excellent lubrication for greased chassis points and other wet-environment applications. It combines an anhydrous calcium thickener, special polymer, and proprietary additive system to ensure superior performance in freshwater marine applications. Recommended for marine applications including greased chassis points, boat lifts, etc. Lubricates well over a wide temperature range up to 250° F. It is not recommended for automotive disc brake wheel bearings. It is also an excellent choice in non-marine applications where a general purpose EP grease with outstanding water resistance is desired, such as water pumps, fifth wheels and other equipment operating in wet conditions.
-
-
When I clean mine up and painted them I just used white lithium grease, even used it on the back side of the new felt glass channel.
-
-
x2 white lithium
Cat Whiskers
-
Removed the ancient “cat whiskers” window weather stripping today and found that a right angle pick tool made it easy. Just stuck the pick under the prong on the clips that fit in the door holes and lifted up. Nice to have something on this restoration go fairly simply for a change!
-
-
Looks like you had the door panel off anyway so... There's a eccentric travel stop on the window regulator. Loosen the lock nut and rotate the eccentric with flat blade screw driver so window winds further down into door. Inner and outer whiskers peel right out, drop right in, once the glass is out of the way.
Door Handle
-
The door handle from the factory is put on a certain way.
-
The door handle on the passenger side, at the up position, should be at the 7 o’clock position.
-
The door handle on the drivers side, at the up position, should be at the 5 o’clock position.
Door Handle Wobble
Troubleshooting Window Handle Wobble
-
Sometimes the drivers window regulator has major wear in the drive bearing assembly. The winder handle may wobble.
-
-
If you'll find someone parting a later model (preferably 4 door a/c car ) and get the bearing assembly from a rear regulator, you can use those parts to renew yours. The seller wouldn't need to pull the entire regulator either. Just pull the interior panel and drill out the rivets gets the parts needed.
Window Storage
-
There are different ways to safely store fastback rear and front windows. One way is to make and store it crated it up. It will keep it safe from breakage and takes less storage room.
-
Mike Jarvie - ‘68 FB
-
-
Here is a box I made for the front windshield. I stored it on it’s side, not flat as shown.
Angel Garrido - ’69 FB
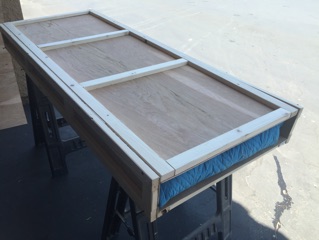
-
6
-
-
I would also recommend storing them on end, not flat. Less chance for glass to change shape and I have been told that can happen.
-
Dr. Bob Breed - ‘67
-
-
Wrap them in moving blankets (buy at Harbor-Freight) and store them under your bed.
-
Phil Saran
-
-
Up in the rafters of the garage would keep them out of the way, but it could be ticklish getting them up there (or back down).
-
-
Like a lot of car parts, they are really a pain to deal with off the car. I try to keep parts on the car for this reason.
-
Max Heim - ‘67 FB
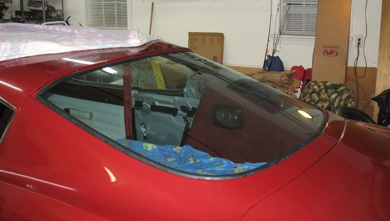

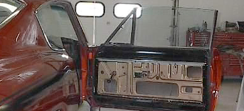
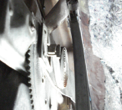
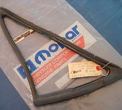
