
General Information
-
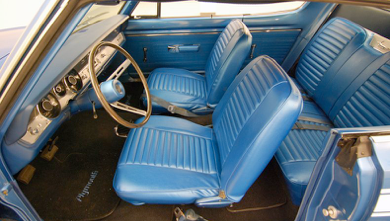
The end goal is to have a perfect interior with all the correct finishes, to include armrest base, molding, window crank, armrest, door handles, lock knob, door panel, carpeting, trim and upholstery.
-
-
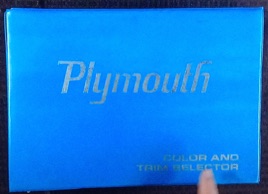
The dealer had a book called the Color and Trim Selector that was used for the customer to special order their car interior colors.
-
Trim Codes
-
H = High Trim Grade
-
6 = Vinyl Bucket seats (b with a 4 will also verify bucket seats)
-
TH HIGH TRIM LEVEL
-
R6 VINYL BUCKET SEATS
-
MB BLUE INTERIOR
Trim code BH27
-
White seats, door panels, boot, but black carpet and dash.
Trim code H6V
-
white soft trim, seats are ivory and so are door panels.
-
-
V = white on red interior.
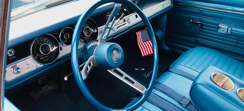
1969 Interior Color Accents
Sound Proofing
-
Originally, as far as noise, ‘Cuda’s were as good as other cars of the time. They came from the factory with rubber door and window seals and a some insulation behind the firewall and under the carpet to keep heat out of the passenger compartment. By today's standards the insulation and sound dampening was woefully inadequate.
-
-
Noise and heat from the engine, exhaust, and drivetrain noise is transferred through the floor and firewall. Sound and heat can also sneak around the trunk seal, the cowl seal at the rear of the hood, and even through the floor and carpet. If the car is missing body plugs or has worn window whiskers more noise can enter. Original door seals compress and harden over time, losing their tight seal and noise canceling value. All of these problems can be reduced by insulating your ‘Cuda using modern noise, thermal, and vibration dampening materials.
Sound Proofing Installation
-
The first step to getting a quiet ride is to install or replace all of the factory seals, body plugs, and insulation and noise dampening material as well.
Aftermarket Replacement Parts
-
Aftermarket parts are made from modern materials making them better than the ones installed when our cars were new. YearOne is reproducing the original seals and insulation found in your ‘Cuda’s.
Aftermarket Insulation
-
Dynamat (good) expensive
-
Hushmat (ok)
-
FatMat (extreme) make sure it's the butyl kind
-
Rockmat (great) 80 mill butyl not aluminized
-
Lizardskin (great) ‘69 charger took 6 gallons @ 187.00per 2 gallon bucket, really expensive
-
Reflectix (ok) cheap
-
BoomMat
-
-
You can get enough FatMat to do the whole floor of a car for $150, so it’s a good savings over Dynamat while still being for automotive use. They even include a Dynamat sample for comparison. And it does peel up later if you need to remove it for some reason. I even used it on the underside of my roof, it’s stayed put upside down on 110* days when my car was parked outside.
-
Companies like Hushmat sell the same OEM approved material in sheets and in kits for older cars. They make our old cars ride more like new ones. The Hushmat material is specifically designed to dampen vibrations, reduce noise, and act as a thermal barrier. The Hushmat insulation comes in conveniently sized sheets and cuts easily with scissors. Hushmat recommends at least 80 percent floor coverage for the best results. So cover most of the floor with the modern Hushmat material. It has self-adhesive requiring little prep work to install. The material is dense and heavy, it is very effective even when used sparingly. It's a kit designed for A, B and E bodies. You’ll have to trim it a bit.
-
-
You can install Dynamat sound deadener on the bare floor.
-
-
Reflectix insulation costs a fraction of Dynamat. That and the carpet padding should be plenty for heat and noise.
-
Jim Conner - ’68 Cuda
-
-
O'Reilly sells a product called BoomMat.
Insulation Cost
-
Dynamat 60 ml $300
-
Dynamat Xtreme 60 ml 36 sq ft $229
-
Dynamat Xtreme 40 ml 36 sq ft $176 Eastwood
-
Dynamat Xtreme 60 ml 36 sq ft $162 Jegs
-
Dynamat Xtreme 60 ml 36 sq ft $162 Summit
-
Dynamat Xtreme 67 ml sq ft $154 Amazon
-
Dynomat 36 sq ft $150
-
Hushmat
-
FatMat 100 sq ft $100
-
FatMat Rattle Trap $2.20 sq. ft
-
Rockmat
-
Lizardskin 6 gallons @ $187 per 2 gallon bucket
-
Reflectix
-
BoomMat 60 sq ft $200
-
Noico 36 sq ft. $ 63 80ml
Floor
-
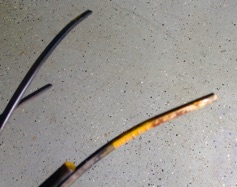
Before installing carpeting, install the wire protectors. They were originally welded to the floor pan, but the tabs are all either cut or rusted away.
-
-
Lay down the sound deadener. Install the sound deadener on the bare floor. Roll out the material to remove humps. If you have overlaps, make them as flat as possible. Apply aluminum tape to all the edges and seams before working the carpet in to shape.
-
-
Consider spraying the entire inner floor with rubberize.
Door Panel
-
Install Hushmat or Dynamat insulation to the inside of the door skin, and the inner quarter panels. Dynamat is already pre-cut for the door insides.
Hood
-
The hood insulation is held in place by a press-in clips, also available new from YearOne.
Trunk
-
Additionally, a rubber trunk mat will help insulate the car from noise and heat.
Undercoating
-
If your car doesn't have factory undercoating, consider coating the bottom of your ‘Cuda to reduce noise.
-
Headliner
Headliner Material
-
ACME Headliner makes the headliner from YearOne. If you order from YearOne, it may take 10 weeks to get. Order from Acme and they will ship in 2 days. Does not include insulation. It does come with material to recover visors.
ACME Headliner
Long Beach, CA 90813
802-288-6078
$75 + shipping 2 days
Headliner Bows
-
The bows are made of steel. They vary in length according to the shape and height of the roof. They are painted on the ends to identify where on the roof they go. The color of the bows depend on the model of the car. If you don’t have luck finding the bows, you could build the bows out of 1/8" round bar.
-
1
-
1969 Dodge Dart 1969 Charger 1969 Barracuda Fastback
-
FRONT FRONT FRONT
-
tan--------------------purple 1. orange 1. purple
-
med. green--------- purple 2. green 2. orange
-
med. blue-----------purple 3. blue 3. blue
-
tan--------------------black 4. red or pink 4. green
-
purple----------------purple 5. purple
-
6. black or no paint
-
REAR REAR REAR
Headliner Moulding
Headliner Installation
-
Have the headliner professionally installed.
Headliner Moulding
-
Sand and paint the headliner molding. The headliner molding does not go under the A-pillar trim. The A-pillar trim goes under the headliner molding, so that needs to be installed first. The headliner molding appears as though it needs to be dovetailed with the stainless piece that the weatherstripping fits in. The headliner molding piece should be installed after the courtesy light panel.
-
Jeff Ramin - ’67 Coupe
Headliner Installation (Rick Kreuziger DIY Technique)
-
With a few tricks of the trade and a fair share of patience, headliner installation is a job that can be done by an amateur with professional results. You can have the headliner professionally installed or use Rick’s technique below:
-
Here's my how-to on installing a sewn type headliner with bows:
-
1. First step is to make a sketch of the positioning of everything fastened to the headliner. This includes items such as the rearview mirror, visors, seat belt clips, coat hooks, shoulder belts, dome
lamp, etc. If possible, a couple pictures can be very helpful, too. -
2. After removing the original headliner, be sure to note the correct order of the bows. They are different and must be reinstalled in their original place. If they were previously removed and mixed up, they can be laid out side-by-side and sorted for position.
-
3. If the car already had the headliner removed, be sure that the dome lamp wiring is in place correctly and if your model has brackets for the shoulder belt clips they should be there as well.
-
4. At this point insulation should be glued to the roof skin.
Polyester filter media is light and gives the desired sound deadening effect. -
5. The new headliner comes folded in a small box. The headliner may be laid out and warmed in the sun to relax out wrinkles, but it is not absolutely necessary.
-
6. Start by sliding the bows into the listing pockets and centering them. At this point carefully trim the listings so that about 1" of the bow is exposed. (This step is done outside of the car.)
-
7. Now move the headliner with bows into the car. Place the rear-most bow into the hanger clips. On the rear bow there are 2 small wires with hooks on the ends. One end hooks on the bow and the other presses into a small hole in the rear-most roof crossmember. There's one wire retainer used per side. I like to hook them slightly inboard so that as the headliner is stretched to the sides it will pull them straight.
-
8. Continue placing the rest of the bows working forward.
-
9. Now for the most important trick!!!... you need about a dozen or so small spring clamps. Some refer to these as Pony clamps; the ones with the orange dip coating on the tips and handles. These are used to clamp the headliner edges WITHOUT stabbing it onto the gripper teeth. These will allow you to work your way around the headliner gradually pulling it tight and drawing all the wrinkles out.
-
10. Start in the rear by verifying that the centerline marked on the headliner is lined up with center of the rear window opening. Pull the headliner rearward and clamp it in place. DO NOT PRESS IT INTO THE GRIPPER TEETH AT THIS TIME!!!
-
11. Again, in the front verify the centering and pull the headliner forward and clamp it in place. Once again don't press it into the gripper teeth.
-
12. Now work down the sides, pulling it gradually from each side, clamping it along the way. As the headliner is pulled outboard, the listing pockets will need to be re-trimmed; trim so that approx. 3/4" of bow is exposed up to the roof side crossmember. Be consistent with this dimension so that the point where the side-to-side stitch seams curves is the same down the whole side. Continue pulling & clamping around the perimeter until the headliner is taught.
-
13. When the entire headliner is tight and looking good, you can go to the next step. First check that the front and rear side-to-side seams are straight. Uneven pulling can make them uneven, this is easily corrected by readjusting. It should look nearly perfect at this point and be taught. Small tight creases from packing folds will come out easily with careful heating. Overheating will melt the material! Practice on a scrap piece if you're unsure of how hot you can make it. It's also important to keep moving around with the heat to prevent overheating a spot. Time in the sun will also relax out these packing folds. Soft wrinkles by the visor corners will be pulled out as these edges are glued.
-
14. Starting in the rear, pull slightly and press the headliner material onto the gripper teeth. Start in the center and work toward the outsides.
-
15. Repeat step 13 on the front edge.
-
16. The sides are done next. This area has to be glued with trim adhesive. I use a special glue gun with a pinpoint spray pattern, but it can also be brushed on. Glue between the clamps and install headliner clips at each seam. Trim edges to approx. 5/8". Remove the clamps as each section is dry enough to hold.
-
17. Trim and glue down areas in front next to the visors.
-
18. Pull headliner to eliminate wrinkles and push down onto gripper teeth in the sail panel areas. Supplemental glue is recommended along the bottom. Trim as needed.
-
19. Finish trimming around the front and rear edges being careful not to cut too close to the teeth.
-
20. Carefully locate the dome lamp position. Refer to your drawings or pictures to be sure. One wrong cut here and its back to square one! On many cars, the dome lamp can be attached in front or rear of the center roof crossmember. Be sure you have it in the right place... make a small slice and locate the wiring & socket. Only trim the slice large enough allow the lamp to be screwed on without distorting the headliner. Cutting an opening is not necessary or recommended.
-
21. Visors, mirror, etc. can be located by feeling through the material to find the indents for the screws. A small needle can also be used to check if you're unsure. Take your time!
Sun Visor
-
If you are going to reuse the mounting hardware, do the following.
-
-
1. Take the new visors apart to install the original mounting hardware.
-
2. Remove rubber tip.
-
3. Rotate rod in old unit while pulling rod out.
-
4. Reinsert rod in new one. The rods are adjustable
-
5. Replace rubber tip.
-
6. Install 3 screws to replace assembled unit in car.
-
7. Repeat for other side.
-
You can purchase sun visors at Classic Industries.
-
You can purchase sun visor upholstery from Legendary Industries in the color you want.
Door Panels
-
Over the years door panels were often removed and the plastic tossed aside. During a certain period, a favorite place to put additional speakers for the 8-track stereo was in the door panel. All of this means that you can very seldom use the original panels of the door and rear side panels. Fortunately, all of these panels are reproduced.
-
-
These models have different levels of trim so be sure to verify your car’s original style. All the trim is attached with push-in clips and are easily removed and reinstalled.
-
-
If you don’t have salvageable panels, sources such as Legendary Interiors restores original door panels and parts, saving enthusiasts from being “stuck” with old vinyl or padding. Simply ship your upper and lower door panels to their Newark, New York, facility where skilled craftsmen and women strip off the factory vinyl covers and yellowed, brittle foam and rebuild your panels from the ground up. Starting with the bare-metal base, Legendary’s techs clean the surfaces and reapply a new coat of glue before attaching the pre-molded replacement foam.
-
-
New panels require popping open the holes for clips and cutting the vinyl for window regulators and armrests. The holes for them are perforated in the backing for easy removal with the small tool included in a Legendary kit. A skilled hand with an X-ACTO knife or razor blade can cut the holes in the vinyl from the backside with no problem.
-
The end goal is to have a perfect-appearing door panel with all the correct finishes; armrest base, molding, handle, and window crank.
-
-
Install all the door plugs, door seals, window cranks, armrest, door handles, lock knob, and door panel. Polish the stainless trim to a high gloss.
Aftermarket Door Panels
-
There are 2 original manufacturers of the repops and they supply the other companies. One is Palco, who is also known as Accuform. They are supposed to supply Hardens, and according to some, Legandary and YearOne. I don't know who the other manufacturers is.
Here is the price breakdown:
Cuda Doors (pair) ONLY (for example) with armrest, From Highest to Cheapest.
Laysons $380
Dashtops Inc $375 http://www.dashtops.com
YearOne $360 http://www.yearone.com
Legendary $350 http://www.legendaryautointeriors.com
MoparMan $300 http://home.earthlink.net/~themoparman/
Jims Auto Parts $285 http://www.jimsautoparts.com/
Hardens $220 http://www.hardensmcw.com
Dashtop (aka AccuForm, Palco Industry) $155
http://www.dashtop.com/ -
What is interesting is that if it is true that Accuform (Palco) makes them for the rest..it is cheapest to go straight thru them.
Vapor Barrier
-
Behind the door panels is a plastic vapor barrier. This is a sheet of heavy plastic held in place with strip caulk. It served a very important purpose: It prevented water seepage into the cavity between the exterior body panel and the interior sub-structure. Most Mopars came off the assembly line with this clear plastic covering that separated the exposed cardboard from moisture and the elements. Attached to the interior metal structure was the door panel with fiberboard backing. Without the plastic, the door or interior panel became wet and warped.
Arm Rest
-
The arm rest are made of two pieces the top which is the pad part. The bottom part or the mount. The mount install through two hole in the rear side covers with two screws.
-
Interior Clips - Arm Rest
-
Clips or fasteners are used to secure the armrests. Fasteners use screws to screw into. The metal body panel below the window has slots.
-
Jim Conner - ’68 Cuda
-
-
Front panels have nuts held in by spring clips that fit into the horizontal slots. Replacement are found at RT Specialties. They don't look the same, but they might work just fine.
-
-
Here's another source:
-
Ron Evans - ‘67 Coupe
Arm Rest Suppliers
-
Legendary has white, black and blue. You will need to die the white pads to the color you need. Dye them with SEM Dye in spray cans ‘cause they work great.
-
Legendary (800) 363-8804
-
Tim Moller - ’69 Conv.
-
-
Ask Bob, owner of ABC Moparts
-
Ron Evans - ’67 notch and vert
Arm Rest Mount Restorers
-
The business is Perfection Dash and Chrome. Howard is a nice guy, who does PERFECTION work for a fair price.
-
Perfection Dash and Chrome
229 Leandro Street
Anaheim, CA 92807
(714) 637-8479 -
-
Kick Panels
-
There is a basic design of the kick panel in these ’67-’69 cars. They are all molded plastic with a grain on the surface. The original panels were plastic that was molded in the color of the interior. All had insulation behind them. They lap over the door jamb, and cover down to the floor.
Aftermarket Kick Panels
-
The kick panels as originally installed were flat. These are available from several manufacturers. Also available are kick panels with seating for speakers. All are made of black plastic. They must be primed and painted to match the interior color.
Sill Plate
-
The sill plate goes over the sill frame, under the door. They are made of aluminum. The sill plate goes over the bottom tab of the kick panel and over the rear sill plate extension. They typically hide wiring.
Sill Plate Restoration
-
The kick panels have usually been scuffed over the years.They are also dented from a loose seat belt clip. If you only paint them, you may still see the scuffs. You can try to buff out the plate on a buffing wheel.
Aftermarket Sill Plate
-
Reproduction panels are available for most cars. They are made of thin aluminum. They are not as thick as factory made sill plates. Some come in polished aluminum. Some manufacturers, to save money, produce them in black. You can paint them to match your original color. If possible, it is better to have panels that are molded in their original color (Such as OEM or from another car) because a black panel that is painted a lighter color appears black when scratched.
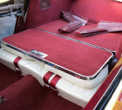
Trunk Mat
-
In ’67 Barracuda’s, black mats were used.
-
In ‘68 Barracuda’s, they had factory rubber trunk mats in the basket weave printed pattern. Part numbers were on the back.
-
Rob Robinson
-
The correct "burlap texture" rubber trunk mat for the fastback hasn't been available. But I just saw some recycled rubber mat at TAP Plastics, sold in 3 x 6 ft rolls, that looked pretty similar. Get some and use your mat as a template.
Rear Cargo Area
Refurbishing the Cargo Area Floor
-
Rip off the old carpeting, scrap off all of the old glue. Scrub it down and put some POR15 where the metal is bare.
-
-
Clean up the stainless trim that goes on the leading edge of the cargo area floor.
Rear Cargo Area Install
-
Before you begin, replace all the plastic and metal screw clips / bits that the assembly screws go into with new ones. There is nothing like getting it all together and 2 weeks later panels start to buzz or rattle.
-
-
Note: carpeting the cargo area ala deluxe interior vs. just the floor piece, the carpeting will make a huge difference in the fit. The deluxe interior included carpet on the side panels as well which makes for a very tight fit. Not all 67-69 Barracudas had carpeted rear wheel houses. It was part of the Deluxe extra cost interior package. The flat cargo area and rear fold-fown panels were always carpeted though.
Rear Cargo Area Install Order
-
1. The upper trim goes on top of the side panels. Start with the upper trim pieces that wrap the window and back seat area, screwed loosely to allow a little movement for when you tuck the side panels under them. Note: some of the clips and screws go through both pieces.
-
-
2. Then the cargo floor. Glue the cardboard-like paper, that goes under the carpet, to the floor. Glue the carpeting to the floor. Used weights (45, 35, 25 lb plates) for pressure as the glue dries.
-
Jeff Ramin - ’67 Coupe
-
-
3. Then the 2 cargo side panels. Pre-install the carpet on the individual panels the night before so it's not that big a job.
-
-
4. Then rear seat back or rear folding seat back. Polish up the stainless trim. Repaint /reinstall the hinges on the seat back. The hinges go on top of that carpet piece. You must have the hinges screwed on before installing.
-
-
5. Then the seat bottom
-
-
5. The floor goes in last. It has 2 vertical tabs back by the trunk divider board that go behind the side panel and get a screw through the side panel into the tab. Leave these things loose until it is all in and lined up.
Carpeting
Original Carpeting
-
Original carpeting had yellow mohair on the back. You can smell original carpeting.
-
I found a tag under the carpet that says J.P. Stevens & Co. #1710EB9, Blue Chrysler A-Body, Rear B/S S/29, with a date of 8/5/68. I'm assuming this is the carpeting and it was put in the car Aug. 1968. Interesting find.
-
Angel Garrido - '69 FB
New Carpeting
-
New carpet makes a dramatic difference in the appearance of your ‘Cuda. Carpet not only finishes off your car, it also serves as a barrier, insulating the car's interior from noise and extreme temperatures. New carpeting is relatively inexpensive-less than 200 bucks and available from multiple sources. They can be easily installed in an afternoon.
-
Most reproduction carpets come rolled up in a box for shipment. Some carpets are molded to fit the floor contours. They both must be laid out flat in the car as soon as possible. The rear section goes in first; the front section is installed next and overlaps the rear piece.
-
-
People install sound deadening material. The sound deadening will not be visible after the carpet is installed.
-
Floor mats help protect your carpet, trapping contaminants, but floor mats can't prevent all of the causes of carpet damage. The sun can cause carpet to fade and dry.
Carpet Damage
-
Water leaks are bad for your car. Automotive carpeting saturated with water, if not dried immediately can cause the dye to run or stain, mildew, and deteriorate. Once the carpet and underlying insulation become waterlogged, water will stand on the car's floor causing rust issues to both the car's floor and the seat tracks. Fix the source of the leaks.
Carpet Removal
-
Removing the old carpeting involves removing a good portion of the interior including the sill plate, kick panels, gas pedal, and shifter boot. Most carpet sets are made a little big, and must be trimmed around the edges.
Carpet Installation
-
Once the carpeting arrives, remove it from the box and lay out in the sun to help remove the wrinkles from the boxing.
-
-
When putting down carpet or foam, use 08090 super trim adhesive. This glue allows you time to work the materials before a permanent bond takes place.
-
-
Don’t forget to get a cheap soldering iron and burn the holes for the belt mounts and seat mounting to prevent it from stringing out.
-
-
ACC has some You Tube videos to aid in the installation.
Before trimming in the carpet, find the holes for the accelerator pedal and mount the pedal. A foam gasket resides between the carpet and the pedal to keep any moisture from entering the interior. Place the carpet on the floor securing it in place with a brick or another heavy object. Use a punch or other sharp, pointed object to push it through the foam and carpet. Climb back into the cab and push a screwdriver through the hole that was just created to locate the holes for mounting the accelerator pedal.
If your car is a 4-speed, or has a console, cut and install the carpet before you trim the outside edges of the carpet.
When you have the carpet positioned correctly find the holes for the seat belts, the seat track holes, the 4-speed hole if equipped, and the dimmer switch hole. Use a soldering iron to sear the hole completely through the carpet. Then take a screwdriver and push it through every hole to hold the carpet in place. You can use a soldering iron to sear the holes for the belts and seats through the carpet as well.
After everything is trimmed and installed, trim in the edges of the carpet. Install the door moisture barrier, wind lace, doorsill, and the often missing scuff plate.
Trim the sides near the kick panels, the front area where the pedal lever attaches to the firewall, and the rear floorpan area where it meets the side panel as necessary. Then wait until you have everything installed and bolted down before trimming the door opening. The dimmer switch has a plastic grommet provided with the carpet. The factory did not use one but instead cut the carpet and pushed the switch up through the hole.
Watch for the foam gasket that goes between the floor and the carpet under the base of the gas pedal. Sometimes the jute backing that is glued on the carpet must be trimmed so that this important seal fits and seals out any moisture from under the car. The carpet is never glued in these cars. When everything fits, you can trim the door opening right to the raised edge of the pinch weld. It doesn’t overlap this edge. Then install the doorsills.
Original doorsills are usually in bad shape and cannot be reused. New ones are available but be sure to buy the best ones you can find. Some are made very poorly. Also check to see if the sills you buy include the correct screws. If the screw holes in the new sill plate do not align exactly you may have to drill one or two new holes. A restorer often uses a larger screw to attach the plate when the hole is too large for the original screw. Because enough room is available to move the plate forward or back without causing any fitment problems, it is preferable to drill new correct holes.
A narrow carpet hold-down strip runs between the rear seat and the doorsill. It attaches with a screw in the front and one in the back. Many people do not have one and are not aware that it is missing. These strips are called two-door B-Body scuff plates. They help to hold the carpet
down along the bottom edge of the rear side panel.
Carpet is one of the easiest interior projects you can do by yourself. Companies, such as Legendary Auto Interiors, offer molded carpet kits that are cut and patterned specifically after the factory floorpan and require minimal trimming, if any, to fit. You can use a clean soldering iron to burn the edges of your seatbelt holes so the loop carpet doesn’t continue unraveling.
Carpeting Manufacturers
-
The carpet is pretty much made by one manufacturer and resold by different stores, i.e.. YearOne and Legendary included.
-
-
ACC is the only manufacture of automotive carpet since they acquired the Trim Parts Carpet line back in November of 2017. Once the order is placed with ACC, the material is cut the night in which the order was processed. The next day it is molded and boxed for shipment. So your generally looking at a two to three day process on most orders.
-
They use Legendary Auto Interior. It is always the correct loop, correct material, correct fit.
-
Graveyard Cars
Mass Backing
-
On the "mass backing" the description is as follows:
-
"Our Mass Back is made of 40mil thick Ethylene vinyl acetate which gives the carpet a dense rubber backing to reduce heat and noise within your vehicle. The Mass Back is applied to the back of the carpet and then molded to the correct shape. This Mass Back carpet more closely duplicates the original factory materials for many later model OEM carpets. Because this is an upgraded product, there is a surcharge for this backing, as well as additional shipping costs. In most cases jute padding will be included with the carpet, and may or may not be attached to the bottom of the carpet made with Mass Back, depending on the application."
-
-
The original carpet backing was a product made from horse hair. Needless to say, that is no longer available. The regular padding is now known as "shoddy padding" and is a man made fiber material. It is not as thick as the original backing and I know some shops who purchase the shoddy padding to help with the contours of the floor boards. I know with the mass backing, some still use the shoddy padding as well for the contour forming.
-
-
The mass backing is much heavier and more difficult to cut. That is the only complaint that we have had with the product.
-
-
According to ACC, they say most shops are going to the mass backing. These shops are doing a lots of the restomods and more custom cars, but they were going this route and not using the more expensive sound deadners like Dynamat. The mass backing is basically a heavier and dense man made backing material to offer stiffening and sound absorption for the floor boards of these cars.
-
-
Just think of molding roofing shingles to the back of the carpet. It will make the carpet underlayment much more quieter and stiffer.
-
-
I think the mass backing helps it hold shape better as well. Like mentioned though, as soon as it arrives get it out the box and let it relax. The only exception on my FB was it was a bit tight and would not lay down against the tunnel in the far rear area of the back foot wells. It has since relaxed with heat and time. The fact it is not cut or offered console specific makes it a little fun as well. Mine had lots of excess to trim out of the sides, front and rear (which I liked).
Upholsterer Companies
-
Can anyone recommend a good but cheap company to do it in So. Cal?
-
Nathan Nuttall - ’67 Fastback
-
-
You might try contacting either Junk Yard Hero or Enrique Agular and see if they have a shop they like.
-
Phil Saran
-
-
Tony's Upholstery in Cypress did mine. He did a good job on the whole interior. Tell them Mike with the Barracuda sent you.
-
Mike Jarvie - ’68 Fastback
-
-
Tony's Upholstery
-
5033 Lincoln Ave
-
Cypress, CA 90630
-
-
Front Seats
-
Front seat arrangements varied.
-
All seats have a metal frame with S-springs. They are almost always worn out or busted from years of abuse.
-
Front Seats Adjustments
-
Seat adjustment is on different sides for each seat. Thus the seats do not exchange since the seat release leaver is on the left on the left seat and on the right on the right seat.
-
Phil Saran
-
There is a stiff wire that runs from the lever mechanism to the right side. Make sure its in place. In addition to the cross over wire, you have to make sure that the seat tracks on both sides are in the same forward & aft detent positions or the tracks will bind.
Front Seats Tracks
-
Seat tracks bolt through the floor. The tracks are specific for driver or passenger. The seat uppers and lowers are the same left and right. The ’68 & '69 buckets cores were identical, and have provisions to install the upper seat latch on either side. '67's don't have the latches.
-
Rob McCall - '68 Fastback
The bench seat has a wire that goes from the driver-side release latch through an adjuster in the middle of the front seat frame. It then attaches to the passenger-side seat track.
Each bucket has its own release. The seat tracks are specific to the model and year and are difficult to tell apart.
Front Seats Tracks Restoration
-
Prepare the seat rails to be reattached to the seat bottom. Remove the rust from all the studs with the grinding wheel, and then grease up the rollers. They will work much smoother now. You can now attach the tracks to the seat bottom.
-
Jeff Ramin - ’67 Coupe
Front Bench Seats Restoration
Most of these are rusted and supplies of them are becoming scarce. They are not reproduced, and even bench seats are harder and harder to find. This makes being able to restore what you have a necessary process to get your car back on the road.
-
Tear the bench seat bottom down to the springs. Same thing with the seat back; remove all burlap, foam and bunting. Take the seat bottom frame apart (remove the rails that the seat slides on from the frame). Take a wire brush to rusty areas and degrease the rollers. Get everything ready for a coat of POR. The only way to paint these pieces completely (springs and all) would be with a spray gun.
-
Jeff Ramin - ’67 Coupe
Unless your car has low miles it is best to completely disassemble the seats. After removing the seat covers, the foam, and the burlap padding, examine the seat frame and springs. Replace any broken springs or parts of the frame that need more support. Your local upholstery shop can sell you springs and clamps. If your frames are in really bad shape it is best to strip and paint the frames and take them to a professional for repair.
Examine all the padding and replace as necessary. Foam kits are readily available for most bucket seats but few are available for bench seats. Again, unless your seats are in very good shape it may be best to take them to a good upholstery shop. If you only need to replace the seat covers and everything else is in good shape, almost anyone can install the covers with good results.
Seat covers are held in place by many hog (or pig) rings. Pay careful attention to where these are positioned so that you can correctly install your new covers. You need a good set of hog- ring pliers and at least one or two large boxes of rings.
When you receive your new seat covers lay them out in the sun or in a warm room. This helps relax the shipping folds and wrinkles before you install the covers.
After removing all vinyl, foam, and padding and any old hog rings, blast and paint the seat frames semi-gloss black. You can then install new padding and foam, followed by new seat covers.
Use burlap to reinforce the seat bottom. The springs should have been restored and replaced so you have a comfortable seat that supports your body weight.
Hear Rest Restoration
If your headrests are in similar shape as these you can restore them: Replate the posts, replace the chrome trim strip, and clean and re-dye the vinyl. If your vinyl is damaged or cracked you have to buy new ones. Fortunately they are now reproduced and can be purchased on eBay or from several distributors, including P.G. Classics.
Front Seats Installation
-
Install the springs on the front seat rails that assist in bringing the seat forward when you adjust it. Attach the plastic clips that the seat belts fasten to when not in use. Bolt the arm rest onto the seat frame. Install the driver's seat back on the frame. Now you can install the front seat belts. Now install the seat back on to the frame.
-
-
Now your ready to put the seat back in the car. When you get seat in the car, insert the studs through the holes in the floor and secure them with the nuts under the car. Kind of ironic - removing those nuts was the first thing I did in the restoration process.
-
Jeff Ramin - ’67 Coupe
The rear seat mounting clips must be in good shape. They are reproduced and available from many sources. To remove or install the seat bottom you must press the seat inward and either lift upward or apply downward pressure.
Bucket Seat Brackets
-
On ebay the bucket seat brackets go for $79.91 for four little pieces of sheet metal!
Jim Conner - ’68 Cuda
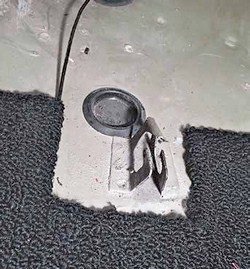
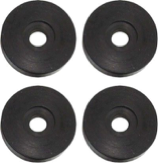
Front Seats Tracks Spacers
-
67 Parts Book...23-47-15 SPACER, Front Seat Manual Adjuster, w/Bucket, Split, or Reclining Seats 2862395. The Dodge Resto book refers to them as “Seat Spacers”. The factory Installed them between the seat rails and floor and they slid over the bolts.
-
The purpose of the '68-'69 Seat Track Spacers 4 Pc. Set was to stop the seat mechanism from dragging on the carpet and makes the seats sit at the correct driver height. The dealers installed them on request for shorter drivers. They didn't want to lose sales when people came back from the test ride saying the seat was too low.
-
Max Heim - ’67 FB
-
-
At the dealership we used to put them on the front two studs to slightly lean the front seat back for some back relief. The factory seats are a little too up right. They are made not of rubber but aluminum. They are about 1/4" high.
-
Bill Mangherini
-
-
I remember my ‘67 convertible has wood shims. They looked like squares with a notch cut out so you only had to loosen the seat up and slide them around the studs. They all had a Chrysler logo branded into them. There were 2 on the front studs and one on the rear studs.
-
Dana Price
-
-
Sometimes dealers would install spacers under the seat tracks for shorter drivers (women, typically). But usually those were in the form of long wood slats with drilled holes. But maybe these were set into larger holes in the slats. There are wood slats the same length and width as the track, but metal spacers around the bolts for strength.
-
Max Heim - ’67 Conv
-
Take those old cracked plastic spacers and replace them with nylon spacers from Sears Hardware. A guy can use donut upper front shock bushings instead. mine were rubber from the factory.
Aftermarket Front Seats Tracks Spacers
-
Lawson’s sells the 1968-1969 Seat Track Spacers Set - 4Pc.
Chrome Seat Lock Handle
-
Those are the small chromed knobs for the lever that releases the seat to flip it over. They fit ‘68-’69 A & B body Plymouth products & are right or left universal.
Seat Knobs
-
For the small knobs that fit on the seat mechanism that moves the seats, look at the link below to see if it is what you are looking for.
-
Eric Valentin - ‘69 Fastback
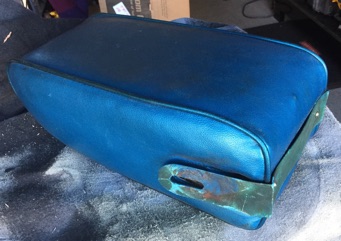
Front Seats MIddle Bustle
Center Armrest Hinge Washer (Plastic Stop Thingy)
-
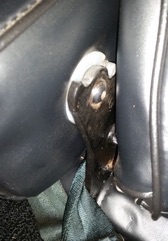
The Center Armrest Hinge Washer is actually just a large, white flat plastic washer with a small cutout for the metal protuberance which stops the rotation of the arm rest. It stops the arm rest from rotating past vertical. The metal protuberance is fastened to the structure of the arm rest. That Center Armrest Hinge Washer is pretty thin, like 1/16". On some cars, the armrest washer was replaced by a large plastic U-bracket.
-
-
-
-
The metal screw like thing fits in the cutout in the plastic washer is attached to the center armrest.
-
The second screw goes through the metal bracket in the center of the disc. To be clear, the metal protuberance that is in the armrest is not a screw. It's just a metal rod, with a rounded off end.
-
Jeff Ramin - ‘6
-
-
The Center Armrest Hinge Washer can be purchased at Classic Industries.
-
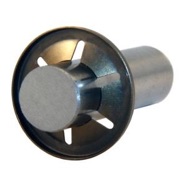
One of these clips goes on the outside of the metal rod to hold on. They can be purchased at Lowe’s.
-
Bench to Buckets Seats
-
I did that on a ‘67 Dart project. This was a bench 270 Dart. Floor pan is identical, I think. The seat tracks are from a ‘66.
-
-
On the floorpan, you can see the indents where they fit -- for the front and rear bolts on the inner tracks. The "dimples" are where the bolt holes go.
-
Max Heim - ‘67 Fastback
-
-
Someday, someone might come along and want to restore this car. Don't want the floorboard to look like Swiss cheese. There are some dimples that are there, but they may be to locate the plates. The reinforcement on the outboard sides use the dimples as locators.
-
Jim Conner - ’68 Cuda
-
-
I didn't know anything about reinforcing plates, I just drilled holes in the floor and used big washers. I may not have used the exact factory locations (I wanted more leg room) -- one of the holes wound up very close to a brake line. I didn't do anything to change the seatbelts, either -- they seemed fine. I would be inclined to do it properly, with the reinforcement plates, if I were to do it today.
-
-
Where would you ever find those plates? I was just going to make some. I'm not worried about the outboard sides cause they're reinforced from the bottom. The inboard sides don't have anything - not even the holes. That's my problem - I want to drill the holes in the appropriate locations.
-
rchoodlum
-
-
You can find those plates at:
-
Autobody Specialties
-
http://www.autobodyspecialt.com/cgi-bin/commerce.cgi?search=action&category=0168
-
-
These are half that price at $25 + shipping, but they are pretty easy to make yourself. I am not sure of the thickness off hand, but I would think .06-.08" metal would work well.
-
Nathan Nuttall - ‘67 Fastback
-
-
On an original bucket seat car, the inner brackets are the same design and material as the outer brackets that are located under the car. The stock brackets get additional strength from the edges being curved upward, so that is probably why the flat plates are thicker (the $25 ones Nathan pointed to).
-
Ron Evans - ‘67 Coupe
-
-
I did an ebay search on Barracuda seat mounts and all I came up with was b-body mounts.
-
Jim Conner - ’68 Cuda
-
-
$29 for 4 pieces of Barracuda seat mounts.
Buckets to Bench Seats
-
I changed from buckets to bench. I needed the bench to carry my 4 kids. But going the other way, you just have to purchase those 4 mounting plates and spot weld them to the floor. Then drill the remaining 4 holes if they aren't there already. The seatbelts are also different - just the stiff inner ones though.
-
Nathan Nuttall - ‘67 Fastback
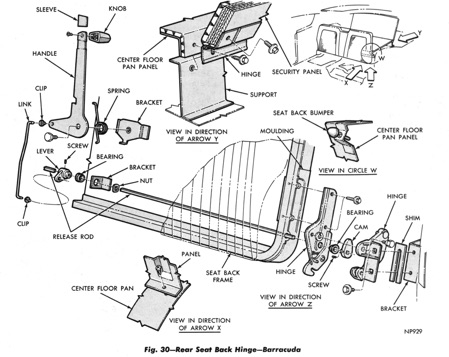
Rear Folding Seat Back
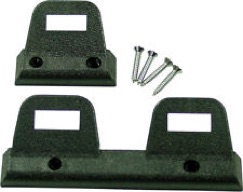
Rear Folding Seat Back Brackets
-
There is a part that attaches to the bottom of the backseat upright (the part that allows the seatback to lay down). The fold down seat has 2 brackets that mount to the side plates on rear seat upper.
-
Craig Tassin
Rear Folding Seat Back Bracket Diferences
’67 - ’68
-
The '67's have a lot more chrome on them than the '68's, and they have more chrome than the '69's.
Nathan Nutthall - ’67 FB
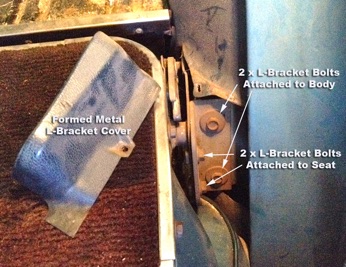
’69
-
The '69 year brackets are black. And they have a large metal cover over the bracket.
Rear Folding Seat Back Removal
-
Remove folding back part first. 3 or 4 bolts hold it on each side. Seat should come out.
Rear Folding Seat Back Troubleshooting
-
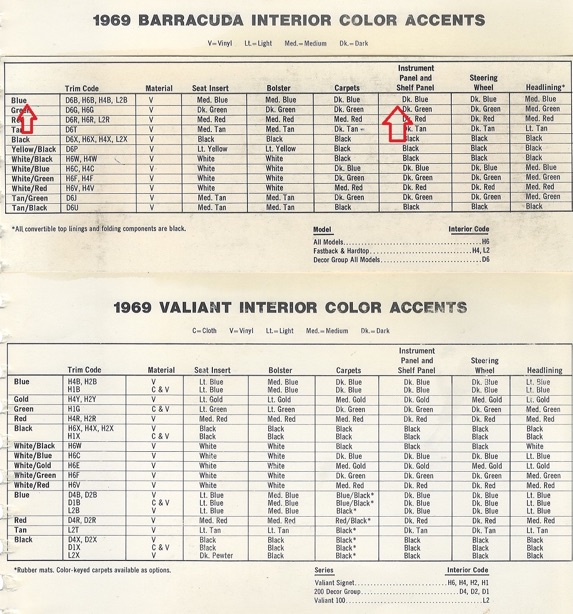
The cam levers are the things that break for some reason. The shaft bearing (flimsy plastic) was know to have crapped out often too. The main shaft (rod) extends across the bottom of the seat into the cams. Below is a diagram of the internals.
-
Mark Csizmadia
Rear Folding Seat Back Disassembly
-
It is easy to do once you strip it down. Not much to it. You have to remove the seat material (carpet and hog rings around the outside) to access the back framework.
-
Mark Csizmadia
Rear Folding Seat Back Restoration
-
Remove the stainless trim and clean it up with steel wool and WD40. Next remove the hinges and the fish piece (the part at the top center of the seat back). Clean up the fish piece. Next remove the old carpeting and cardboard underneath.
-
-
-
-
Do not replate the fish piece given those fine cut lines. It can be done, maybe, but better to use 000 steel wool, making sure to really get down to the bottom of those lines. Clean with reducer, non oil based thinner, and argent paint. They wrap an old t shirt TIGHTLY on your finger tip, dip finger tip in thinner and wipe with little to no pressure. Let the thinner do ALL the work. As your finger tip fills with paint, switch often. Switch with each pass.
-
Dana Price - ’68 Conv.
-
-
Install and glue the new carpeting to the back of the seat. Use weight plates to hold it nice and flat while it dries. Clean up the hinges, and put a coat of POR15 on the cast iron pieces that bolt to the floor of the car,
-
Jeff Ramin - ’67 Coupe
-
Some ‘Cudas came with a jute insulation pad behind the rear seat. Replace with some of better quality.
Rear Folding Seat Back Cam
-
These cams are hard to come by.
-
2
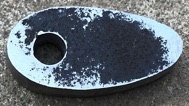
-
You can make a Farmer John version of one. Roughly cut this one of of 3/8" plate (should be 5/16") using a cutoff wheel and ground it down into shape and drill the 5/16" hole. Just need to spend a while with a file or maybe a plasma cutter to cut the corners out. Then drill the set screw hole and cut it down to 5/16" thickness.
Nathan Nutthall - ’67 FB
Rear Folding Seat Back Installation
-
Just re-assemble and lubricate moving parts. Screw the stainless trim on and bolting on the hinges. Scrub down the vinyl and apply some Armor All.
-
Jeff Ramin - ’67 Coupe
Rear Seat Bottom
Rear Seat Bottom Removal
-
Bottom cushion has a series of bolts (2) on the back connected to chassis. You can’t see until you take out the rear folding seat back.
-
Lift up and then out.
Rear Seat Bottom Restoration
-
The springs might be rusty, and there was stuffing will be missing. Derust using sandpaper, and vacuum all the crap out. Spray it down with Lysol. Put a coat of POR15 on the frame of the rear seat cushion and springs.
-
Jeff Ramin - ’67 Coupe
Rear Seat Bottom Installation
-
Install the rear seat bottom and bolt it in before you re-install rear folding seat back.
Rear Seat Install
To install the rear seat, bottom part goes in first, it hooks on the bottom then has 2 bolts on tabs at the rear bottom. Then the top rear seat gets 2 bolts on each side. Some cars had two shim packs that go between seat back hinge and the body for alignment as well. Covers on the hinges are installed lastly.
You can't reach the lower seat rear bolts with the folding back installed without a lot of contortion a wrench and cussing.
The rear latch is operated by a lever located inside the center fish emblem on the front of the upper bun!!
Seat Belts
-
The original set of seat belts were the lift style latch, not a push button. The outer front belts should be retract type and the inner ones should be the long part with the buckle.
The belts with the buckle at the end, and another belt sewn to it, are the front lap/lower shoulder belt combination. You must have a rear lap belt mounted in the front. Let’s go through all the belts!
1) in 1969, Chrysler only used enough seat belts in the rear seat area, for 2 people unless the car was ordered with an extra belt for the third person seated in the center. You should have gotten only 4 separate belts with a bent mounting anchor. They would have the number C-509 stamped on them.
2) the upper shoulder belts are pretty self explanatory as they are the only 2 belts with the elastic straps sewn in place with a snap.
3) All the other belts would have a straight, flat mounting anchor and have the number C-469 stamped in them. Those are all for the front. The 2 belts with the second belt sewn onto them, are the front lap belts, with the sewn on belt being the lower shoulder belt.
4) if you had a bench seat or bucket seats with a buddy seat in the center, you would have had an extra belt in front for the center passenger.
Please make sure there are no belts in the front, with a bent mounting anchor, and none in the rear with a straight mounting anchor.
William Edwards (All Mopar Co.)
The first thing to do is inspect the belts and decide if you are missing any of them. The rear seat should have enough belts for three people. If you have a bench seat or buddy seat with buckets in the front, you should also have belts for three people. If your car is a 1969 or 1970 shoulder belts are standard. The shoulder belt configuration is different for 1969 and 1970.
In 1969 cars the buckle is on the shoulder belt and snaps into the tang that is mounted with the sun visor for storage. The rest of the belt is held into place with an elastic band with a snap.
If your car has all of the belts and they are in good shape you can clean them with Simple Green. You can then use 0000 fine steel wool to shine the chrome pieces and remove any grime. You can also repaint the buckle and re-dye the webbing if needed.
If you are missing a few belts you can find them at swap meets, at online “for sale” locations, or at online auction sites. The belts can be re-dyed if you find the missing ones in a different color.
Front Seat Belts for a ‘69 fast back
-
If you only want a simple single belt setup you can find that for sale new at Long Beach Swap Meet usually the 1st or 2nd Sunday at Veterans swap meet.
-
Philip Saran
-
-
In SoCal go with Seatbelt Planet (dot com) in the Dartillac. I opted for the GM style metal belts.
Front Seat Belts Restoration
-
Clean up the front passenger seat belts with the seat out (this is the time to do it). If there’s rust on the buckles, go over them with WD40 / steel wool. Then scrub down the belts themselves with soapy water, to get rid of that old car, musty smell.
-
Jeff Ramin - ’67 Coupe
If you have all the original belts, you can have them rebuilt to original appearance, even down to the correct date/part number tags. One source that provides all the necessary services is Ssnake-Oyl. Their standard of work is on the highest level and if you are serious about showing your car they are the best way to go. They also have complete sets that are already restored ready to ship if you are missing your originals and all you have to do is install them.
Of course, you can always buy a complete reproduction set of belts for your car from suppliers such as P.G. Classics. They have many sets for many applications in stock and ready to ship. These belts are not exactly like your originals and they do not have the date/part number tag, but they are very similar and are much less expensive than sourcing an original set.
Front Shoulder Seat Belts Restoration
-
Scrub down the belts with soapy water. Sew a new piece of elastic to the passenger shoulder belt. The old piece, as always, is stretched to uselessness.
-
Jeff Ramin - ’67 Coupe
Seat Belts Restoration Shops
-
All Mopar Seat Belts will restore your seat belts. For $499 you would get all the belts, all the bolts, washers, screws, new reproduction part number tags AND free priority mail shipping to anywhere in the lower 48, provided that yours are good cores. It would take approximately a week in order to get them back.
-
-
All Mopar Seat Belts
-
Bill & Robin Edwards
Seat Belts Bolts
-
The special seatbelt bolts are shanked and for a reason. The seatbelt tabs need to be able swivel a bit. In a collision this stuff needs to move around on the axis of the bolt shank as everything takes up tension when the belts are pulled against by people strapped in.
-
-
The use of a washers is “atypical”. I am not aware of any application where any washers are used. Theres a very good reason for them being mounted this way without washers under the bolt heads.
-
-
The bolts used to secure the seat and shoulder belts are gold cad in finish and come in various shoulder depths depending on where and how many belts are mounted to the bolt. The root diameter of any bolt is the weakest point. On these, the shoulder is mainly for the eye of the seat beat attachment plate to pivot on. Originals are usually rusted and must be replaced.
-
-
They come listed as:
-
C-8
-
C-10
-
C-11The bolt measures 1.5" total length.
-
C-12
-
C-14The C-14's have X's stamped on them also.
-
C-15
-
-
Earlier cars used mostly C11, but also used C10's and C12's.
-
Seat Bolt Location
-
Front seat belts use the following:
-
2 C-10 Used by the door.
-
2 C-12 Used by the drive shaft tunnel.
-
Front belts, two short bolts go by the doors and two long ones go by the driveshaft tunnel and the last two short ones go on your shoulder belts
-
-
Rear seat belts use the following:
-
2 C-11 Used on the outer edge.
-
2 C-12 Used in the center with a spacer between the belts.
-
The rears require two C-12's and two C-11’s. In the back the two short bolts go in the corners by the wheel wells and the two long bolts go in the middle with spacers.
-
-
Shoulder belts use the following:
-
2 C-11 Used for the shoulder belts.
-
C-11's bolts for the headliner anchors.
-
-
Total of 10 bolts, 2 C-10, 4 C-11 & 4 C-12.
Seat Belts Clips
The seat belts are clipped into the seat belt clips that are mounted to the lower edge of the front seat.
-
The seat belt clips hold the seat belt against the seat bottom when not in use. This keep the seat belts from sliding about. One single seat belt clips attaches to the passenger side seat at the bottom. The double clip attaches on the driver side, also at the bottom. There are preset holes in the seat frame.
Shoulder Belts
-
Shoulder belts required in US starting Jan. 1, 1968. The original belts, are two separate belts sewn together using a common anchor on the transmission tunnel. The shoulder belt and the lap belt connect separately each with their own latch. The shoulder belt clips into the sun visor mount and the inside belt clips into the "belt retaining clips" mounted to the seat frame.
-
-
Belts look kind of like:
-
-
Belt retaining clips on the seats look like:
-
http://www.classicindustries.com/product/mopar/a-body-barracuda-1964-69/parts/md118bk.html
-
Michael Mosley
-
Retro-fiting Shoulder Seat Belts
-
Installing the upper point is not very difficult if you car doesn’t have it. The hole is already there. Luckily, once you remove the trim on the side of the headliner, most of the time the glue is old enough you can separate it very carefully and get to where you want to put the mount. You could weld a plate on top. Once that upper mount is in place, you can buy retractable 3-point belts in almost any color at a pretty decent price. Once the plate is in place, just tack the corners of the cut you made and put the headliner back.
-
Rob Robinson
-
I retrofitted new style retractable belts to my ‘Cuda, and I love them. The belts were from Wesco Performance. They are in California. They have a great website and a large selection of styles and colors. You need the ones with the pivot that bolts directly to the roof. They use the stock roof pivot point and the stock seat belt anchors. I added an L bracket to the rear floor for the retractor ass.
-
David
-
-
I had to oversize the belt reel mount hole just a tiny bit to fit the factory bolts. I went with the stock belt reel location. The other end of the shoulder belt needs to be anchored a bit farther forward. Not wanting to drill extra holes and have to reinforce them, I opted to do what XV Seatbelts does and use a chunk of metal with a hole on each end.. Lucky for me, Seatbelt Planet also has 6" extensions. Bolted that to the same spot as the reel, then bolted the loose end of the belt to the extension.. For the buckle end, I opted for the 20" long belts (the ones without a plastic sleeve). Caveat is that if you're running low-to-the-ground bucket seats (hack-job 4 door Aspen buckets for the Dartillac. Sat practically on the floorboards), that'll be way too long. Good news is I believe they can do a custom length for that.. Better news is that with a fold-down armrest bench, they're just about perfect. They do 8 and 12 inch lengths if you opt for the plastic sleeve. I spent the extra few bucks and got the drop-down dogleg for the shoulder belt. They fit surprisingly comfortable and I feel much safer knowing it isn't going to clothesline my neck in an accident.
-
-
The bad news is the cost wasn't amazingly low (about $70 a seat) but I do feel safer. That $35 extra per seat means nothing if you're dead. The other bad news is that I have to be patient putting on the belts.. Not sure if it's a function of how I mounted them, or if it's the belt manufacturer themselves, but the belts do lock up if you grab them too fast.. I think it's a function of the angle they're at (because of the stock location) and the speed. I got used to it quick, but passengers get annoyed.. Too bad for them :)
-
-
I had the XV Belts installed in my car. The only complaint I have is that the belts do not go all the way tight when they are unhooked -- the buckle stops at the upper loop, preventing the tensioner from pulling the belt all the way tight. It's not a big deal -- still looks O.K. If you are taking a car to a show, you can move the buckle and the belt will tighten all the way flat. I wasn't sure at first about the hard end pieces that the buckles are on, but now I really like them.
-
Ron Evans - ‘67 Coupe
Bucket Seats With Built in Seat Belts (Aftermarket)
-
At one time the Sebring was one of the only cars to have the shoulder belts in the seat, now others do. The Sebring seats in my Barracuda, are bulky.
-
Alan Erland - ’67 FB
-
-
The Sebring seats have the top shoulder belt mount located on the upper seat back so that you wouldn't have to mount the shoulder point to the body anywhere. In fact, the entire seatbelt mechanism is built into the seat frame. This makes for a relatively easy solution on a convertible or hardtop if you want shoulder belts but don't want to have to weld a mount to your roof.
-
Nathan Nutthall - ’67 FB
-
-
There are several other alternatives. Mark VIII seats are popular with hot rodders, and CTS seats look nice. Most of the newer seats all have built in belts. There is a steel rail that they bolt to that bolts to the floor. I'm going to try to secure them to the original seat belt plates. The outside belts bolted directly to the upper and lower attachment holes.
-
-
CTS seats might be a little narrower than the Sebring seats, and the CTS seats are usually less money.
-
-
Some of the seats aren't much different than the older style buckets. The Ford Escort seats that I originally bought are pretty compact. Check out these here on Craigs List. Honestly, they're all a PITA to modify to bolt in to the original seat belt plates.
-
Jim Conner
Bench Seat Belts
-
On the bench seat, the belts are actually sewn together with the outside belts.
-
-
The XV Belts have a bench seat models.
-
Raj
-
-