General Information
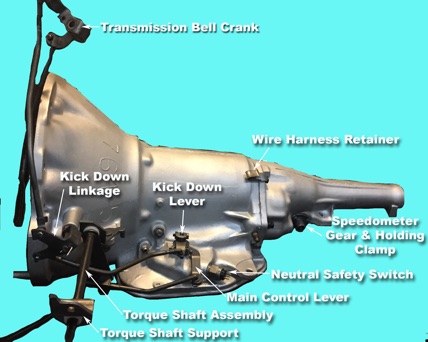
Transmission
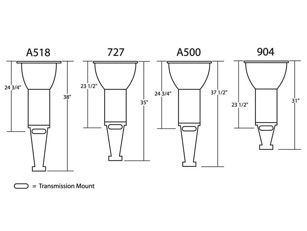
727 vs. 904 Transmission
-
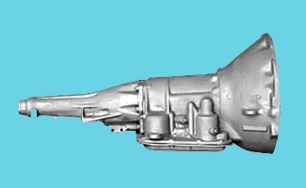
The A-904 and A-727, debuting in 1960 and 1962, respectively, are 3-speed automatic Chrysler TorqueFlite transmissions. They have become synonymous with strength, durability, and performance.
the parts between the 727 and 904 are not interchangeable. However if you go of our videos you will see many similarity's between the 727 and the 904. You can use our videos to successfully dismantle and re-assemble the 904 as 90 % of process is the same. the differences are : The pump is assembled differently, and depending what year your 904 is it will have extra or less washers in the trans. that is something you will need to look at closely when dismantling your transmission.
Nomenclature
-
The 904 was originally called the Torqueflite 6 and the 727 was the Torqueflite 8. These designations were changed in '64 when the 904 was adapted for use in the new 273 V8 and was no longer a 6 cylinder only unit.
-
-
-
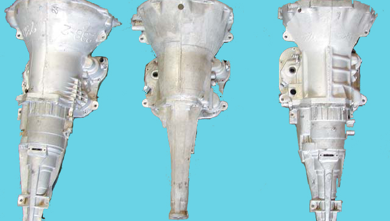
727 Transmission
-
Pan shape and transmission size will tell you. A 727 will have a bump out on the pan.
-
Rob Robinson
-
904 Transmission
-
Pan shape and transmission size will tell you. A 904 has more of a square pan. The 904 is great for street application since it takes less power to spin the mass and it has a lower 1st gear than the 727.
-
Rob Robinson
-
-
-
-
The build sheet specifies 072 for trans.
-
Jim Conner - ’68 Cuda
-
-
Take a look at this link and look at the pan gasket shown in the thread. Laying on your back under your car, you should be able to spot the difference. http://www.forbbodiesonly.com/moparforum/showthread.php?17287-Your-Guide-to-the-727-904-transmission
-
-
Transmission Identification Number
-
It is important to know the history of the car to ensure original equipment. Cast date codes are also found on all transmissions on the passenger’s side of the block.
‘66 - ’67 Vin Stamps
-
On the ‘66 and ‘67 A-Bodies you don’t find VIN stamps on transmissions; only cast numbers and date codes.
’68 Vin Stamps
-
On ‘68 cars the SO number is stamped on the passenger-side pad of the transmission. The engine and tranny numbers need to match because the same stamp was used on both.
’69 Vin Stamps
-
After January ‘69 and through 1970 cars, the partial VIN of the car is stamped on the passenger-side pad of the transmission. The passenger side carries with it (if its ‘69 model year only) the complete VIN of the vehicle.
-
-
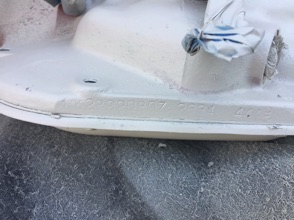
Transmission I.D. numbers are stamped on the left hand side of the case flange next to the oil pan. The identification number’s on a transmission has a set of numbers starting with “PK” on the driver’s side of the transmission above the tranny pan but below the shifter levers.
-
-
Engine and tranny numbers match because they were stamped at the same time with the same stamping mechanism. You can compare these numbers by taking a piece of paper and a pencil and rubbing the pencil over the paper while it is placed on top of the stamped number.
’70 Vin Stamps
-
1970 and above have the year, place of manufacturer, and serial number of the vehicle it was made for. The partial VIN of the car is stamped on the passenger-side pad of the transmission.
-
-
-
-
-
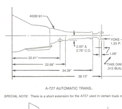
My Specific Tranny Numbers - A904 3-Speed Auto Trans.
-
Part Build Info
-
transmission part number#28920807
-
build date#2684 Dec.‘69
-
build date#2634 Oct. ‘69
-
sequence number#4449
-
-
Main Case Info
-
casting number#2392764-5
-
casting date Jan 29-Feb 4 ?
-
-
This particular transmission part number (#28920807) was used for:
-
’69 Barracuda 8-318
-
’69 Dart 8-318
-
’69 Dodge 8-318 Std. Duty
-
’69 Plymouth 8-318 Std. Duty
-
’69 Valiant 8-318
-
-
-
Mopar Transmission Bellhousing Casting Numbers 1960-1981
-
Casting Number TYPE YearEngine CID MATERIAL
-
-
2780900 9-1/2" clutch 1967-1968 A-body 273 318 Cast Iron
-
-
2780902 9-1/2" clutch 1967-1968 A-body 273 318 Cast Iron
Transmission Color Stamp
-
Color stamp on a transmission are the last 3 numbers of the transmission part number (i.e. 677). They are usually blue in color.
-
Transmission Front Pump
The A904 had more than one style front pump.
Transmission Troubleshooting
A904 Tranny Leak: Common Causes
Trans fluid is about the thinnest fluid around, and can weep from even the smallest cracks.
How to Diagnose
Spray the case down with brake cleaner and wipe it clean. Go for a quick drive and look again. Where it's freshly wet should give you an indication where it's leaking.
Front
The Problem
-
The leak is comes from the front next to bell housing.
-
It happens while it's just sitting in the driveway.
The Cause
-
1. over filled
-
Drain back is what happens when the TC is full and the oil is seeking level by draining back through the
-
hollow reaction shaft. (where the oil came from by way of a port/passage from the valve body.
-
-
2. running REALLY hot
-
3. front shift shaft seal
-
Almost every auto has had a leaking shift shaft seal. When installing the seal, sometimes you can knock
-
the spring out from behind them if you are not careful. Just because you have a new front pump input
-
seal does not eliminate it as the source of the leak. That seal has a tough job to do if the trans. to crank
-
alignment is not so good. It also can be easily damaged at installation of the TC.
-
4. pump perimeter o-ring
-
5. pump housing
-
The pump housing may have split a crack.
-
6. torque converter
-
You have a leak that comes from a seal that is an -external seal- (independent of whether the TC holds
-
it's oil or not) such as those already mentioned like the front pump seals.
Bottom
The Cause
-
1. Trans pan gasket
-
Pans leak quite often from people over tightening them and warping the edge.
-
2. oil dipstick tube o-ring
-
3. shift lever shaft seal(where valve body goes up through the case)
-
4. speedometer gear housing o-ring
Rear
The Cause
-
1. snap ring access cover gasket on tailshaft
-
2. tailshaft to case gasket
-
3. tailshaft seal
-
Transmission Rebuild
-
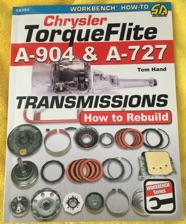
The Torqueflite is an easy to rebuild. Buy a manual from Automatic Transmission Service Group (ATSG). They are inexpensive, and will guide you in a step by step , way. You will need a few special tools ( not that expensive, and will work on other transmissions too). The clutch spring compressor, is the most expensive one, but should available under a $100, new. A used one should be even less expensive. This is also a good time to install a shift kit from Trans-Go or B & M.
-
Francisco Javier Rodriguez Morales
-
-
Here is another manual that is available:
-
-
-
-
Here is a Youtube video that is available: https://www.youtube.com/watch?v=Q0unc7PxTLg
-
-
Transmission Rebuild Procedure
-
Remove the extension housing from the tranny case, and start removing gears/stop rings/snap rings, etc from the main shaft.
-
Remove all the 3rd and 4th gear stuff from the shaft, and then remove the shaft from the extension housing.
-
If you remove any of the 1st/2nd gear stuff from the shaft, that would require removing the rear bearings. If it looks great, do not mess with it.
-
Remove the front bearing retainer, degrease, and paint it.
-
Also start scraping away the remnants of the various gaskets.
-
Replace any parts, gaskets and seals as necessary.
-
-
Buy a gasket scraper, and proceeded to clean all the gasket remnants off all the transmission pieces. Derust/degrease and put a coat of POR15 on the side cover.
-
-
7. Reassemble the 1st/2nd portion of the main shaft.
-
8. While doing that, swap the 3/4 stop rings with the 1/2 stop rings. The reason is that the 1/2 stop rings take a worse beating, so swapping them should even out the wear.
-
9. Install the new rear baring with a length of 1.5" PVC pipe. Run that over the shaft, and drive the bearing into place. Or take it to the shop.
-
10. Re-install the bearing retainer, with a new gasket.
-
-
Follow the instructions in the FactoryServiceManual to put the tranny back together. If it isn’t bolted to a stand, another pair of hands will be needed.
-
-
11. First, slide the main shaft into the extension housing. Seating the retaining ring in the housing is not difficult.
-
12. Now mate the extension housing to the case. This is a little more difficult, as space in the case is limited, and getting all the gears to mesh properly with the counter shaft takes a little wiggling.
-
13. In the end, set the case on its end (input shaft pointing at the floor), and lower the shaft into it. After a little jostling, the extension was seated against the case.
-
14. Now derust the bolts that hold it in place, and torque it down.
-
15. Also derust/degrease the speedometer parts and install them.
-
16.Now "shift" the tranny into every gear to make sure you assembled everything correctly. Accomplish that by sliding the clutch sleeves by hand.
-
-
Use the wire wheel to clean up the bolts that hold the shift plate to the case. Also clean up the shift levers and the nuts/washers that retain them. Pour a quart of 20W-50 into the case to check for leaks. Tilt the case this way and that, to check each gasket. If you tilt it backwards, oil will come pouring out of the rear seal. The inner portion of the rear seal is for the drive shaft, not the main shaft. So, unless the drive shaft is inserted, oil will pour out the rear of the extension housing.
-
-
Replace the O-rings on the shift shafts, and reassemble the shift plate. Grease up the new gasket, and position the plate on the case. Follow the Factory Service Manual instructions, by positioning the shift place so that there is a small drag between the reverse and 1st/2nd cams, and then tightened everything down and the tranny is now completely reassembled!
-
Jeff Ramin - ’67 Coupe
-
-
Transmission Shift Kit
-
There are 3 different stages. 1, 2 or 3 for the shift kit.
-
-
What is stage 1, 2, 3?
-
This is how Jeg's describes them. It refers to the B&M shift kits, but it's about the same for Transgo
-
-
Stage 1 - Heavy Duty:
-
Firm, positive shifts without loss of passenger comfort for improved performance in all street vehicles. Recommended for normal passenger vehicles and tow vehicles. It's just for a little firmer shift.
-
-
Stage 2 - Street/Strip:
-
Provides positive shifts for high performance street use or competitive events. This configuration is for the enthusiast who wants hard, fast shifts.
-
-
I prefer stage 2. I have squealed the tires in my ‘67 Cuda into third with a stage 2 kit.
-
John Paasch - ’67 Barracuda
-
-
Features:
-
Recalibrate your transmission’s shift timing.
-
Select the configuration that best suits your application.
-
Provides well appointed, crisp shifts.
-
Eliminates excessive shift overlap.
-
Less wear and tear on your transmission’s clutches and bands.
-
Jim Conner
-
-
I used a Transgo TF SC kit which wasn't much more than a manual valve and a couple of springs. I did have to slightly drill a couple of holes in the separator plate for better fluid flow. I really doubt that this kit will make much difference. Looking back, I probably would have gone with a stage 2 kit.
-
Jim Conner
-
-
Stage 3 - ?:
-
-
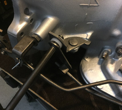
Transmission Shift Levers
-
Generally, a 727 shifter lever is straight and a 904 is offset (though some applications have different length of levers to compensate for vehicle model/engine combinations).
-
727 on top, 904 on bottom:
-
Reference
-
http://search.barnesandnoble.com/Tor.../9781557883995
-
-
http://www.forbbodiesonly.com/moparforum/showthread.php?17287-Your-Guide-to-the-727-904-transmission
-
Mike Jarvie
-
-
Transmission Shift Levers Parts
-
-
-
-
Contact the following shops for linkage parts:
-
Norms Speed Shop
-
http://normsspeedshop.com
-
-
A&A Transmission
-
Rick Allison
-
Camby, In
-
-
-
Transmission Shifter Brackets
-
All shifter brackets on the transmission for a console shift between 727 and 904 are the same. I actually converted my car to console shift while I still have the 318 and 904 installed. Once I put in the 340, I used the newer cable kickdown linkage since there was some differences in a 2-barrel vs. 4-barrel kickdown and used the original shifter brackets for the console. All went in with no clearance problems.
-
Rob McCall - '68 Fastback
-
-
I'll have to deal with the "kickdown linkage" conversion going to the Magnum engine.
-
Jim Conner - ’68 Cuda
-
-
Either way way, the trans tailhousing needs to have the flange with 2 holes on the bottom for the bracket to mount to also. Check your trans to make sure you have the provisions for it otherwise you'll need to find a tailshaft housing also. Most don't have the housing for a floor shifter.
-
Jim Conner - ’68 Cuda
-
Transmission Shifter Parts Restoration
-
Clean up all the shifter parts (degrease, derust, lubricate). Use white lithium grease for lubrication. Clean up the shifting linkage rods; parts associated with the shifter. They will be rusty and the swivels will be rusted in place on both the forward rods.
Shifter Mounting Screws
-
The finish should be Clear zinc & the screws have been found w/& w/o a nylon pallet
-
-
Transmission Shifter Parts Reassembly
-
Get it reassembled and bolt the shifter to the car. Next bolt the shifting levers to the tranny, and then install the linkage rods. Adjust them by getting all levers in neutral positions and get the shifter in neutral, and then set the swivels so that you can insert the rods at each end.
-
Jeff Ramin - ’67 Coupe
-
-
Mopar: A727 904 Trans Shifter Linkage Bushings Grommets Torqueflite 340 440 Hemi
-
Nylon bushing 2781420 goes on support bracket with paw tranny
-
Nylon bushing 2781420 goes on torque shaft support bracket tranny
-
-
Transmission Anti-Rattle Clip
-
transmission anti-rattle clip #1949176 4.1
-
-
Transmission Throttle Body Brackets
-
On the 904, there are three 5.2 throttle body brackets.
-
-
Transmission Kickdown Cable Brackets
-
There a kickdown cable bracket. These attach the kickdown cable from a Magnum throttle body.
-
Jim Conner - ’68 ‘Cuda
-
-
Transmission Linkage Rod
-
This 904 linkage rod links the shifter torque shaft to the transmission control lever. It includes the swivel assembly.
-
-
-
-
-
Transmission Overdrive Gear
-
I know for a 727, that you could potentially get 3 different lengths: standard long tail shaft, short van tail shaft, and super short 4x4 tail shaft. I am planning on running one of them in my 383S car.
-
Nathan Nuttall - ’67 Fastback
-
-
Invoice says 3DFS727A 727 Long flat Sump O/d kit, AC slip. Had to cut driveshaft a very short amount. Only a couple of inches.
-
Kirby Holden - ’68 Conv.
-
-
That is the standard length kit. People say that the short van version #3DFS731A fits into the tunnel a little easier because it places the overdrive closer to the front of the car. Unfortunately, it requires a short tailshaft transmission to go with it. Tom Hunsaker used one of these in his '69 hemi Barracuda but still had to pound out is tunnel a little. But from the description, it sounds like he had to do less pounding than you did. He said, "All I had to do was a slight "bulging" of the tunnel with a ball peen hammer."
-
Nathan Nuttall - ’67 Fastback
-
-
Finished installing the Strange S60 today. Went in very easy. Hardest part was getting the polyurethane bushings to fit right in the rear hanger. Next, car is off to the welder to have the gas tank mounts modified.
-
Ron Evans - ’67 Coupe
-
-
An 8 3/4 would have worked fine (it's a 650 hp engine), but I've always liked the way the Dana’s look.
-
-
Transmission Bearings
Restoring Transmission Bearings
-
Carefully inspect the tranny bearings. Listened to them, inspected them with a flashlight. Look for some pitting on the inner race of the rear bearings, so if worn that dog will need to be replaced. You may struggle with the snap rings that holds the rear bearings on the main shaft for about an hour. You will need snap ring pliers. Measure the snap rings with a micrometer for wear. You won’t be able to get the bearings off the shaft yourself. You'll need to have a shop press them off.
-
-
Have the main shaft rear bearing pressed on at a shop. It is a simple job.
-
Finish reassembling of the main shaft. Next thing to do is clean up the extension housing. The old rear seal may be rusted tight to the housing. Use a hack saw to reveal where the joint between the housing and the seal flange is. Then use a chisel to pry the old seal out of the housing. Next step is to de-rust it. POR15 will stop future rust. Hammer in the replacement rear seal.
-
Paint around the speedometer hole, as that area would be a little difficult to paint once the entire transmission is reassembled. Now bolt everything back together.
-
Jeff Ramin - ’67 Coupe
-
-
Transmission Color
-
The Automatic was unpainted as it came from the factory.
-
-
I painted mine "Bright Silver Metallic" by Krylon. When all is said and done, it dries looking like the stock aluminum finish on the tranny (it doesn't look chrome "bright" or Chrome "metallic"). I guess Dull Aluminum would work too.
-
-
If you are concerned about the paint peeling off, use "Bulldog" etching primer available at your auto paint and body shop supply store. Put on a coat of Bulldog, let it dry, lay down the paint, your set. I used Bulldog on the engine, manifold, tranny, K-Frame and all the front end components. Great stuff. It's not cheap ($24 a spray can) but it works.
-
Steve Toth
-
-
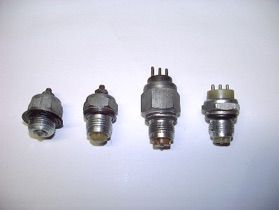
Transmission Neutral Safety Switch Plug
-
The 3 pin switches are for the later model (68 and later) cars and trucks.
-
The 2 outer pins are for the back up lights and the center pin is for the safety switch.
-
There is a cupped rubber covered metal gasket that seals the switch, no O ring. The P/N is 2408123.
-
NEED PART # for: NEUTRAL SAFETY SWITCH HARNESS
-
The four switches used in the TF. The two at right are interchangeable if the proper wire connector is used.
-
-
-
-
They used the same one on 727 and 904 transmissions.
-
http://www.ebay.com/sch/sis.html?_nkw=TRANSMISSION+NEUTRAL+SAFETY+SWITCH+WIRING+PLUG+727+904
-
Transmission Neutral Safety Wire Harness Clip
1960-76 Mopar Neutral Safety Wire Harness Clip
-
Replacement wire harness retaining clips for all 1960-76 models. These clips are used to secure the reverse light/neutral safety wire harness as it passes from the firewall bulk head connector to the transmission switch.
Part # MD7121
-
-
Part number MD7121 is commonly found under the upper left bell housing-to-block mounting bolt of both AT and MT transmission applications.
part # MD7122
-
-
Part # MD7122 is located under either of the upper tail shaft mounting bolts for automatic applications.
Transmission Dipstick
Tranny Dipstick Length
-
The easiest way to replace it is to drain the oil, put the dry dipstick in, then fill the oil up to the recommended amount. Pull the dipstick and mark it with a scribe. I made a couple marks with a dremel. I still use that dipstick.
-
-
Trans, "check idling hot in neutral" is a puzzle. Best solution has to be a matched set, tube and stick.
-
-
A search found that the fluid comes up the tube by about a 1/2" or so, the level being above the pan gasket.
Tranny Dipstick Tube Leak
-
A leak typical of the dipstick tube involves the "O-ring" seal. A run of the mill O-ring replacement does not work very well. Buy new from the Dodge dealer. They are a little thicker than the parts store piece and they work. Make sure the tub isn't cracked where the o-ring goes around it.
-
Michael Mosley
Aftermarket Transmission Dipstick
-
Check out tflite_patty on ebay. They say they will custom make you a dipstick of any length for the 727. They are selling one now here for $35:
-
-
http://www.ebay.com/itm/Torqueflite-727-Fluid-Level-DIPSTICK-use-with-1971-B-Van-Tube-12-1-2-Tall-/221482606231?pt=Vintage_Car_Truck_Parts_Accessories&hash=item3391645e97&vxp=mtr
-
Nathan Nuttall - ’67 FB
-
-
Transmission Tooth Gear
Speedometer Gear
-
The tooth gear on the transmission determines the speed on your car relative to the wheel circumference.
-
Different speedometer gears are used for different rear ends. They are different colors. The one used also depends on rim and tire size. More teeth on the gear slows the speedometer down, less teeth raise the speedometer. Gears with 25 teeth or less require a different speedometer adapter. Look on http://www.moparts.com in their tech section and there is a list of speedo gears and what fits what. It doesn't say in the service manual.
-
Phil Saran
-
-
Check YearOne. If you do a google search on "mopar speedometer gear" and look in images, you can pull up a bunch of different charts.
-
http://www.drivinithome.com/mopar-speedo-gear-chart/
-
Jim Conner
-
-
The teeh gear are no longer available from dealers. Junk Yards are the best place to find these.
-
-
-
For 1957 - 1965 Automatic Transmissions
-
Gear No. No. of Teeth Gear Color
-
2204355 16 teeth - Brown
-
2204356 17 teeth - Orange
-
2204357 18 teeth - PurpleWhite/Tan(HD)
-
2204358 19 teeth - Blue
-
2204359 20 teeth - GreenBlack(HD)
-
2204360 21 teeth - Gray
-
-
-
1966-1989 727 & 904 Automatics Transmissions
-
AXLE RATIO 24" 26" 28" 30"
-
2.76 2538930 2538928 2538926 2538924
-
2.94 2538932 2538930 2538928 2538926
-
3.21 2538935 2538933 2838931 2838929
-
3.55 2538939 2538936 2538933 2538931
-
3.91 2538943 2538940 2538937 2538935
-
4.10 2538945 2538942 2538939 2538936
-
4.30 2538944 2538941 2538938
-
4.56 2538945 2538943 2538940
-
-
Please note: These numbers are for the standard style pinion gear, also last two numbers are the number of teeth, 2538945 = 45 teeth
-
-
Pan Gasket
-
The pan gasket is different. The 727 has a little bulge off one corner that the 904 doesn't have, otherwise the shape is similar. So it's conceivable the 904 is a tad narrower.
-
Max Helm - ’67 Fastback
Distortion
-
Check the pan for warpage and welding distortion using a flat surface. If you don't have access to a machinist's surface plate, go to your local granite countertop shop and get a sink cutout from their scrap bin. The monument shops (usually located near a cemetery) may also have some polished flat scraps. You don't need Starrett pink granite accuracy (flat to +/-0.0001"/ft). I do recommend treating it as a precision measuring tool and making a wood box in which to store it.
-
Ken Mayer
-
Sealing a Pan Gasket
-
Sometime transmission pans are a B*TCH. You might end up having to coat both sides of the gasket with sealer and pray you never have to take it off. I have one of those pans with the tubes running from front to back, supposed to act like a cooler. I've had it off three times trying to stop the very small leaks.
-
-
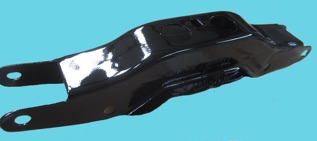
Transmission Support
-
-
-
-
-
Torque Converter
Recommendations
-
I'm starting to shop for a torque converter for my ‘67 Barracuda.
-
-
I'd like to hear what stall speed people are using in similarly setup cars. How do you like 2500 or 3000 stall speed in daily driving? Any headaches or excess slippage for around town or highway driving?
-
-
The car will be a driver and will not see any track time. I want it to run nice in town and on the highway without any issues. The existing converter is a bit stiff and doesn't accelerate quite as well as I would like.
-
-
Unfortunately, none of the torque converter manufacturers show their stall speed curve, just the max HP stall speed. Obviously at the 1500-2000 rpm HP levels, the stall speed will also be much lower. I want to avoid a converter which will be slipping in typical cruising driving. Right now my converter is stock and should be a lock up (need to pull it out to be sure), quick driveway stall test came in around 1800 without getting too crazy. So probably 1800-2000 rpm max stall.
-
-
When I spoke to Turbo Action they were leading me toward a 3000 stall, ATI was leading me toward a 2500 stall, but then realized they only had 3000 stall for my application.
-
The setup is as follows:
-
1969 340 built as a torquey motor with XE268H cam, TTI headers, 9.8:1 true compression, LD340 dual plane, mildly ported X-heads, etc. Simulations show it should be about 420HP at 5500-6000 rpm and about 100 HP at 1500, 150 HP at 2000 and 200 HP at 2500 rpm.
-
-
I have a 1981 A999 trans in the car now, was a lockup converter setup, will remove lockup parts so can use shift kit and replacement converter. Using Turbo Action street performance rebuild kit to freshen it up.
-
-
rear is 3.55 8.75"
-
-
tires are 245-60-15
-
-
Most of the setup is optimized toward good handling with stiffer springs, sway bar, etc. Definitely not a drag car.
-
Todd Rimmer
-
-
With the motor and rear end gears you have I would say stay in the 2000-2500 rpm range on a convertor.
-
Phil Saran
-
-
I have the Turbo Action 10" S800 converter in my fastback. I have the A&A steep gearset in my 727 and 3.55's out back. 255/60's are a hair taller than your 245's. I'm running more cam and the Ed heads in mine.
-
-
The converter is good, but I think it's too much for your combo. It's a little soft at low speeds, but not bad. I had the TCI Street Fighter in there before. That had way too much slip. If I was running 4.10's it might not have been as bad.
-
-
If I were keeping the car an automatic I'd get one of Frank Lupo's 9.5" Dynamic converters. They can fine tune them to just about any combo. I'll probably go with one of them for Erin's Challenger when the stroker motor eventually goes in.
-
-
One thing to remember on your 999 is the input shaft spline count is different than the regular 904. Turbo Action, Lupo, or any of the custom converter folks can make a non-lockup converter to fit your 999 input shaft. Or if you want to keep the lockup (not a bad feature for a cruiser) TCI's Breakaway 141350 for a 999/A500 would be a good fit. It has about 2400-2600 flash stall and the lockup will knock down the highway RPM a little too.
-
-
I'm pretty sure A&A has shift kits that will work with the 999.
-
Rob McCall - '68 Fastback
Torque Converter Bolts
-
There are only 4 torque converter bolts. Coat them with Loctite Blue when you put them back in. Remember, Locktite Blue on those bolts not Locktite RED...... You only have had to turn it 270 degrees to reach all of them.
-
Max Heim - ‘67 Fastback
-
-
Be careful reinstalling as a bolt can hit a connecting rod and will not let the motor turn.
-
Phil Saran
-
-
Tranny Cooler Lines
-
These are pre-bent transmission cooler hard lines. The same ones for 727 work on the 904.
-
Alan
-
Replacement Tranny Cooler Lines
-
If factory lines are being used it will most likely only fit one way as one line is longer than the other. If you are using factory lines they should only connect one way.
-
Aftermarket Replacement Tranny Cooler Lines
-
Fine Lines is the main vendor for those sorts of parts. Any resto supplier can get them.
-
Jim Lusk
Replacement Tranny Cooler Lines installation
-
If factory lines are being used it will most likely only fit one way as one line is longer than the other. If you are using factory lines they should only connect one way. The line coming from the front (pump) of trans goes on the left fitting on the rad cooler, the other line should be longer and have a longer bend where it connects to the cooler, that one goes to the rear fitting on the trans(return line).
-
-
It really makes no difference how you hook it up. All your doing is passing the fluid through it to cool it down.
Replacement Tranny Cooler Flared Compression Fitting
-
It looks sort of like gas fitting. Or maybe a compression fitting. A 3.8 barb fitting goes on the end of it.
-
-
You can pick up one with 90 degrees at Menards in the plumbing section.
-
-
It can be either a 37 or 45 degree flared fitting. Both are common some for refrigeration, some for natural gas or propane. McMaster’s (www.McMaster.com) has a whole variety of them in straight and 90 degree flared or compression style depending on the application.
-
David Martin
-
Tranny Tailshaft Extension Seal
-
The 904 had a dust boot on the tailshaft where the driveshaft fits in.
-
-
I found a seal with a dust boot on Rock Auto.
-
Max Heim - ‘67 Fastback
-
-
I found a seal with a dust boot on Timken from Autozone.
-
-
When you install it, you can't see the output shaft. That made it very convenient when putting the driveshaft in since it held the yoke up while turning the driveshaft while laying on your back.
-
Jim Conner - ’67 Cuda
-
-
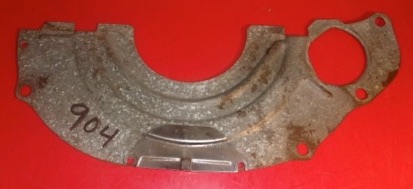
Transmission Shield (Transmission Inspection Plate)
-
-
-
-
Transmission Removal
-
Obviously if removing the transmission you have to remove the drive shaft first. But I'd get a shop manual or a Chilton's for a better "how to."
-
Karl - ‘67 Formula S Fastback
-
Reinstalling the Transmission
-
Get the front of the car up on jack stands, and set the tranny on a crawler. Now use a floor jack to raise the transmission up to the same level as the bell housing. Manually lift the rear of the transmission, and you’ll be able to get the input shaft inserted far enough so that you could get the 6" guide bolts into the bell housing. Once you got a couple of those in place, things go pretty smoothly. It should take about an hour to get the transmission in.
-
-
You have to install the driveshaft in the tranny so that you can get the splines on the input shaft aligned with those on the clutch. Once you do that however, it slides into place. Replace the guide bolts with the actual bolts one by one, and then use the floor jack to lift the rear of the tranny high enough so that you can bolt the support in place. That’s pretty much it.
-
Jeff Ramin - ’67 Coupe
-
-
Tranny Stand
-
Don't let it rest on the pan on the floor. Put it on a Harbor Freight dolly (the larger one). Use a 2x4 across it under the mount. It will be somewhat mobile if you scrub it down, and will keep it out of the way of everything in your shop.
-
Ron Evans - ’67 Coupe
-
-
Use an engine stand for it will bolt right up. But it’s not good to work on.
-
Ridge
-
-
I used a furniture dolly. Might want to bolt a 1x2 across the face of the torque converter and a spacer to keep the converter from sliding off the pump.
-
Michael Mosley - ’68 Coupe
-
-
The pan is fine, I used the smaller Harbor Freight dolly, with a 727 on it.
-
Alan
-
-
The width of the tranny pan compares to the engine oil pan is:
-
727 pan width in front is about 12 inches. Oil pan is about 8 inches.
-
-
Tranny Swap
-
Big block and small block can't interchange transmissions, (i.e. A ‘68 trans will not bolt up to the ‘67 big block, or to put it another way, a B/Rb 727 and A 727 don't interchange.)
-
Robert Wiffen - ’67 Fastback
-
-
Trans Repair Shops
-
Looking for a good but reasonable place who can fix a 727 transmission leak without rebuilding the whole thing or a lot of guessing and blindly replacing parts.
-
-
Call Action Auto in Cypress and ask for Bret, tell him that I recommended you and that you would like to have Raj work on the car. They aren't that cheap but they do stand by their work. I have used them for years, they are located on the corner of Walker and Lincoln Ave. And make sure you tell them what you want before handing them the keys.
-
(714) 826-1880
-
Mike
-
-
Transmission Specialists in Santa Ana are terrible. Biggest mistake ever.
-
Ed
-
-
Transmission Fluid
-
What are you going to use the car for most of the time? Cruising? Street racing? Or just "exuberantly" punching it between the lights?
-
-
If it's going to be a cruising street machine, I would try the ATF+4 first and see if you like how the shift feels once the shift kit is installed. If it feels good and solid - done. If you think you want an even more solid shift after you try the ATF4+, or are just curious, try a fill with good quality Type F. After that if you don't like it or the shift is too hard with the type F, go back to ATF4+.
-
Steve Toth
-
-
Craig at Coan says that in a band apply transmission, such as a torqueflight, you need to use a good Type F or FA oil. He cautioned me on what kind of Type F to buy. He insists on finding a "name brand oil company oil" such as Shell, Castrol, Penzoil, Chevron, etc.. and to check the label regarding what specs it meets. It should say "meets and exceeds" the specs for type F or FA. He made it a point to tell me more than once to not buy napa/orielly's/autozone generic ATF.
-
Josh Walton
-
-
The guys at Coan know their stuff; but FWIW I put a reverse pattern Trans Go shift kit with increased pressure settings and standard Dexron ATF in the race car when I had the Torqueflite rebuilt and it hammered each gear.
-
Steve Toth
-
-
For a stock or close to stock rebuilds use Kendall Classic ATF:
-
http://www.phillips66lubricants.com/documents/Kendall/power_transmission_fluid/Ken%20Classic%20ATF%20TDSw%20778847.pdf
-
-
For ones that will be seeing some hot lapping at the track use Kendall
-
Versatrans. It's a synthetic blend:
-
http://www.phillips66lubricants.com/documents/Kendall/power_transmission_fluid/Ken%20VersaTrans%20ATF%20TDSw%20778632.pdf
-
Rob McCall - '68 FB & '67 Conv.
-
-
ATF+4, when I get to that point with my '68 I'm going to run Royal Purple ATF. It's salty on the price but worth it to me. Redline makes a good fluid also.
-
Adam Guzicki
-
-
Transmission Additive
-
Transmission fluid is close to 30 weight. Use straight 30 weight non-detergent motor oil. One quart of this oil is all that is necessary. Use 1 quart of this oil with the remainder being transmission fluid. Must be non-detergent so that it will not foam inside of the trans. What this oil will do is lubricate the parts inside of the trans. And before anyone ask Yes I have done this with automatic trans with no problems.
-
-
I read the same thing about mixing motor oil wit ATF for racing applications.
-
-
Transmission Troubleshooting
Transmission Issue - Delay
-
The torqueflite transmission is odd though. When you put it in gear, it sits and does nothing for 30-60 seconds until it suddenly engages. Then it works fine. Any idea what would cause that?
-
-
Your tranny is acting normal, although I would say the 30-60 seconds is a tad long. I don't think I experience more than a 10 second delay at the very most, more like a 5 second delay. I usually start the car than shift it into neutral in order to get the converter charged. Below is a similar statement from an article in ALLPAR (by the way, great article on the 904/727 trannies).
-
-
http://www.allpar.com/mopar/transmissions/torqueflite-tom-hand.html
-
-
Sometimes Chrysler owners complain of delayed motion of the vehicle after dropping it in gear from park. This is due to the converter not being fully charged in park. The best remedy for this is to start the vehicle in park and then immediately shift to neutral. This will fill the converter which gives a quicker vehicle response.
-
Tim Moller
-
Transmission Issue - Low Pressure
-
Low pressure in an auto trans will lead to unnecessary clutch slippage and premature transmission failure. You can adjust pressure on a tranny by an adjustment on the tranny.
-
-
Clutch
Clutch Linkage
-
Parts go from clutch pedal to clutch fork.
Clutch Adjustment
-
Adjust the clutch pedal free play, with the help of someone.
Aftermarket Clutch Parts
-
Jack's Auto Parts came up as a good source for clutch parts. YearOne has some items, but they are pretty expensive.
-
-
Classic Industries carries them:
-
http://www.classicindustries.com/mopar/parts/transmission/clutches-parts/push-rod-parts/
-
-
I've bought them from Brewer's:
-
http://www.brewersperformance.com/
-
Ron Evans - ‘67 Coupe
-
-
Passon Performance
-
http://www.passonperformance.com
-
Michael Mosley - ’68 Coupe