
-
Then you sand the primer and be sure to do it between 24 to 48 hrs after spraying. Before 24 hrs, the primer is not cured, too soft. After 48 hrs, the primer is way to hard to sand. After everything is completed, scuff the paint with Scotchbrite pads and wash the car. Reprime with two coats. Next is to mix more epoxy primer and reduce it to make a sealer coat. Two coats of that. Then spray a basecoat once the primer/sealer flashes. Let that flash, then sprays another basecoat. If that coat does not hide properly, then spray a third basecoat. After that flashes, start with the clearcoat. By spraying before each stage dries, the stages bond together better and you won't have peeling. You are wasting your time not using a sealer stage. Without it you will have peeling or bubbles.
-
Jim Conner - ’68
Zinc Chromate Etch Primer
-
You are smart to get it primered quickly. I've seen body parts that were blasted and left in a garage that were covered with rust in only a couple of months.
-
Nathan Nuttall - ‘67 Fastback
-
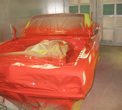
The car should get Zinc Chromate etch primer (same as what you would see inside old aircraft). Here is mine after Zinc Chromate etch primer:
-
http://www.forabodiesonly.com/mopar/showpost.php?p=1970200079&postcount=137
-
Michael Mosley - ’68 Cuda
-
-
The red primer in an epoxy based primer that seals the metal to prevent moisture from getting beneath it. It also has rust inhibitors in it, so you could paint it over rust if you wish, but I don''t trust it. So I sanded all of the surface rust off first (not shown) and then sprayed a rust converter on top of that to be safe. After that, it got sprayed with the red primer. People with experience doing body work will tell you that the hardest part of any repair is the filler/finish work - getting it straight afterward. So it is best to get it as straight as possible before you apply any filler. Makes for a better job with less filler, and makes the filler step a lot easier.
-
Nathan Nuthall - ’67
-
Flat Clear 2nd Primer Coat
-
Add the second coat, the topcoat with flat clear. Do it…
-
Clair Davis
Primer PPG direct to metal product
-
The latest in PPG primer products, it goes over metal, filler, etc in one shot. It is very thick. 4 coats and let it dry 4-7 days. Then you do the body work.
Pre-Paint Surface Prep
-
For the pre-paint surface prep I use Bull Dog - it's a clear surface prep adhesive primer available at auto body supply stores. The paint needs to stick to the metal especially in the hood inserts so I used the adhesive primer. (BTW it also is tremendous on engine blocks, drive train pieces, suspension pieces, et al. - I don't like to have paint pealing off over time so I used the Bull Dog)
Pre-Paint Final Inspection
-
Make sure the "feature" line that runs across the lower part of the doors continues onto the quarter panel for about 6 inches or so.
-
-
Look at the reflection of the fluorescent ceiling lights on the car to pick up imperfections in the metal surfaces. Get them to orient the car parallel to the lights. You should not see any waves or other imperfections.
-
-
Look at the gaps to see if they are about even, 1) where the hood, door and fender come together at the sides of the cowl, 2) doors, 3) hood, 4) rear deck lid
-
-
Look at the gaps between the front of the rear tires and front of the rear wheel opening, should be about the same. Stick your fingers between tire and opening.
-
-
Measure the wheel opening heights, at the center of the wheels. On a professional build like yours, they should be within 1/8" side to side, assuming the torsion bars have been adjusted.
-
-
Check door, hood, and rear deck lid closure (should be easy, and not bind), and check fitment around perimeters of those (should be even with surrounding surfaces).
-
Ron Evans - ’67 Conv.
-
IF you have any filler, use a small inspection flashlight held nearly parallel to the surface. You'll see pinholes that will otherwise be missed. I learned that on my own, and it has saved me lots of do-over late in the process. Your body man does not want that mistake either, and pinholes are very easy to miss. Much easier and cheaper to correct in primer.
-
Michael Mann
-
There should be no Orange pill left and primer at all. Our window molding sits below the edge of the body. Most body shops miss the finish work there because they think the mold and sit flush
-
Matt Brooks
Painting
-
One of the biggest expenses we incur while fixing up our cars is the paint job. About the only thing that is consistent is that everybody says to use the same system. If you start with PPG, then use all PPG products. Or DuPont, or Nason, or whatever.
5 Stages of Painting & Prep
Stage 1 - Spray Paint Color
Stage 2 - Spray Clear Coat
-
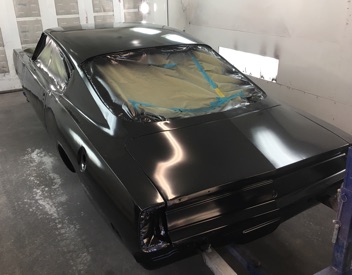
People put a thick high gloss layer of clear coat with UV protection. This is modern base coat / clear coat paint and painting process. You spray the base, then after it is flash dries, you spray the clear. If the base covers well you can do the base in one relatively thin coat. These new Polyurethane paints almost always dry to an orange peal texture and where the clear is a little heavy it sags easily. Now on a production or typical body shop paint job this is the point where you are done. Under close inspection you can see the texture and mine did have one sag.
Stage 3 - Sun Dry
-
Push the car out of the garage so the sun could shine on it and that will help the paint cure.
Stage 4 - Wet Sand
-
For a show level finish you literally scrape the sags with a razor blade, then sand down the clear flat with 600 grit, then some go to 1000 or as high as 1500 grit with sand paper.
Stage 5 - Buff
-
Then you break out the buffer and polish it to a high gloss. When you are done the result is a mirror perfect surface. After buffing there is no waxing and you have to be very careful not to scratch the paint for about the first month. After a month the solvents are mostly dried out and you can go ahead and wax it.
Stage 6 - Wax
-
The wax helps protect the clear from scratches. If you drive a car like this daily you should wash it almost weekly with a clean mitt and dry with a microfiber towel. Once waxed you do not want to use dish soap or other degreasing type because it will remove the wax. You need to use a car wash type soap.
-
Michael Mosley - ‘68 Coupe
-
Picking the Paint Color
-
Look at color swatches outdoors, and not in direct sunlight. Don’t look at them under shop lights unless your car will live in the shop.
-
Max Heim - ‘67 FB, ’67 Conv.
-
-
See if they can spray on a scrap fender instead of a spray card.
-
-
Your underlay will determine the shade of the color, along with other things a painter above my paygrade can do. You can't beat PPG.
-
Michael Mann
-
-
Made sure that the paint color is from the same year as the car. If you look at the B-5 Blue it varies from year to year. Over the years I have had three cars that were B-5 and each one is slightly different. 1960, 1967 and now 1968. But at the same time all three were the old types of paint not the water based paints.
-
Mike Jarvie
-
-
-
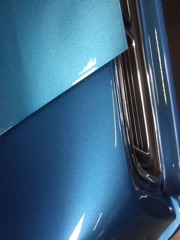
PPG '71 B5 blue is on left, '69 B5 blue on right. What a difference!
-
Angel Garrido - '69 FB
-
Color is subjective and following a formula from 1969 with paint materials from 2018 may not look anything like the factory paint book chip. It's up to the customer to make the call on which precise shade of blue he wants, and how much metallic powder, etc. Look over the big picture, not every little flyspeck.
-
Max Heim - ’67 Conv.
Painting
-
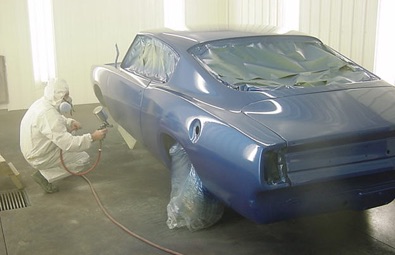
The place that painted my car uses the PPG Deltron Metallic base coat / clear coat paint system. For PPG Deltron 2000 DBC you use 2-3 light coats of the base paint with a minimum 10 minutes flash time between coats. This paint is very thin and has a very dull sheen.
-
Michael Heim - ‘68 Coupe
Clear Coat
-
The DCU 2002 is what a lot of paint shops use to go with the 2000 DBC base coat. The clear provides a very tough polyurethane covering and the gloss comes from the clear coat. The smoother the top finish of the clear coat the glossier it will show. The PPG DCU 2002 clear recommends 2 wet coats and has a flash time of 10-15 minutes. I'm not sure exactly which clear they used on my car, I know they used a pricey high UV resistant version on the outside of the car.
-
-
They used a cheaper variant without as much UV for the inside, engine compartment and the bottom side of the car. From the firewall pinch seam back and between the rocker pinch seams the bottom of the car, the wheel tubs and the inside of the front fenders are painted with a tintable truck bed liner material.
-
-
All the dry times, flash time between coats, gun settings and such are included in the data sheets on PPG's website.
-
Michael Heim - ‘68 Coupe
Grille Paint
-
Spray paint the grille surround with a color called silver argent. It can be ordered from a Chrysler dealer in spray can form.
-
Mike Jarvie
-
Spray paint the grille egg crate with Trim Black.
Behind the Grille Paint
-
The area behind the grill, by the factory, was blackened out any color that was light. If you don't black it out, you will see the metal structure through the grill and it will look odd. When blacked out, It gives depth to the grills and brightwork. And it hides all the funny metal work and wires.
-
Nathan Nutthal
-
-
Usually the body color was the paint behind the grilles from the factory. Light color cars got a flat black treatment on the radiator support and headlight bezels to keep the color from shining through the grilles. Some people paint the body color behind the grilles black for more contrast to bring out the details of the grilles. Of course do this prior to installing the headlights and grille.
-
Rob Robinson
-
-
It is correct that the factory blacked out that area, so no body color would show through the grille. If you are doing a factory correct resto, then a washed out flat black is correct, however, you can go either way. I personally, do factory correct restoration, so it would get blacked out.
-
Matt Gause
How the Factory Painted Behind the Grille
-
It was shot on there from below with an air gun on the assembly line.
How to Paint Body Color Behind Grille
-
Spray the front of the radiator support flat black. Not neatly, just loosely, just the parts that show through the grill.That's the way the factory did it. They skipped this step on some of the darker colors.
-
Max Heim - ’67 Fastback
-
-
You can buy paint at the NAPA store. Get the flattener in a quart can and mix it with the regular paint at the correct ratio to get a semi-flat finish. (More flattener=flatter finish). Then just spray it like regular paint.
-
Catfish.
-
-
Baking soda will flatten / take the gloss out.
-
Leanna ~ The CudaChick
Area in Front of Radiator
-
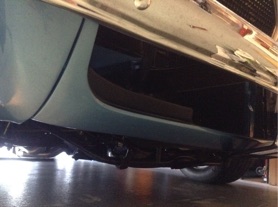
My car is GG1 (Dark Green), everything is painted body color. My understanding is that on light colored cars the area next to the headlight buckets and the radiator support that can be seen through the grill was sprayed flat black quickly with a hand held spray gun after the rest of the car was painted. No masking, prep, or anything fancy .
-
-
Here is a pair of pictures, both 1968, one from a junkyard car I am certain had the original paint. Notice the brace that runs down from the latch is painted on the front, the piece around the latch is not. Paint is only on the forward facing areas. Paint is also on the lower portion below the radiator and around the corners a few inches under the bumper brackets. It is pretty obvious from what I have seen that the bumpers, grills, and latch were not installed. The yellow car I am pretty sure the black around and behind the headlight bucket is original, but the yellow paint is not, so the yellow may go a little farther than it used to.
-
-
The top facing piece around the latch on the '68 Dart pieces I have is painted, but on a Dart that area can be seen through the grill, so I can understand why it is different.
-
Michael Mosley - ’68 Cuda
-
-
The area in front of the radiator support is supposed to be flat black. But the "tray" area where the big spring sits supposed to be body color with everything flat black underneath it or is the tray supposed to be flat black also?
-
Steve “Catfish” Parker - ‘67 Conv.
Radiator Support Area
-
The factory wouldn't have sprayed the back of the rad support black.
-
I actually got a good shot of the original black spray when I disassembled my car for paint when we got it in 1985. It was a white car, so it is quite obvious the pattern. When we changed color to the burgundy, I went back and reshot it with the black because I think it just looked better behind the grills.
-
Ron Evans - ‘67 Coupe, ’67 Conv.
Behind the Valence Paint
-
Another thing to note is on the lower valance. There are 2 insets, both should be painted black as well. All together it gives the look they were after. Many don't know it's supposed to be painted or just forget.
-
Dana Price
-
Note that the "tabs" on the lower valance are also painted black on light color cars. I also reshot those to give that valance a more smooth feel.
-
Ron Evans - ‘67 Coupe, ’67 Conv.
Painting Engine & Trunk Compartment
Original Factory Colors
-
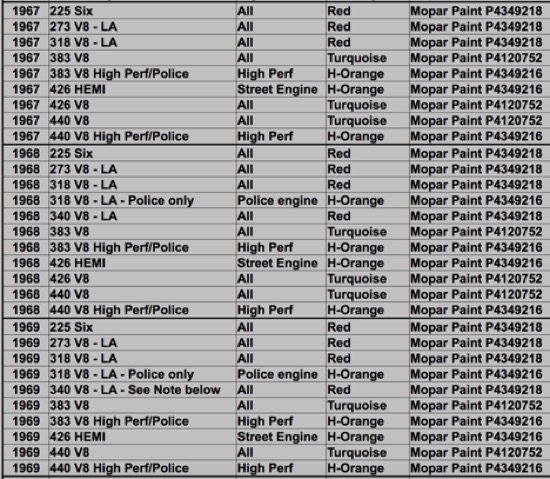
The original 273 in ’68 & ’69 was blue.
-
The original 318 in ‘68 was red.
-
The original 318 in ’69 was red.
-
The original 318 in ’70 was blue.
-
My car has been repainted the original factory color. They used a light color primer for the repaint. I bought Martin Senour single-stage paint from NAPA to do the engine compartment and trunk and they are ridiculously expensive on everything! Do I use Martin Senour primer or a primer designed for single stage paint?
-
Jim Conner - ’68 Cuda
Painting Trunk Trim
-
Depending on the year of the car, spray paint the rear trunk trim with a color called silver argent. It can be ordered from a Chrysler dealer in spray can form.
-
Mike Jarvie
Door and Trunk Area
-
Now I know the tray stays body color and everything around and under it gets shot with flat black. I'll try just giving it a freehand shot of black and see how it works for a 'factory' look. If I'm not happy with the results I can always go back and mask it off and do it a little better. I did notice the small flat black areas on the lower valance on mine and made note of that so I can put it back correctly. Still replacing some (more) metal but getting primer to the 220 sanding stage on everything from the door frames to the back. Replaced the lower rear quarters, trunk wings and rear valance already. Found a small rust spot in front of the right rear wheel well last week so I had to cut that out and make a patch for it. Working my way to the front slowly but surely. Got the undersides of the trunk lid and the hood shot with finish white already, and primer on the tops. They were both in pretty decent shape, no rust at least. Repaired the lower rear corners of both front fenders including fabricating new inner braces, and working on the front corners, both of which are dented. Also rebuilding tops of the splash shields and fabricating front fender braces since mine didn't have any when I got it.
-
Steve “Catfish” Parker - ‘67 Conv.
-
-
When I paint the body, I'll use matching primer and paint, such as PPG or Sherwin-Williams. I'll have a professional to do that.
-
Jim Conner - ’68 Cuda
Floor Pan Area
-
I was going to paint the floor pan with the NAPA paint, but switched over to a generic enamel. I think it was a quart of regal red from Ace hardware. It went on fine, as usual, but I'm used to spraying with it. I also thinned with naptha and used the acrylic hardener.
-
Jim Conner - ’68 Cuda
Misc. Areas
-
I was thinking about epoxy paint to paint the corrosion repaired zones and steel wheels.
-
Ricardo Esperon Graham
Clear Coat Sanding “Wet Sanding”
-
I took a deal where the clear coat was not entirely wet-sanded and buffed for a cheaper price (under $2k). So now that I have the car back, I need to know the proper technique to do this.
-
-
I figured out the basics reading a Car Craft Best of the Best Project Cars magazine dated winter 2013 when they painted a ‘67 AMC Rouge: wet-sand using 2000 grit or finer wet-sanding sandpaper, use sanding block whenever possible, watch out for edges so one does not overdo it, etc.
-
-
In addition, the trunk-lid is fiberglass (hood is fiberglass also but I left it in flat black, car painted with stock hood installed). Is the technique for wet-sanding and buffing the same or is there something different in dealing with fiberglass?
-
-
Note: pictures are attached, go to this link:
-
Shane Toomay - ‘68 Fastback, 318 auto (cruiser)
-
-
You'll never get anywhere if you start with 2000. I started with 800 (some start with 600) but you better know how much clear you put down, I'd say 3 coats.
-
-
They make different pads but all I used was a flexible pad that was about 3/8" thick and just sand away. I did it wet and you feel the difference once you sanded enough it is pretty obvious. move on to 1500 and then 2000, each time you feel the difference. After all that you use a cutting compound with a buffer followed up with a polishing compound.
-
-
I know this is a quick overview but anything more would be difficult to explain.
-
Alan
-
-
You may wish to practice on some scrap sheet metal before hitting the Duster. Especially around edges as you note. Maybe even your body/paint man would be willing to give you a fender, hood, or door with some clear coat on it so you could sand away.
-
-
Another option is to hook up with someone that has done wet sanding and you're comfortable to work with.
-
-
It's not rocket science, but I can tell you from early experience that I over-did the buffing and created what we typically call burn patches. My first red looked like it had clouds of darker red patches.
-
-
Since you didn't do the paint and can't go back and correct any mistakes, you need to be a little careful.
-
Otherwise...go for it big guy. Have fun and when done, sit back and be proud of the work.
-
-
PS: Agree with Alan, you don't want to start with 2000.
-
-
Several good books and video's available these days, but practice is the real deal.
-
-
Tim Moller - ‘69 Cuda Conv.
How to Wet Sand
-
Just started a two year auto body course at a nearby community college. Five hours of shop a day. We've done two cars. All look pretty bad when they come out of the paint booth.
-
-
Our process: wet sand with 1000, then with 1500, then buff, then polish. Because you're using a machine buffer, that will damage the paint quicker than sanding. In all of it, be gentle. Periodically, as you wet sand, wipe with clean wet towels and then dry and examine. Once it has all the imperfections out, and specks of gloss remaining, redo with 1500. Our stuff is "production" - he wants us to be able to work in a normal body shop. Finer sanding is good, but doesn't seem necessary. My flat panel, a dark gray metallic, is beautiful; as good as a new finish. It is not that hard if you have somebody who knows giving a little supervision.
-
-
Stay away from the edges. Don't wet sand where you can't go with a buffer, or you'll have smooth dull paint. Plan each panel as you do it, so you find those areas and remember to avoid them. We have not get discussed any sort of detail hand buffing, but it may be doable.
-
-
Just be gentle; once you reach color, it's a do-over.
-
Michael Mosley - ’68 Cuda
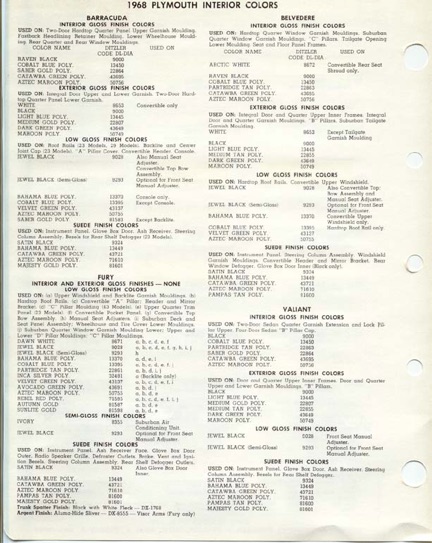
Paint Codes
-
Dodge called them one thing and Plymouth called it another name, same code different name.
-
Plymouth Paint Codes
-
A4 Silver Metallic L1 Sand Pebble Beige
-
B5 Blue Fire Metallic Q5 Seafoam Turquoise Metallic
-
B7 Jamaica Blue Metallic QQ1 Dark red metallic
-
C7 Ice Blue Metallic R4 Performance Red
-
EK2 Vitamin C R6 Scorch Red
EL5 Bahama Yellow T3 Honey Bronze Metallic
EV2 TOR red T5 Bronze Fire Metallic -
F3 Frost Green Metallic T7 Burnished Bronze Metallic
-
F5 Limelight Metallic W1 Alpine White
-
F6 Rallye Green X9 Black Velvet
-
F8 Ivy Green Metallic Y2 Sunfire Yellow
FC7 In-violet Met Y3 Yellow Gold
FJ5 Lime Light Y4 Spanish Gold Metallic
FJ6 Sassy Grass Green Y6 Citron Gold Poly -
FM3 Moulon Rouge 999 Bahama Yellow
FY1 Lemon Twist 999 Orange
GY3 Curious Yellow 999 Rallye Green -
-

-
-
-
Underbody Paint
-
Depends on what you are after. Several people have scraped every ounce of undercoating off with a torch and paint scraper, then applied body color paint shinier than most tops of show cars. Some repainted the visible areas in the wheel wells, behind grilles, and any undercoating that got paint on it back with spray bomb semi-gloss black. Some paint the bare spots with body color and the undercoating semi-gloss black.
-
Rob Robinson
Prep
-
1. Strip with a wire cup wheel on a grinder.
-
2. Scrap undercoating off with a torch and paint scraper.
Undercoating
-
After paint, spray on undercoating. Use International Automotive Co. ValuGard PF undercoating #VG-104. You can shoot it on with a shoots gun. It protects the car from the elements better than other products.
-
-
Before undercoating, mask off everything you don't want undercoat on. It is gooey and very difficult to remove. Be sure to tape off, body and all body holes with light green masking tape.
Painting Small Parts
Clean Up and Prep
-
My method for cleaning small parts is to use a spray can of Gunk, a squirt bottle of water with a bit of Simple Green, brushes, and lots of blue shop towels. This will work on the transmission, starter, trans braces, trans dipstick & tube, kickdown linkage, radiator hoses (new enough to reuse) and clamps, oil filler cap, gravel shield, nuts & bolts.
-
Max Heim - ‘67 Fastback
-
Clean Up Chrome after Painting
-
Dupli-color Specialty Reducer
-
Use Dupli-color Specialty Reducer to remove paint from chrome. It won’t leave a film.
-
Painting Small Parts
-
Come up with a system for hanging parts outside for painting. When painting small parts use 1/8th to 1/4 inch hooks to stabilize the parts. Keep the hooks taped at the top of the rack as this keeps them from swaying during the force of air from the spray gun allowing a smooth paint job. Prep for paint, shoot with primer, and hit a couple of coats of paint.
-
-
The fumes in the garage get pretty strong. Do all my painting outside, and use an air filter when you do. That POR15 stuff is pretty nasty. Use a mask.
-
-
Get some paint on parts that had been media blasted before they start rusting again.
Painting Trim Black
-
$9.25 + 8.25 sh R&E Paint Supply
-
$8.56 autobodytoolmart
Argent Textured Paint
-
Textured Argent wasn't used on the console or the headlight buckets or grille, just the hood inserts.
-
-
I have used from the company below for their Argent textured parts and the tailpanel red on my ‘69. They list a silver for consoles.
-
Eric Valentin - ‘69 B5 408 Fastback
-
Mixing Light Argent Textured Finish
-
From MUSCLECAR REVIEW, JUNE 1991
-
-
Chrysler used two shades of this highly textured Argent paint-light and medium-and they were the only manufacturer that used them at all. The Light Textured Argent, part number DX 8555, is obsolete. The Medium Textured Argent, part number DNA 8933, can sometimes be found at larger, older Ditzler dealers. Last used in the mid 1970's, it is now all but obsolete. Older Ditzler dealers that have remaining stock can mix this paint for you, but it can also be mixed from currently available paints. Here's how.
LIGHT ARGENT TEXTURED
-
Ingredients for 1 pint (double for quart)
-
1/2 ounce DX 204- Radiance Silver
-
1/2 ounce DDL 8568- Non Smudge Aluminum/aluminum base
-
3 1/2 ounces DCA 468 High Performance Clear
-
Add 4 ounces of top grade lacquer thinner with drying time according to temperature. Mix thoroughly and pour in 1 pint touch up gun. Use 10 clean 1/4" ball bearings in paint cup to keep the paint mixed. Use three light coats over an existing finish or four to six coats over unfinished parts. This paint runs VERY easily, allow 5-10 minutes between coats.
MEDIUM ARGENT TEXTURED
-
The steps are exactly as above, but add black lacquer to darken. Start with six drops per pint and stir thoroughly, then spray a sample to compare to the original finish. Add a drop at a time until you achieve the correct tint.
-
-
Spray these paints at 55-60 lbs. keeping the gun 18-30 inches from the surface. Frequently agitate the mixture to maintain uniform consistency because the Radiance Silver is heavy and will settle out quickly.
Cosmoline
-
Most lower control arms were bare steel dipped in cosmolene just short of the ball joint end. Some lowers were dipped in black paint (semi-flat black). When AO Smith (original manufacturer of control arms for Chrysler) had their cosmolene lines occupied with railroad components they also manufactured, they would run the control arms in black dip.
-
Rick Kreuziger
Cosmoline Paint
-
Urethane paint formulated to closely mimic the original cosmoline finish. This is an ideal product for those wanting a durable finish that can be wiped clean and not hold dirt like the real thing. Dries to a satin gloss. Darkness & coloring will vary with number of coats applied and color of control arm. Thin with a urethane reducer, no hardener required. Sold in a half pint can for use with a spray gun. One can will easily do two sets of control arms, depending on application thickness. Can also be used to accentuate the coloring of some cast iron parts. $24
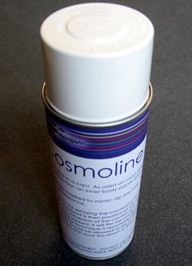
Cosmoline Spray Paint
-
To simulate this dipping, spray this aerosol can of Cosmoline rust inhibitor coating on the lower control arms for protection. It was used on Mopar lower control arms. It is also an excellent corrosion inhibitor for coating inner panels such as door skins. Price: $10.00
-
Mopar Chassis Color Chart
-
I put a copy of a "Mopar Chassis Color Chart" in the files section of the yahoo site in case anyone wants to save it on their own computer. That sheet has proved to be very reliable for my factory-style restorations.
-
Leanna ~ The CudaChick - ’68 Fastback
-
Legend:
-
BC: Body Color
-
GB: Gloss Black
-
SB: Semi-gloss Black
-
CI: Cast Iron Gray
-
N: Natural Steel or Aluminum
-
MP: Manganese Phosphate
-
CC: Color Code
-
CO: Cosmoline
-
(*): Some Mopar core supports are body color with semi-gloss black sprayed on the grill side.
-
There are some variables from what is shown above.
Assembly:Front Unibody subframe assembly BC
Inner Fenders BC
Firewall BC
Core Support BC*
Axle/Suspension Components
Axles N/CC
Third Member SB
Upper Control Arm GB
Lower control Arm GB/CO
Inner and Outer Tie Rods N/CC
Tie Rod Adjustment Sleeve SB
Center Link MP/CC
Idler Arm/Bracket CI/CC
Strut Rods CI/CC
Torsion Bars GB/CI/CC
Shocks SB/CC
Rear End U-Bolts N/CC
Rear Leaf Springs N/SB/CC
Backing Plates GB
Spindles CI/CC
Anti-Sway Bars N/CC
Brake Components:
Brake Drums SB/N
Disk Brake Shields N
Calipers CI
Master Cylinder GB or CI
Exhaust Systems
Muffler Hangers and Clamps N
Exhaust System and Mufflers N
Gas Tank Components
Gas Tank N
Gas Tank Straps N/GB
Gas and Brake Lines N
Steering Components
Pitman Arm CI/CC
Steering Box N/CC
Transmission Components:
Transmission N/CC
Driveshaft N/CC
Transmission and driveshaft Yoke N/CC
Differential Housing SB
Clutch Linkage N
Mopar Engine Paint Colors
-
Below is the correct engine color for Mopar engines from 1960 to 1973. After about 1969 most were Blue except for a few odd balls. The paint numbers are from Mopar Performance.