

General Information
Interior Cargo Area
Interior Cargo Removal Order
-
1. rear seat bracket cover
-
2. rear seat bracket
-
3. rear seat (bottom)
-
4. rear seat (folding)
-
5. cargo floor pan trim (chrome)
-
6. cargo floor pan
-
7. cargo panel trim (chrome)
-
8. rear quarter panel trim (chrome)
-
9. rear quarter panel (upholstery)
-
10. rear pillar trim - 5 screws - 1 short 4 long
-
11. separate dome light cover
-
12. separate dome light socket
-
13. rear pillar cat whisker trim (chrome)
-
14. lower quarter panel bracket piece (insulated) 4 screws
-
15. rear window center panel - 5 screws
-
16. rear window side panel - 2 screws
-
17. cargo side panel (insulated) - 5 screws
-
18. rear window plastic spacers (white) - 7
-
19. rope wind screen
Interior Panels - Front
Interior Panels - Installation
-
After you put in dash you can put in: A-pillar molding, upper windshield reveal molding, side moldings.
Interior Trim Install Order
-
Cargo floor panel.
-
Cargo side panels.
-
Trunk divider panel.
-
Rear glass side trim panels
-
Rear glass center metal panel
-
Rear seat area carpet edge strips
-
A pillar covers
-
Kick panels
-
Door sill plates
-
Headliner side finishing strips
-
Rear seat area lower panels
-
Rear seat area upper panels
-
"L" shaped stainless trim strips on cargo side walls.
-
Rear seat vinyl panels.
-
Rear seat lower cushion.
-
Rear seat upper cushion.
Interior Pillar Molding
-
Interior inside Pillar moldings came either Chrome plated or painted plastic.
-
-
The ‘67 came with chrome A-pillar moldings.
-
The ’68 did not come with chrome A-pillar moldings.
-
The ’69 did not come with chrome A-pillar moldings.
-
-
New safety regulations went into effect in ‘69. That is why the centers of the gauge bezels are blacked out, instead of all chrome like they were on ‘67s. I suspect the pillar moldings fell under the same rules. I seem to recall that the effective date was 1/1/69, in which case it should be based on build date. Mopar may have also put some of these changes into effect in advance of the deadline, for production reasons.
-
Max Heim - ’67 Conv.
-
-
I always thought maybe it had something to do with the trim package. Some verts have belt molding, some don't, and some have deluxe door panels, and some don't.
-
-
My ‘68 did not have belt molding, and it did not have deluxe door panels. My ‘67 has chrome pillar molding, chrome upper inside trim, deluxe door panels, and belt molding.
-
Ron Evans
-
There is no interior trim piece that goes over the headliner on the front windshield. It is just the rubber frame of the windscreen.
Interior Panels - Rear (Cargo)
Interior Panels - Installation
-
There are 4 left/rear panels. Be careful installing as you can put a couple nice scratches on one of them, as sliding them together take a little force. One slip and you've got scratches.
-
-
1. install the panel that holds the courtesy light (some rapping with your
hand and soft hammer helps to get it in place)
2. install the courtesy light
-
3. install the cat whisker piece; ended up using the original one, as it was in excellent shape
-
(a reproduction piece is a little too long and you will have to cut it)
4. install the regulator panel (the vinyl piece)
5. install the window crank
-
-
A couple things need to happen before the final piece (just below the quarter window) gets screwed in place. First the windlace needs to be installed (it goes under that panel). Second the molding that covers the edge of the headliner also needs to go in.
-
Jeff Ramin - ’67 Coupe
Interior Panels - Wheel Well Cargo Panels
-
On deluxe interior cars, they used carpet over the cargo panel. The cargo panel on standard cars had a vinyl textured overlay material glued over it. It is extremely difficult to remove. I would think heat and a scraper, or your local media blaster could remove that surface.
-
Angel Garrido - ’69 FB
-
I covered the side panels in mine in leather. Found leather with a grain close to what is on the panel. Cost for the leather was approx $100.00. Time per panel to install the leather approx 2 to 3 hours.
-
Some passenger side cargo panels had a rear defroster / defogger as an option. (large oval hole)
-
Some people cut holes in the cargo panels and mount rear speakers.
Interior Kick Panels
Kick Panel Restoration
-
Use walnut shells to blast kick panels that are sun baked.
-
After that use scotch write to sand top of panels. You don’t have to push hard to reveal the grain. Then use a cleaner.
-
Follow up with the appropriate dye color.
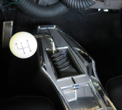
Center Console
-
There is a long bracket that fits the console cover door to the console, on the side. The brackets that go to the floor panel are generally welded in and not everyone takes them out with the console. They are hard to come by. Those you will need to hunt around for.
-
Barry - ’68 Twin vert’s
-
-
There is a cover assembly to put the gear shifter to the tranny.
Aftermarket Center Console
-
You can purchase a console new from AMD.
-
http://www.autometaldirect.com/body-components-floor-console-brackets-c-23_135_333.html
-
Nathan Nutshell - ’67 FB
Center Console Color
-
Depending on the year of your car, the site below will have a chip sheet with the exterior and interior colors with codes.
-
‘67 only has the exterior colors, and ‘68 & ‘69 have both.
-
Eric Valentin - 69’ B5 408 FB
-
-
Here is a link to the Dupont interior colors for ‘67, this includes all divisions.
-
Eric Valentin - 69’ B5 408 FB
-
The sides of my ‘67 console are black with an aluminum center too.
-
Robert Wiffen - ‘67-440 Fastback
-
Mine had the white interior (vinyl) and maroon dash.
-
Jim Conner - ‘68408 FB
Center Console Repro Paint
-
Mine was maroon originally and I painted it back the correct maroon which is the same maroon metallic that I was telling you for the interior. Add a slight bit of flattening agent to give it a fiberglass/plastic low gloss look and you will have it- not as flat as the dash however. More like the plastic of a steering wheel. Look at my interior photos on my website.
-
Rob Robinson - ’68 Fastback
-
-
The paints are available but very expensive, over a hundred dollars a half pint. On the '67 version you don’t have the padded lower section of the dash like on the ‘68. If you are doing it in black then a semi gloss black would look fine. That is the color they sprayed mine in fact that is the color the whole interior was sprayed.
-
Mike Jarvie - ’68 Fastback
-
-
When I did my ‘69 interior I used Lacquer with flex agent where needed. If you paint your own, make sure the surface is clean and primed it doing plastic/vinyl. I also used the Lacquer suede paint (textured for ‘69 dash), and it worked perfect with my airbrush and smaller paint guns. I even painted my headrest, and with the flex agent I have yet to have any problems (5 years now). I got my paint from a local shop that still handled lacquer.
-
Eric Valentin - ‘69 B5 408 FB
-
-
There was a suggestion about using a lighter color on the back such as a silver or gray, it lightens up the whole area under the dash and makes it easier to work on when you're wiring everything up.
-
Leanna ~ The CudaChick
-
-
The center console is done in argent silver I got from Total Auto, I polished the chrome, and gave the side a shot of gloss black.
-
goldenfish ‘67
-
-
Chroming is expensive. You can use a repro paint that is used for silver parts such as headlight bezels, grill shells, and in particular, the top of the console. Disassemble for cleaning and paint. I've only seen black consoles.
-
Jim Conner - ’68 Cuda
-
-
Get the easy release painters tape, pinstriping and Krylon "Dull Aluminum”- (#1403) to paint the black stripe down the middle with some satin black. The pinstriping sounds a lot easier than taping and painting.
-
Jim Conner - ’68 Cuda
-
-
Krylon "Dull Aluminum" (#1403) - available at your local hardware store. My understanding is that Textured Argent wasn't used on the console or the headlight buckets or grille, just the hood inserts.
-
-
I have used from the company below their Argent for the textured parts and the tail panel red on my ‘69. They list a silver for consoles.
-
Eric Valentin - ‘69 B5 408 Fastback
Application:
-
Sand off any surface marring on the console top, mask off the chrome sides of the console top with blue painters tape, use a sharp X-acto knife to trim it to the edge, spray the console top with dull aluminum, pull off the masking tape. Then lay the pinstripe tape into the groove and press down with a paint stirring stick (the groove is slightly narrower than 1/4", so make sure you get the tape centered. That will give you good edge friction as well as adhesive backing adhesion to keep the strip in place. You can cut the pinstripe tape to length using the X-acto knife, and you get so much in a roll for cheap that you can afford to make a mistake or two, or three, or four, etc..
-
-
Tip: when I did the black stripe down the middle of the console I used 1/4" black pinstripe tape, available at your local auto parts store - it's easy and it covers any surface marring in the center groove.
-
Steve Toth
-
-
I just finished the console lid with the dull aluminum. Looks correct as I remember it. The can has www.toolup.com handwritten on the label, so I assume that's where he bought it. Ace hardware has Krylon aluminum - matte finish, but it's not the same.
Wood Dash Console Insert
-
Wood Dash Insert For a wood grain insert, you would have to make a template for the ‘69 ‘Cuda console. You could order the vinyl insert as a pattern and make one.
-
Eric Valentin - ‘69 FB
-
-
Try using a walnut burl veneer or maybe some type of exotic. The only thing is you need to make sure you can stabilize it, then adhere it to the console. Mike K's vert hand-made wood inserts for the dash and console. They were 1/4in thick golden oak and not veneer.
-
Max Heim - ’67 FB
-
-
Performance Car Graphics may be willing to sell you a pattern or something. But they did not have anything digital. They use a steel plate to press/cut their inserts..
-
Console wood grain: http://www.performancecargraphics.com/ Console_Stuff.htm
-
Dash wood grain: http://www.performancecargraphics.com/
-
Dash_Stuff/Woodgrain/A-body_Rallye_Woodgrain.htm
-
Rob Robinson - ’68 FB
Center Console Wiring
-
The console wire is long. It’s made to run from console, up to right side behind kick panel, along the bottom of dash, over to connector that used to plug into column. The harness served two purposes. One is for the bulb for the shifter, the other was for the backup light switch. Plugged in in two places.
-
Rob Robinson - ’68 Fastback
-
Backup light switch is on the column or console through 1968. The dash part of the console harness has the connector for the backup light connector under the column.
-
Jim Lusk - ’67
-
-
Two wires to the backup lights, one wire (red) to the shifter indicator light and ground wire with a ring terminal. The connector for the indicator light is a single wire to the shifter indicator light. It is located in the turn signal/horn connector.
-
Jim Conner - ’68 ‘Cuda
-
-
If you are willing to deviate from stock....You convert to a 3 pin connector and a newer style switch on the transmission, but you also have to change the detent lever "rooster comb" to the correct style. Two outer pins are for the reverse. Inner pin is the neutral safety wire.
-
-
Michael Mosley - ’68
-
Console Lid Bumper
-
The lid on the console rests on some kind of rubber bumper to avoid metal to metal contact. Without it, the lid rattles like heck. If you look inside the box in the front driver-side corner, there is a little ledge with a small hole in it. A small rubber bumper snapped into this hole. It supports that corner at the right height and keep it from rattling.
-
-
The original were small round bumpers that pushed in from the outside & down. I do not know of anyone that makes exact duplicates. The rubber bumpers were shorter than they were wide. They were about 1/8 inch wide and 1/16" tall, and had a hole down the center and were black. Each console had two of them, one down below in front, & one on the ridge in back; which usually got cut off in time with use by the rear of the console door. They do have a tendency to shrink with age/use & break through the hole they were mounted in.
-
Barry - ’68 Conv.
-
Alternative Bumper Solutions
-
I ended up going through the hardware store till i found something that would work i ended up using some king of foam rubber gasket that they use for insulation and sealing around a window that had a sticky side that i used not sure if they originally ever had something for that but it is definitely needed because mine did the same thing.
-
Pat Faley
-
-
I just used some mounting tape (foam). Just be mindful of the thickness on whatever you use. Cut to fit.
-
-
Saw one done with velcro strips cut to fit as well. But the cover bulged (not a good tight close) a bit.
-
-
I used the small stick –on silicone bumpers like you put on cabinet doors. Don’t remember if I had to shave them down a little for a good fit or not. They’ve stayed on good so far.
-
Stephen ‘Catfish’ Parker
-
-
Sorry, the glove box ones are well too big! The 'closest' thing I have found to them is on the new Challenger gas caps that look like 'old style' Barracuda gas caps (or Charger). They are a bit bigger, but very similar. They are what the gas cap door rests on when closed.
-
Barry - ’68 Conv.
-
-
You can buy from Auto Metal Direct.
-
Pedal Assembly
-
Take video so you know how to put it back together.
Disassemble Pedal Assembly
-
Dismantle the pedal assembly with the help of the Factory Service Manual.
Restoring Pedal Assembly
-
Degrease parts that have 45 years of old axle grease on them. Remove any rust on the parts with the wire wheel and sandpaper in some cases. Paint one side of all the pieces and let dry. Finish painting the various pieces of the pedal assembly, and then put it all back together. Put fresh axle grease on the moving parts. Replace the clutch spring. It may take some work as that spring is really stiff.
-
Jeff Ramin - ’67 Coupe
Trim Pieces
-
There are two different trim pieces. The shiny one is all polish aluminum. The dark one is like a dull gray. On the gray one, the rivet for the name has not been distributed and the gray goes under the name.
-
Robin Findlay
-
-
The center rear trim should have a grain structure to the aluminum. I have never seen a gold hue to one before though. The unpainted surfaces are clear anodized, and the painted center is as Alan said, gray. I have seen a couple of NOS taillight centers and they were also gray. Reproduction parts are also gray so there is consensus here.
-
Nathan Nuttall - ‘67 Fastback
-
-
My ‘67 Cuda has a leather sort of pattern imprinted in it and on first appearance looks like it was gold originally.
-
Danny D. Williams
-
-
Yes, it has a pattern etched into the metal. No, it should definitely not to be gold. Gold-colored trim was an aberration introduced in the 1950s, that fortunately went into remission during the 60s and 70s, only to reappear horribly in the 80s and 90s.
-
-
Technically, the color is Argent Silver. Personally, I think the supplier of these trim panels used a slightly darker shade than the Argent Silver used on other pieces like the console top or dash bezel. But it may just be the texture or the way it weathered.
-
Max Heim - ‘67 Fastback
-
-
I've seen some very nice ‘67s with the trunk and taillight centers painted to match the body color. Just depends on personal preference. As Sly Stone said, 'Different strokes for different folks'.
-
Ron Evans - ‘67 Coupe
Rear View Mirror
-
Clean up and installed the rear view mirror. Do not use WD-40 in the socket. It may move too freely after.
-
Jeff Ramin - ’67 Coupe
Trunk Firewall (Non-Fastback Models)
-
Fabricating a trunk firewall. I took the old paper partition and cut a new piece from 1/4" paneling. I installed it today and noticed that it is lacking terribly in coverage of the entire opening. Now I'm thinking of putting a sheet metal partition in instead.
-
Jim Conner - ’68
-
-
Do you have to seal the trunk off from the passenger compartment entirely? If I come down from the ridge behind the speaker holes to the trunk floor I can seal off the trunk area, but I still think that leaves "holes" on the sides where the C-pillars come down to the inner wheel housings. Those passages go straight up into the headliner area. The other issue is how to attach the pieces on the sides. It’s more complicated than I first thought.
-
Michael Mosley - ’68 Coupe
-
-
I don't really have to seal mine off, but since I have insulated almost all of the passenger compartment to reduce heat and noise, I thought I might as well do the rear. I'm concerned that where the paneling fits over the "hooks" that the thickness will interfere with hanging the rear seat back. I'm speaking of the hooks that the seat back slides down onto.
-
-
If I use sheet metal, it can be pop riveted to the two diagonal braces. I was just planning on using HVAC tape along the sides and bottom of the partition.
-
-
In your situation, that may not work. I'm assuming you have to have a complete seal between passenger compartment and trunk. Most likely be easiest to come down from the package tray to the top of the differential hump.
-
Jim Conner - ’68
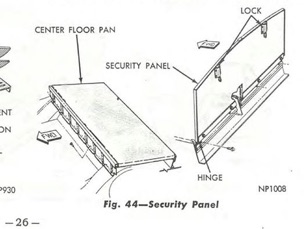
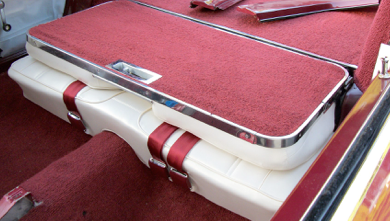
Trunk Security Panel - Wood Divider (Fastback Models Only)
-
In the fastback, there is a wooden board that separates the trunk from the cabin. The panel folds down and separates the interior from the trunk. The divider goes as far as the 2 interior panels that it buts up against. It does not cover up the wheel wells. Some people cut holes in it for speakers.
Divider Restoration
-
Remove the trim and carpeting. Use some wood glue to fix any places where the plywood is cracking. Apply a couple of clamps and let it dry overnight.
-
The board was not naked plywood painted black. It had a definite gritty texture to the paint. Some people might call that "flocking" but it had a hard surface. Flocking is usually kind of fluffy. It was thick enough to completely hide the wood grain. However, it was fairly easily scratched. It was sort of similar to the textured trunk paint you see in GM cars.
-
Max Heim - ’67 Conv.
Divider Replacement
-
You will need a template for this board, (it is a very specific shape).
-
-
You can make a new one board from a piece of 5/8" thick sanded plywood (hardwood is better). You will need the hinge for the bottom and the 1 or 2 latches for the top.
-
Nathan Nuttall - ’67 Fastback
-
-
My trunk divider is now a custom sheet of heavily polyurethaned oak veneer. When you get to the need-that-template stage, it'll be here. Measurements will be somewhat helpful but that top edge has a serious bevel to it that HAS to be there for it to fit your trim pieces right.
-
Leanna ~ The CudaChick
Divider Trim Pieces
-
Derust and paint the metal trim pieces.
-
Jeff Ramin - ’67 Coupe
-
-
The trim goes on the carpet side. They are usually painted body color or carpet color. The trim goes on the carpet side. The little channel slips over the wood and carpet.
Divider Latch
-
Determine if the car had a single center latch or dual latches. Oddly enough, the catch recesses are actually built into the sheet metal, so you can't arbitrarily change from one to the other. If your car was built with the single latch, you are stuck with that configuration. From the 1967 FSM Supplement... interestingly, it shows 2 latches... my ‘67 only has one.
-
Max Helm - ’67 FB, ’67 Conv
-
-
In cars with a trunk light, the light bulb is located where the single latch would close. This means there is a completely different sheet metal stamping for cars with trunk lights and dual latches versus cars with no lights and single latches. But not all cars with dual latches have trunk lights installed. This is true over all 3 years.
-
Max Helm - ’67 FB, ’67 Conv
Trunk Access
When you can't open the trunk
-
If the keys not turning it could be as simple as putting a little graphite in the keyhole. My trunk key stuck like that years ago.
-
Dave
-
-
An option: if the car is driveable to a shop, a skilled locksmith can "impression" a key, make one from scratch with only a correct key blank, a file, and a light hammer, and some use a pair of pliers. It might be worth a fee to avoid damaging anything. Some will also make a house call for more fee of course.
-
Bill & Kathi Parker
-
-
If there is no lock in place, insert a flat blade screwdriver through the lock hole and into the latch slot. A 6" screwdriver works fine. Turn to the right.
-
Bill & Kathi Parker
-
-
You can access it by going through the interior. When the carpet covered plywood trunk divider is closed try this.
-
-
Pass something thin and flat (like a putty knife) through the top of where the latch catches and see if you can get it to release.
-
Rob Robinson - ‘68 FB
-
-
Some trunk panels have 2 latches. It seems to be random by year. So if there isn't a catch in the middle, try to either side.
-
Max Heim
-
-
Unless the panel is in great shape (and maybe even it is) take a hole saw and cut a hole in the plywood.
-
Jim
-
-
Is there a spare tire? Trunk mat? If not, pop the body plug.
-
Jim Lusk
Spare Tire Recess Cover
-
With the original spare in the car, the board didn’t sit completely flat. There were originally horsehair pads on either side of the board that when in place had the original mat sitting closer to flat. The pads were cut to fit the area to the right and to the left of the board to bring the mat to the same height as the board. It must have been glued to the bottom of the trunk mat.
-
Rob Robinson - ’68 Fastback
-
-
The "horsehair" (I think it is jute) was out at the ends of the mat, beyond where the board ends. Traces of it are visibly glued to the bottom of the original mat.
-
Max Heim - ’67 Fastback
-
-
Your spare should fit very nicely into the recess with the cover flush with trunk floor.
-
Dr. Bob Breed - ’67
DIY Spare Tire Recess Cover
-
There seems to be a lot of excess weight to be carrying around. You could cut your hole out of 1" foam sheet and attach your mat to the top of it. You could use stiff foam with a good backing that would easily support what you would want to set onto it.
-
Nathan Nuttall - ‘67 Fastback
-
-
A slab of styrofoam is a good idea, though harder to cut cleanly. You'd still want the masonite panel under the mat, otherwise it would sag or puncture in the middle where it wasn't supported (over the wheel).
-
-
I was actually thinking of cutting "lightening holes" in the plywood (since I'd have the jigsaw out anyway). And really, roughly a quarter-sheet of plywood isn't all that heavy. It does occur to me that it might be a bear to get in and out of the opening (the masonite bends a little when necessary). Fortunately, there would be no reason to remove it once it was in (since the spare could come out the center hole).
-
-
A more carpentry-centric approach would be to construct a perimeter frame (for the masonite) out of 1x1 pine, say, with a few cross pieces for support. Possibly less work, depending on how your shop's set up, and less weight. And you could store a few odds & ends in the spaces under the masonite (rags, flat tool roll, maybe the FSM).
-
-
You need to find a new spare first, so you’ll know how much depth to allow. The critical thing is trying to find the right diameter, so it's as close as possible to the road wheels, but still fits in the hole.
-
Max Heim - ‘67 Fastback
-
-
For years I have used a black carpeted spare wheel cover from a C body or related car over the spare tire. It is not flat, but does flatten out the area around it & looks good when you pick up the floor mat; top & bottom. It is also relatively thin & durable.
-
Barry - ‘68 Conv.
-
I had an original spare in my car but, the board still didn’t sit completely flat. There were originally horsehair pads on either side of the board that when in place had the original mat sitting closer to flat. Now you can’t find a reproduction of those pads anywhere. Only thing I find offered is the trunk mat. You could find some thick foam and cut out some of those pads if needed.
-
Rob Robinson - ‘68 Fastback
-
My biggest issue with the spare is clearing the bracket for the latch - sometimes even a taller tire will fit in the well, but I can't seem to get it in because the bracket prevents it from dropping in there.
-
Steve Toth -
-
-
But the problem isn't that the far outer ends of the mat aren't level with the part over the board -- the problem is that the board bows up in the middle because of the thicker tire, and is unsupported at both ends, meaning it will break if you put a heavy load partly on it (like your toolbox). What you really need to support is the entire board except for the circle that is supported by the tire, and then extend it beyond the board to support the whole mat and create a level floor. You could do it with a rigid foam board, or just some scrap styrofoam packing. 3/4 inch thick would be close enough to be useful, I think, and still would allow the fold-down panel to operate.
-
Max Heim - ’67 Fastback
Seat Belts
Front Shoulder Belts
-
1968 was the first year that federally mandated harnesses were put in cars and small trucks.
-
Mike Jarvie - ’68 Fastback
-
-
The ‘68 and ‘69 had shoulder belts, so the upper point is already there. There was no option, if you bought a '68 or ‘69, you had to have them. The shoulder belt use was optional. You could only use the lap belt if you wanted and leave the shoulder belt off.
-
Jim Conner - ’68 Cuda
Installing Shoulder Harness Kit
-
The ‘67 didn't have an "original mounting for the shoulder loop". You’ll have to weld in the nut plate that came with the kit. The directions said to center the upper mounting hole in the same place as the coat hanger hole was. It is more convenient to weld it into the opening just to the rear of the coat hanger hole, but the farther back you mount the hole, the more the belt edge might irritate your neck.
-
Ron Evans - ’67 Coupe
-
-
Use the original lower belt mounting for the retractable end of the shoulder belt and the upper original mounting for the shoulder loop. The buckle is mounted to the seat and the inner floorboard. How did you do the front lower mounting point? The front lower mounting point is where the lap belt would attach. You would have that point, come across the lap to the buckle, go across the chest to the upper mounting point/loop and down to the final point with the retractor.
-
Jim Conner - ’68 Cuda
-
There is a rigid sleeve (8 inch or 11 inch) over the inner belt that fastens to the stock mounting hole on the tunnel. It uses the same original lower seat belt mount as the retractor. Sits under the retractor. Note: The 8 inch sleeve would be too short, especially if the seat was pushed forward.
-
-
-
The ‘68 and ‘69 did have an upper mounting for the shoulder loop. The bolts should be there. On the 1968 Barracuda fastback, there is a dimple on the rear side panels and behind those dimples are seat belt mounts. All you have to do is drill the panel to make access to the retaining mounts.
-
Cars '68 and forward, had anchor points for the harnesses.
-
-
Use the existing mounting holes in your car to attach the slide for the harness. The upholster may cover over the original holes on the car's roof for the harnesses. The best way is just to feel with your finger for the mount, then use an awl or needle to pinpoint the anchor hole.
Eric Valentin - ’69 Fastback
-
As far as being installed on convertibles, the harnesses was probably attached to the area behind the front seat along the rear window belt line or on the top of the rear fenderwell.
-
Mike Jarvie - ’68 Fastback
-
Considerations
-
For a fastback, the roof anchor lets you use your choice of seats, but it's a major effort to install if it's not already there.
-
-
Shoulder belts might not be such a good idea with ‘67 seats, that have the floppy backs with no latches. That seems like a neck-breaker. You really need to look at the whole system.
-
Max Heim - ‘67 Fastback
-
-
Consider installing Sebring seats with the harness. They would solve your problems in one fell swoop as they have the harnesses and the locking mechanism all in one unit. They are heavier than the factory seats but once you drive with the Sebring seats you won't put the factory seats back in.
-
Don
-
-
Or try SCAT Pro-90 seats. Most people think they look 'period correct', and they have adjustable lumbar support. I don't particularly like the look of the headrests, so I take them off when I park it at shows.
-
Ron
-
-
With a convertible the best way probably would be to install a roll bar behind the seats and change to some type of later seat, such as a '68 or later, but again that would be major work. But it would be safer.
-
Mike Jarvie - ’68 Fastback
Rear Shoulder Belts
-
There were no factory rear shoulder belts on any Mopar of this era.
-
Alan Erland
-
-
Rear shoulder harnesses have been seen in ‘68 Barracuda fastbacks before. You can install them. There is a dimple on the rear side panels and behind those dimples are seat belt mounts. All you have to do is drill the panel to make access to the retaining mounts.
Restoring Seat Belts
-
Mr Clean and a scrub brush should clean the fabric, a wire wheel and WD-40 and steel wool for the metal parts of the seat belt.
-
Jeff Ramin - ’67 Coupe
Aftermarket Seat Belts
-
Beam's http://www.seatbelts.net
-
Seatbelt Planet http://www.seatbeltplanet.com
-
Seatbelts Plus http://www.seatbeltsplus.com
Sill Plates
-
Sill plates were the same for all three years (’67-’69).
-
Rubber Bumpers
-
Rubber bumpers are sound deadeners that go in a lot of different places. Several companies have those in kits, but can be bought separately. You can order some of the generic ones off of Rock Auto.
’67
-
Rubber bumpers on a ’67 go in a lot of different places like:
-
ash tray
-
glove box
-
under the hood
’68
-
Rubber bumpers on a ’68 go in a lot of different places like:
-
on the sides of the hood (4)
-
front of the hood (2) - those are the hood levelers
-
license plates
-
glove box
-
doors(2) top and bottom
-
trunk lid (2)
’69
-
Rubber bumpers on a ’69 go in a lot of different places like:
-
on the sides of the hood (4)
-
front of the hood (2) - those are the hood levelers
-
license plates (4)
-
glove box (2)
-
ash tray (2)
-
doors(2) top and bottom
-
trunk lid (2)
-
clutch pedal

