

General Information
-
Good flowing exhaust system will make power regardless if your doing a restoration or enhancing for performance. Most exhaust shops use tube bending equipment that crushes the pipe at the bend. This decreases the pipe's diameter. This procedure may not affect the performance of a 318 with a two-barrel carb, but this pipe bending technique will cause restriction, impede the exhaust flow, and decreased power, especially in a performance engine.
-
-
The parts of the exhaust system include:
-
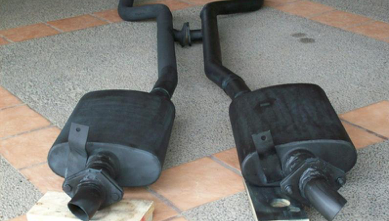
Head pipe, resonator, tail pipe, muffler, axle pipe, head pipe.
-
-
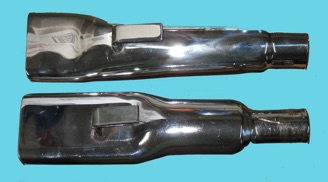
If the resonator has a pentastar, date, and part number, that tells you that is as close to original part as you can get.
-
Graveyard Carz
Exhaust System Installation Advice
-
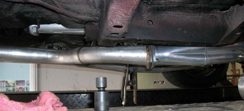
Assemble exhaust system on table to get a sense how it all goes together under car. Do a final fit of the exhaust system before you tighten all the clamps because you want to make sure all the pipes are exactly where they need to be, forward and backwards, and not hitting anything. Rattle the exhaust to make sure it's not loose or hitting anything. After adding exhaust, put on valence. You may need to adjust exhaust tips after.
-
-
You want clearance between exhaust and brake line, gets hot, at least a couple of fingers. Clearance by sway bar too as car twists as it turns. Drive car for 30 minutes and go back and tighten everything down again. Tips will move inward.
-
X-pipe vs. H-pipe
-
Found this explanation out on Jeg's website:
-
"X-pipe and H-pipes synchronize the balance of the exhaust pulses from each bank of cylinders based on firing order which increases velocity and scavenging from each cylinder. Most people agree that X-pipes are better at improving performance than H-pipes, especially at the top end. However, H-pipes tend to have a deeper sound than x-pipe equipped vehicles and generally build power down low. These are general claims and your engine and exhaust combination could have different results. "
-
Steve Toth
-
-
I think the H or X pipe are good for low end torque and they may quiet the system a bit.
-
The TTI H pipe leaves a little more clearance under the car.
Exhaust Pipe Size
-
It is true that a 3" exhaust is louder by nature than 2.5". 2 1/2 is also good in case you decide to up the engine displacement in the future, but 2 1/4 is plenty for most small blocks.
-
Nathan Nuthall
Exhaust System
-
In a high performance engine, exhaust headers are among the most significant power enhancers. The higher the power level, the more relevant headers become. There is a lot more going on than just reducing back pressure.
Headers versus Manifolds
-
Headers perform better than exhaust manifolds especially on an a-body. On a big block, there is no room. They have fender wall headers. But you have to punch through the fender wall to fit. On a small block there is room for headers.
-
Graveyard Carz
After Market Exhaust System
-
For an OE restoration, and it’s factory, it needs to be accurate. Accurate Exhaust Products also makes what’s needed. www.accurateltd.com
-
-
-
Tube Technologies offers us ‘Cuda fans an alternative to the exhaust shop, allowing us to install quality dual exhaust ourselves in the comfort of our own garage. TTI has 2.5 and 3 inch exhaust kits for just about every Mopar body style and engine combination. Even a big-block A-body, whether equipped with factory manifolds or aftermarket headers. They have both H-pipe and X-pipe systems that are all made from 16 gauge, mandrel bent, aluminized tubing. They use only the finest grade of aluminized steel with precision welding. All of TTI's kits come with all of the hangers, clamps, and hardware needed to complete the installation, and are available with or without mufflers. TTI even has kits that will bolt right up to most popular header or manifold applications. Which one you use depends on the application.
-
-
Original-style stainless exhaust tips are available from TTI, or opt for the factory appearing turn-downs.
-
-
TTI exhaust is a great upgrade for any Mopar, and is easy to install in a weekend without the hassle of the local exhaust shop. Check out TTI's website to see what options they have for your car.
-
-
You might consider calling TTI and talking to Sam Davis, the owner. Sam will spend time with you answering your questions. He has gone way above my expectations in helping me. Number is 951-371-4878.
-
Ron Evans - ‘67 Coupe
-
-
TTI Exhaust Endorsements
-
TTI gets my full endorsement. Their kit fit like a dream with very few issues. I ended up with the 2.5" kit with X-pipe. I bought series 40 flow masters and I already had TTI headers. I could not be happier.
-
Josh Walton - ‘67 Coupe, ‘68 Conv.
-
I've only heard good things about TTI. I bought a set for my ‘67 fastback formula s with a 273 ci commando with a/c from the factory and they slipped right in without mods anywhere. Previous one required mods around the idler arm and starter, but these went in with no mods anywhere. I can't help with the H pipe or back exhaust as I had a custom built to side pipes. I can vouch for the headers though. Look great and work great.
-
Jeff
-
-
I just finished installing 3” TTI exhaust from headers back to the tips with a crossover. Impossible without a hoist! and the old CPPA headers I have were longer and necessitated mucho trimming, but they are on, and it sounds great. I used a set of 20” Dynomax mufflers. It was real tough around the gas tank strap on pax side. The car runs better too. I didn’t have the cutouts but the tips just come in under the lip of the valance. It cost me more than anticipated.
-
Robert Wiffen - ’67 Fastback
-
TTI Installation Procedure
-
Begin by installing the muffler hangers and hardware. This involves threading longer bolts to retain the rear seat belts. The seat belt attach points are reinforced with extra metal, also good for your exhaust system.
-
-
The tailpipe section has pre-welded hangers. These hangers are made to slide right into a bracket by simply sliding through a hole in the bottom of the rear frame rail, and through another factory hole in the inner side of the frame. No drilling is required to mount the rear hangers.
-
-
For the head pipes, the TTI flanges are the proper diameter. Because they're made from thick steel, they won't distort like the originals did.
-
The tailpipes are a little long so they can be cut to length for different exhaust tips. Use the turn-down style tips to mark and cut the pipes to the appropriate length. The tips are then held in place by the provided exhaust clamps.
-
With the clamps all snug, the tailpipes lined up perfectly with the openings in the rear valance panel.
-
Before installing the H-pipe, be sure to slide the U-clamps over the forward end of the muffler. Do the same for the tailpipes. Tighten the clamps until snug. When the exhaust is in place and properly aligned, do the final tightening on all the clamps.
-
-
And to make removal easy, the TTI H-pipe is a slip-joint, held in place with a clamp, just in case you have to get to the tranny.
-
Note: TTI head pipes are used for all body styles, but the rest of the system is A-body specific. The instructions do state that "for some applications" (it would be nice if they would've been more specific), it may be necessary to cut 2" off the head pipes.
-
Jeff Ramin - ’67 Coupe
-
You can install the 3" TTI on an A-body. Be prepared to do a little work around the gas tank strap. Nothing serious, just a little tweaking. Start the installation from the rear of the car and work forward. It is much easier going from the back of the car to the front. Front to back will fight you. Put everything in loose then tighten it up after its all in place.
-
-
Access to a lift with the 3" pipe will make it easier, but it can be installed in a home garage with jack stands and patience. The 2.5" is a little easier.
-
Rob McCall - '68 Fastback
-
-
I have 3" tti's all the way back, and it was very tight but didn't need any cutting. But it was a PITA getting everything in and aligned. I remember having to put it on and take it off several times. I think I tried the transition pieces that connect to the cross-over every which way possible, before getting them right. After I finally had it in, had to take it to a muffler shop to get it tweaked into alignment. Also had the shop put in flanges just ahead of the mufflers, do I can drop the cross-section to work on the trans if need be.
-
Ron Evans - ‘67 Coupe
-
-
I’m mounting a TTI exhaust with 2.25 in H pipe and Flowmaster clones from an A body with shorty Hedman hedders. I have long tube 1 5/8 in Hedmans. My old pipes were barely 1 7/8" outside diameter. I decided to start from the tail pipes. What I did today was cutting the old exhaust tail pipes behind the mufflers. I confirmed the "new" tail pipes fit nicely.
-
Ricardo Esperon Graham
TTI Exhaust System Clearance Numbers
-
Clearance at the:
-
t-bar - a total of just under 1/4" is more than adequate
-
TTI Exhaust with CPPA Headers
-
Whomever you order the system through, be sure to tell them you have the CPPA headers. I'd need to check the charts at the shop, but I think the outlets on them might be in a slightly different position than the current TTI offerings. They have several header adapters available.
-
Rob McCall - '68 Fastback
-
-
With CPPA headers, the collector extends beyond the crossmember at the rear edge of the trans crossmember, the extension past the merge collector is longer. CPPA’s are much longer. Some fab might be required.
-
-
You will have to shorten the exhaust if they do not accommodate this difference. MANY years back, when TTI first started selling exhaust they were aware of this difference and told me I would have to deal with this. They offered to trade straight up a new set of 2" TTI for my "old" unmodified CPPA headers because they had racers that wanted the older style due to the longer collector length.
-
Michael Mosley - ’68 Cuda
-
-
One is the H pipe and 3" from the headers. Has anyone done 3" without major mods? My headers are from CPPA, the precursors to TTI, so they should be the same. the site says I can do it but its not always so in the garage.
-
Robert Wiffen - ‘67-440 Fastback
TTI Exhaust Transmission Modification
-
Don't forget about the recommendation to modify the exhaust (H or X Pipe Section), so that you can drop just that section if needing to remove the tranny.
-
-
If you ever have to drop it, you'll be glad you did this in advance.
-
Tim Moller - ‘69 Conv.
Ball Flanges vs. Straight (flat) Flanges with Gaskets Addition
-
Ball flanges seal better and last longer than flat flanges with gaskets.
-
I had them install ball type flanges at the back of the x-pipe, so I could easily drop the x-pipe to remove the trans (which I have since had to do twice). Money very well spent -- I strongly recommend the ball flanges. The total cost was about $250 including the fit up, the flange parts ($40 each), and the ball flange installation.
-
Ron Evans - ‘67 Coupe
TTI Exhaust Clearance Problems
-
A common problem with the 2.5 inch tail pipe is not fitting correctly on the right rear. I installed a complete TTI setup on my convertible (68/340/727) last year and there can be issues. I used flowmaster mufflers and that required some modifications to the X-pipe assembly. I had to shorten the tubes a few inches to make everything fit right. I also used the rear seat belt holes for the hangers.
-
Josh Walton - ‘68 Conv.
-
-
TTI's products and customer service are excellent. I had trouble getting a clutch linkage arm (z-bar arm) to clear one of the header tubes, and Sam Davis, TTI president, patiently worked with me to get it squared away. My z-bar was different because a previous owner had done an automatic to manual conversion, and did his own fabricating on the z-bar. I'm running their 3" exhaust system with an x-pipe.
-
Ron Evans - ’67 Coupe
-
I have the TTI complete exhaust system on my 340 fastback and once installed we had to heat the area at the exhaust tip to bend it straight but now I am noticing that the pipe is also hitting my shock and the right rear spring. I can see no place for adjustment to make this fit better. Cannot twist pipe to get the fit better. They told me originally the X pipe would work with the gear vendors it did not so I put the H pipe in. I used supplied mufflers. Left side fits fine with no problems. I used the rear seatbelt bolt holes to attach the mounts.
-
Kirby Holden - ’67 FB, ’68 Conv.
TTI 3" Exhaust Tip Cutouts
-
With a 3” TTI exhaust installation, to install the tips there must be 2 exhaust cutouts. Most ‘Cudas have one with cutout 2.25” exhaust with tip and it’s just fine. TTI tips will fall just below the bottom of the valance, without needing the cutouts. An installer could bend the 3” pipe a bit and angle it down slightly to give more clearance.
-
-
But as far as positioning, it's true there isn't much leeway. The tailpipe going up over the axle is a very tight fit. One has to optimize that section, then the tip is just going to wind up wherever based on TTI's radii. If they (TTI) duplicated the factory profile on center, then the top of the tip would be 3/8" higher than the factory pipe, making the cut-out pretty much mandatory. But I would think they would have accommodated the extra width in their design.
-
Max Helm
-
-
I have a 3" TTI exhaust, with an x-pipe, and rectangular tips. The tip locations look just like the ones in your picture, about 1/2" clearance to the original valance. But, the whole system was a real bear to install. I tried for 2 days with the car on jack stands in my driveway, and finally got it barely good enough to drive to the muffler shop to have the fit cleaned up by a professional.
Exhaust Flanges
-
There are two types of exhaust flanges: straight through-hole exhaust flanges and flared style flanges.
-
-
Any muffler shop can make pipes and flare them to fit the manifolds.
-
-
J C Whitney sells straight through-hole exhaust flanges.
-
Ed
-
Local shops usually don't have the proper 2-inch, or 2.5-inch flanges in stock to fit Mopar exhaust manifolds, so they generally just cut the pipe off and reuse the original, rusty, and often bent exhaust flange. The quality of the tubing is also questionable at most local shops as they tend to use inexpensive pipe to maximize profits. Additionally, instead of using proper, well-engineered hangers, the local shops commonly attach the exhaust to the vehicle with self-tapping sheet metal screws right through the car's floor.
Muffler
-
Seems every manufacturer has their own rating system and description for their mufflers - sport, street, turbo, super turbo, race quiet, etc. Lots of options.
-
Have the local exhaust shop install a set of dual exhaust and performance mufflers.
-
-
The AAR exhaust requires special mufflers with the inlet and exit on the same end of the muffler, otherwise, you could use glasspacks and put the pipes where you want. I've done it in the past, the problem is you may have to drill the floor.
-
Ricardo Esperon Graham
-
Muffler Noise
-
There is significance to the length of a muffler. The longer the muffler is both less back pressure and quieter.
-
-
With short mufflers and turndowns, you should put better & longer mufflers on it and extend the pipes to the back of the car, which makes it much quieter. The longer the muffler, the less prone they will be to drone as well. A 20" mufflers doesn't have a hint of drone, but a 16" straight thru mufflers on a ‘Cuda are much worse. Better still are 18" turbo style mufflers.
-
-
Nevertheless, it is true that 3" exhaust is louder by nature than 2.5".
-
Nathan Nuthall
-
-
I bought my ‘Cuda with 3" pipes and turndowns right after the short flowmaster mufflers too. It was horribly loud and set off car alarms in the driveways that I passed.
-
-
I'm running the TTI 2.5" system. The mufflers that come int he system are the #17733 Super Turbos. They are the ones with the 14" long case. The longer the muffler the quieter it will be, but the 14" ones fit very well under an A-body. Offset on the inlet side, center on the out. They are throaty enough to know it's a performance muffler, but quiet enough you can have a conversation in the car at highway speeds.
-
Rob McCall - '68 Fastback
-
-
I’ve just installed 3” TTI exhaust with H pipe and 16” Walker Dynomax mufflers. It’s quieter at idle than with the old 2” pipes but quite loud under acceleration and at highway speeds, but i like it.
-
wiff 67-440 fb
-
Muffler Manufacturers
-
Dynomax is the performance division of Walker. The Super Turbo mufflers have a lifetime guarantee too.
-
I would use 18-20" Walker turbo mufflers. A good choice.
-
Nathan Nuthall
-
These are Walker Quiet Flow mufflers.
-
Walker Super Turbo 2.5" were $34.95 ea including shipping. Prices were twice that of Super Turbo.
Resonator
-
The 1967 Commando 273 had single exhaust with an enormous resonator at the back.
Tail Pipe Extension
-
Originally the '67s with the 383 engine didn't have tailpipe extensions. The tailpipe just turned down right before the bumper and you couldn't see them unless you expressly looked for them.
-
Mike Jarvie - ’68 Fastback
Tail Pipe Extension Alignment
-
Most pictures I have seen the tips are either level with or lower than the valance. One or two I have seen with them angled upward a little. Either way they seem too low to me aesthetically.
-
Michael Mosley - ‘68 Coupe
-
-
Put a slight angle on them. The right angle would be slightly upward. Make an offset hanger for the factory bracket and be certain you like how much they stick out before putting in place since the larger opening tip stick out about 3/4” too far.
-
Rob Robinson - ’68 Fastback
-
-
My car has relocated leafs, so the springs are in the way where the stock outlets would be anyway. I am shifting them inboard about 4 inches. I am also considering tucking them up a little higher, maybe an inch into the valance. I’m looking at maybe tucking them up half way. I can tuck the exhaust up quite high and put it pretty much any location I want. I will consider the angle. I have to make the bracket for the exhaust tip since they can't bolt on in the stock location anyway. I am going to set the tip in place and see what I think looks best. I am going for a quasi-stock look, but not technically correct.
-
Michael Mosley - ‘68 Coupe
-
-
The fabrication guy set the tip up into the opening and looked at the different options. Ended up with top of the flat part of the tip slightly higher than even with the bottom of the valance and sticking out about two inches. This puts the transition from rectangle to the pipe under the valance where it can't be seen and tucks the exhaust up so that you will hardly see it from the side of the car at all. I am very happy with the cut out made for the tips. Trimmed the area for clearance and welded in a flange.
-
Michael Mosley - ‘68 Coupe
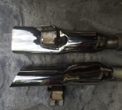
Exhaust Tips
-
The “original tips” and the larger stainless Barracuda tips that Accurate LTD offer are somewhat different in shape and in the placement of the hanger.
-
Rob Robinson - ’68 Fastback
Rectangular Exhaust Tips
Rear Exhaust Valence
-
You may have to cut out and modified your rear body valence for rectangular exhaust tips. You should leave it to a competent body man.
Rear Valance Reference
-
OK, warning, Jeff Ramin reference picture. For anyone newish to the list, check out Jeff's site. Lot's of good information.
-
-
Exhaust Manifold
-
There are different manifolds for different engines.
-
-
The stock single plane with the 4-hole inlet, aligns to the carburetor venturis, and creates a kind of mini-velocity stack effect. Like individual built-in 3/4 inch carb spacers. Aftermarket ones with just a big square opening would tend to kill the off-idle throttle response.
-
Max Heim - ’67 Fastback
-
-
It’s surprising the number of people that run stock manifolds on Mopars. In the Chevrolet world, that's the first thing you replace with headers.
-
Jim Conner - ’68
-
LA Engine Exhaust Manifold Casting Numbers
-
Casting Number Engine CID Year
-
28439533181968-69Barracuda / Right
-
24757193181968-69Barracuda / Left
-
Specific Engine Exhaust Manifolds
318 Exhaust Manifolds
-
The original 318 manifold, passenger side manifold, has a center outlet.
-
273/318 manifold are pretty common to find.
318 stock exhaust manifolds manifold heat control valve (flapper)
-
On a 318 ’69 running the stock exhaust manifolds, the passenger side has the flapper with the thermostatic spring on it. It has an anti-rattle spring. It is called a “manifold heat control valve”. This thermostatic spring closes when cold and opens when warm.
-
-
That flapper creates back pressure in your exhaust to get more of the exhaust to flow up into your intake manifold when the motor is cold. It is somewhat useful during winter months to get the motor to warm up faster. The valve is not critical. If you never drive in cold weather, or fast warm ups are not an issue, you can remove it. But then braze the holes back in. Or just remove the flap, or you can just wire it to always be open. Clever but trouble prone when there’s corrosion to freeze up the bushings.
-
Nathan Nutshell
-
-
A external spring can be attached to keep tension on the flapper while the engine is running. This external spring was installed by the dealer and by keeping tension on the flapper no more noise when engine was running
-
Darrell Stephens
-
-
At Mopars @ Carlisle this year some vendors had replacement flapper valve hardware. So that might be an option. Mega parts and/or Vans might have had them. Probably all from the same manufacturer.
-
Todd Rimmer
340 Exhaust Manifolds
-
Originally the factory 340 had a rare and expensive stock high-performance manifold. It’s interesting that the 340 manifolds weren't much of an improvement over the small 318 version. Back when it first came out it was praised, but alas time moves on and there are better manifolds out there now.
-
Nathan Nuttall - ’67 Fastback
-
The bypass hose fitting from the 318 won't work for the 340.
-
Jeff Ramin - ’67 Coupe
360 Exhaust Manifolds
-
A certain type manifolds, with 2 1/4" outlets, will not fit on ‘68 small-block without power steering. The oil pan won't fit, either.
-
Jim Conner - ‘68 Cuda
-
-
In the A Body, the driver's side needs to have a curve in it to clear the steering shaft.
-
Darrell Stephens
-
Possible replacements of A body 360 casting numbers:
-
Drivers side: 38 30 905 (Two inch outlet) ‘74-76 Dart or Valiant
-
Pass. side: 38 70 055 (unknown outlet size) ‘80's truck manifold
-
Ricardo Esperon Graham
383 Exhaust Manifolds
-
It had a unique left hand exhaust manifold. The down spout is a little bit longer than b-body and a little bit of a different angle. It has its own casting number.
-
Graveyard Carz
Ram Manifolds
-
They come with the 2 1/4" outlets have some problems. The passenger side works great, but the drivers side has some interference with the steering coupler. Consider shimming the motor mount to give clearance. That's how little the conflict is.
-
Jim Conner - ‘68 Cuda
Manifold Removal
-
Remove the studs from the heads. Try at first (even with heat and vise grips). A great tip to remove studs, is to place 2 nuts on the stud, and then turn the inner one. The outer nut keeps the inner one from turning, so then the stud turns. Works like a charm. Now degrease / derust all the exhaust manifold bolts and studs.
-
Jeff Ramin - ’67 Coupe
-
A tried and true method for removing the 4 exhaust manifold studs from the heads on a small block is to take two nuts and install them on the threads of the stud. Then back the inside nut up against the outside nut. This will act as a locking mechanism and you get an open end on the inside nut to turn the stud. Use plenty of WD too.
-
Tim Moller - ’69 Conv.
Manifold Repair
-
If you have a hole, let’s say from a former exhaust temperature gauge, you need to be plug it. Put a bolt in the hole, and cut it off. Then grind it level with the manifold, and put a couple coats of paint on it.
-
Jeff Ramin - ’67 Coupe
-
-
The only way to properly repair a manifold is to find a cast iron welder. The main caveat is that it HAS to be a shop that knows how to properly repair/weld cast iron. And "yes" they can be repaired - I have had two cast iron manifold weld repairs done: One was a 4 inch crack in one of my HP 340 manifolds, the other was a flange that broke off because of an internal stress crack. Both repairs were welded up properly by a cast iron welder and the manifolds have been 100% ever since.
-
-
Shops that do cast iron welding are more difficult to find. I only know of two in the entire Seattle/Tacoma/Everett area and one of those two was going to retire. The guy that was thinking of retiring told me he was getting work from all over the western US because it was getting harder and harder for the welding shops that did know how to do cast iron welding to get the supplies and equipment to do the job correctly.
-
Steve Toth
-
-
Exhaust Manifold Restoration
-
Have the exhaust manifolds bead blasted.
-
-
There's another new choice for factory-appearing manifolds too. That is our own Steve Bright's CH28 dual quad with Heavy Silver and Clear Vision. It's a different kind of "flash" than Alien Silver, especially under close inspection, and is proving to be a new favorite. It looks like new aluminum too.
-
Leanna the CudaChick - ’68 Fastback
-
-
When putting on exhaust studs, is good to put on anti-seize on threads that way if you have to take it off it won't rust and seize together.
Exhaust Manifolds Gasket
-
Original exhaust manifolds steel gaskets for a 318 have heat shields for the spark plug wires. 318 ports are much “shorter” and the 318 gasket cannot be opened up enough to be used on a 340 to expose the 340 ports. The 318 ports are the same size as the 273.
-
Max Heim - ‘6
-
-
Original exhaust manifolds steel gaskets for a 340 have heat shields for the spark plug wires. Also original factory 340 heat shields are taller (longer) then the repops.
-
Ricardo
-
Original exhaust manifolds steel gaskets for a 360 did not have heat shields for the spark plug wires. The 360 ports are huge compared to the 318.
Exhaust Manifolds Gasket Size Comparison
-
Be careful as the 318 and 340 port openings are not the same size so the gaskets are not identical. 340 and 360 have the same port size. The 318 ports are the same size as the 273.
-
David Martin
Aftermarket Exhaust Manifolds Gasket
-
Repros are available from the usual sources. I've seen "blems" on eBay at $135 otherwise list is $180 or so.
-
Bill Parker
Exhaust Manifolds Heat Shield
-
In ’67, the factory did use a "heat shield" that mounted like a gasket on the 273. The ‘67 should have two separate paddles sticking up. The ‘67 273 commando came with heat shields on the passenger side.
-
The ‘69 318 came with heat shields on the passenger side.
-
The 318 one will work but has a connecting piece between the paddles. The 340 one "looks" like the 318 one but has a different port opening on the end two ports. Typically the factory did not use exhaust gaskets at this time.
-
Alan
-
Correct in all cases (273, 318, 340) on the driver side only because the exhaust manifold actually was cast to rise toward the hood to provide clearance for the steering box and linkage. The exhaust was close to the firewall too. That created a very tight spot to insert plugs and wires and would cook the wires without the heat shield or some other protection. Probably a good spot to warm your breakfast sandwich though. The passenger side just headed south from the middle of the manifold as no clearance issues.
-
David Martin
-
-
Exhaust Fumes
-
Everyone should keep in mind the dangers of exhaust fumes and CO poisoning (which comes from incomplete combustion of any carbon based fuel and can have no smell). So can you die of CO poisoning even if you get away from where you got briefly exposed to it.
-
-
Keep in mind with just the vent windows open it creates a low-pressure zone inside the car and the crappy trunk seal let fumes come in to the passenger compartment. If I have the under dash vents open-ish, it helps keep fresh air pushing through the car. This is really only a big deal when the main windows are up in cooler weather. When it's hot, the main windows are down, the under dash vents are wide open, and the vent windows may be pointing out to force more air in to the car...
-
Clair Davis
How to Troubleshoot Exhaust Fumes
-
Are you pipes running all the way out to the back of the fish?
-
Do you have any exhaust tips on the ends or just running straight pipes or down-pointed pipes?
-
Are you running headers?
-
Any leaks around the flanges?
-
How good are the seals around the trunk?
-
Is the engine running rich? Even if the exhaust system is intact, if you're putting out horrific fumes you'll probably smell them.
-
Tim Moller - ’69 Conv.
-
-
If you have a fastback, the trunk seal is critical because the trunk area is NOT sealed from the passenger compartment, and the aerodynamics of the rear deck create a suction under the trunk lip. So you can get a very fumey situation even with a perfect exhaust system. The trunk seal is the most likely culprit.
-
-
One suggestion is taking a rag and plugging the pipe at the rear of the car while running and listening for leaks underneath yet…the old way of finding rusted out pipe’s/mufflers here in the rust belt of Massachusetts’s !….then if there are no leak’s go for the gasket’s.
-
Jon Rutka - ‘68 FB
Exhaust Fumes Solution
-
Had the same problem with my '67 & '68 fastbacks. Turned out the lower lip had been bent down somewhat and was not sealing very good. Take a sheet of paper and place it over the seal, close trunk and pull out the paper if it pulls out easy you don't have a tight seal, continue from side to side and you should have a pretty good idea of where the exhaust is leaking thru. If the seal is in the correct location and in good shape all you may need to do is adjust the trunk latch to get a better seal.
-
Lee
-
-
The seal on the fastback makes some funky turns, and if it's not glued down perfectly straight will leave gaps in the upper corners -- even rain will get in. And then it has a seam somewhere, usually in the center bottom, which opens into a gap as it ages and shrinks. Try chalking the seal and see if it offsets onto the trunk lid all around. Or at night, fold down the rear seat and trunk hatch and slide in there, and have someone shine a flashlight all along the gap from the outside.
-
-
I had this problem on my convertible with the top up and solved it when I moved my exhaust tips out more past the lower valence. Moving the tips back also got some of the HP Juice off of the lower side of the car.
-
Kirby Holden - ‘67 FB
-
If you don't want to spend a lot of money and if your exhaust has leaks, I'd recommend you to fix the leaks with a patch system sold at Autozone. It's a tissue that has to be saturated with a resin (all you need is included) that hardens with the heat from the exhaust. I did the same around every weld on my home made 2 1/4" exhaust of my Barracuda I did last year. It looks like a mummy but works just right.
-
Ricardo
Custom Exhaust System Work
-
In So. Cal for custom stainless exhaust work, I highly recommend Bob's Muffler in Bakersfield. It was a longer drive than I would have liked, but I had them connect the x-pipe system to the Dakota manifolds and they did an EXCELLENT job for a very reasonable price ($130). Maximum ground clearance without touching anything, perfect mandrel bends, installed O2 sensor bungs, and they asked me exactly how I wanted it connected etc. If they were closer, I would have taken them my other cars as well.
-
Nathan
Headers Coating
-
Header manufacturers usually offer a ceramic coating option. Engineeredapps is one of them.
-
You can get a good deal on a set of painted headers, or a set of used headers that need to be recoated, this place does great work. The headers I had done were ceramic coated from the manufacturer, but were scraped up pretty bad. They removed the original coating, and then recoated them. I paid $180 a set of small block headers, done in bright polished ceramic. Their process coats the inside at the same time. They also do large volume ceramic coatings for many of the header manufacturers, so their processes are well proven and consistent.
-
Ron Evans - ’67 Conv.
-
-
-

