

-
During Restoration What do People Do:
They replace the Differential with Sure Grip 8 3/4", 3.55 gears, 742 case. -
They replace the Differential with an A-Body 8 3/4 with 3.23 posi. OEM 8-3/4 rear end with 3.91gears.
-
They replace the Differential with Sure Grip Detroit Locker Differential, and Richmond 4.30 gears.
-
They replace the Differential with Richmond 4.88 gears.
-
They replace the Differential with National Drivetrain-equipped 831/44 rear end.
-
They replace 3.23 rear axle gears with 3.91 gears for more torque multiplication.
-
They replace the driveshaft with a Victory 3" driveshaft, that was bought through Mancini Racing.
-
They replace the driveshaft with a custom one by Denny's Driveshafts.
-
They replace the factory axle with new forged axles.
-
They replace the factory axle with Billet Dutchman Axles.
-
They replace the factory axle with Moser Axles.
-
They replace the factory axle bearings with Strange Engineering sealed units that eliminate the adjustor.
-
They replace the eliminate all reverse thread lug nuts with regular thread.
-
-
General Information
Rear Differential
-
Built by the Dana Corporation, the housing is cast iron with tubular steel axle tubes pressed and welded in to form a complete carrier and tube assembly.
Rear Differential Types
7 1/4
-
You could get a 7-1/4 or an 8-3/4 in 1967.
-
Phil Saran
-
Introduced in 1960, these units had 9-bolt covers with 2.5" diameter axle tubes from the axle flanges
-
to the differential housing. These were originally small bolt pattern (5 X 4" bolt circle) axles used in
-
A-bodies.
-
The axle tubes on a 7 1/4 are 2 1/2" in diameter.
-
7.25 has a Differential Ratio of: 2.94 3.21, 3.55, 3.90, 4.11
-
9 or 10 bolts on rear cover with 7.25" ring gear, commonly a c/clip axle however there was a bolt in application up until 1981. The 9 bolt rear uses a different case and spider assembly which is not compatible with new components.
-
-
• Ring Gear Diameter: 7.250
-
• Cover Bolts: 10
• Cover Bolts: 10
• Ring Gear Bolts: 8
• Spline Count: 25
• Dropout: False
• Pinion Support: False
• Carrier Breaks: 2.47 / 2.76
• Rear Suspension: Solid
• Pinion Nut Size: 1-5/16
-
Because the 7.25" axle is usually avoided for performance use, there is less aftermarket support for it than with other ring gear size axles, such as the 8.25" or 8.75" units. It will last a long time if it is not abused.
7.25 Rear End: 4” vs. 4.5” Bolt Pattern Axles
-
There are 7 1/4 rear end with 4in bolt pattern axles. The '73 Duster has a 7 1/4 but has the 4.5in bolt pattern axles.
-
-
You can’t swap out the axles to get the desired 4.5 pattern.
-
The bearing retainer axle and c-clip axle would not swap.
-
4" axle has 4 bolts on the housing flange, 4.5" axle has 5.
-
Also most of the brake parts will not interchange, only the wheels cylinders and some of the hardware.
-
The 4.5 pattern axles also have a bigger bearing on them. They will not even slide into the axle tube.
-
The brakes off the 4.5 pattern rear will bolt right on to an 8-1/4 or 8-3/4 though.
-
Besides the bearing issue the 4" pattern 7.25 is wider than the 4.5" 7.25, it's also wider than a A body 8.75, around 2".
8 1/4
-
The differences between rear differentials, in most cases, is the bolt pattern. Its about an inch difference. Seriously, this should help....
-
Jonathan Lockhart
-
-
You could get an 8-3/4 in 1967.
-
Phil Saran
-
-
The 8-1/4 was not available in 1967. The 8.25" wasn't available until ‘71 or’ 72. The 8-1/4 will be a 4-1/2" bolt pattern.
-
Jim Lusk
-
-
The axle tubes on an 8 1/4 and 8 3/4 are 3" diameter.
-
-
If you are upgrading from a 7 1/4, you will need 3" u-bolts, shock plates from the 8 1/4 or 8 3/4 and a shorter driveshaft. E-brake cables will work with the new rear.
8 3/4
-
Referred to as the 8 3/4; because of the diameter of the ring gear, these axles are most easily identified by the 10-bolt pinion housing. Depending on the year, the pinion shaft can be 1 3/8 inches in diameter up to 1 7/8 inches, with the largest pinion used in the later model and heaviest-duty muscle car applications.
-
You could get an 8-3/4 in 1967. The 8 3/4 rear end has a sure grip clutch system in it. And has a 10 bolt pattern. 8 3/4 mopar rear axle is so simple to work on. The 8.75 (8 3/4) rear end LOADS FROM THE FRONT and IS THE ONLY REAR END THAT DOESN’T HAVE A REAR COVER.
-
Graveyard Cars
-
-
If you are upgrading from a 7 1/4, you will need 3" u-bolts, shock plates from the 8 1/4 or 8 3/4 and a shorter driveshaft. E-brake cables will work with the new rear.
-
-
The axle tubes on an 8 1/4 and 8 3/4 are 3" diameter.
-
-
A tag on one of the carrier mounting nuts identifies the ring and pinion ratio, and if an "S" follows the ratio, this would indicate a "Sure-Grip" assembly.
-
-
9 1/4
-
The 9 1/4 rear end came with 12 bolts.
-
Dana 60
-
The Dana 60 rear end was basically a 3/4 ton truck rear end. It had 10 bolts with a 9 3/4” ring gear.
-
Rear Differential Axle Tubes.
-
Jim O’Conner
Sure Grip vs Posi-traction
-
Chrysler calls its rear end Sure Grip rear end. You have a Sure Grip, with the car is off the ground, when you turn one rear wheel the opposite wheel will turn the same way.
-
Graveyard Cars
Rear Differential Identification
-
Mopar Rear Differentials are Identified by casting number & number of cover bolts.
-
-
YearBody SizeCasting NumberNotes Width Drum-to Drum
-
1967 A 7.25 2070051 9 bolt cover 53.2”
-
1967 A 7.25 3507881 9 bolt cover 53.2”
-
1967 A 7.25 3723675 9 bolt cover 53.2”
-
-
1967 ABCD 8.75 1634985 10 studs, no rear cover 57.8”
-
1969-74 ABCE 8.75 2881489 tapered pinion shaft 55.0”
-
1965-72 ABCE 8.75 2070741 small pinion shaft
-
1957-68 ABCE 8.75 2070742 large pinion shaft
-
-
1966-70 B 9.75 54.9”
-
-
The quick and short of it: measure the center to center distance on the spring perch, should be 43". Outside drum to drum is 57-1/8".
-
Michael Mosley - ’68 Coupe
-
Reference
-
Below is a link to the moparts page for reference. http://www.moparts.org/Tech/Archive/axle/17.html
-
Eric Valentin- ‘69 FB
-
-
Rear Differential Ratio
-
To determine the rear differential ration, sometimes they have a tag under one of the cover bolts. If not, and you have the cover off, it should be stamped into the ring gear as well as the date.
-
Jim Conner
-
-
There would be a metal tag attached to one of the cover bolts. Usually it’s long gone.
-
-
3.23 is a common ratio, but not the only one. It would be on the build sheet and the window sticker, I believe. Don’t think it’s on the fender tag. And someone might have swapped the axle.
-
-
You can jack the rear off the ground, turn the driveshaft by hand and have a buddy count wheel revolutions, and do the math. Or maybe the other way around works better… haven’t thought it through. If you have it apart you can count the gear teeth.
-
Max Heim - ’67
-
-
"You can jack the rear off the ground, turn the driveshaft by hand and have a buddy count wheel revolutions, and do the math".
-
-
If it's an open rear end, you have to keep one wheel still while turning the other to get the correct gear ratio, unless it's a SureGrip, then both wheels can turn.
-
-
Correct, and then multiply the resulting ratio by 2.
-
Nathan
-
-
How to tell ratio:
-
To clarify, you jack up the rear so both rear tires are off the ground. Be careful to chock the front wheels as the car may roll with both rear tires in the air. The handbrake also acts only in the rear tires.
-
-
So the car will essentially be in neutral even if it's in park when you do this.
-
Next put the car in Neutral so the driveshaft can rotate freely. It won't if it's in Park.
-
Next rotate a rear tire and see if the other rear tire turns in the same direction, the opposite direction or not at all.
-
-
1) If other tire turns the same direction, you have a sure grip and just count driveshaft rotations vs 1 tire rotation.
-
2) If other tire turns opposite direction you have an open axle. Lower that tire to the ground or block it somehow and then count driveshaft rotations vs 1 tire rotation and divide result by 2.
-
-
If other tire doesn't move it's dragging and check the brakes to free it up and then repeat 1 & 2.
-
Ed
-
How can you identify the Rear Axle Ratio? I have a 7 1/4 rear end. Is it 3.23?
-
Angel Garrido - '69 FB
-
-
The 7.25 rear in my 69 notch is 2.76:1; I took off the cover and read the gear count numbers (and date code).
-
-
It could be 2:76, 2:94 more probably. On a lift, you measure how many times the rear wheels turn for every 1 turn of the driveshaft. Most of the time, the wheels turn a little over 2.5 times means a 2:76 gear. Almost 3 times is a 2:94.
-
-
Unless it's a SureGrip, you need to hold one wheel still, then spin the other one to get the gear ratio.
-
-
Rear Differential Disassembly
-
Make sure you take pictures of brake lines before disassembly.
-
Rear Differential Removal (Technique 1)
-
The easiest way to remove a rear end is to undo the rear first. Remove the 3/8's bolts from the rear and then front spring brackets and then roll the whole unit out from under the car and then dis-assemble the rest with it out of the car. No need to take the tires off before I doing anything.
-
Carl
-
Removal and Disassembly (Technique 2)
-
(1) Raise vehicle to a desirable working height and install jack stands.
(2) Remove wheel cover and wheel and tire assembly. Remove brake drum. Clean all dirt and foreign material from area of housing cover.
(3) Loosen housing cover and drain lubricant from rear axle and proceed to remove cover.
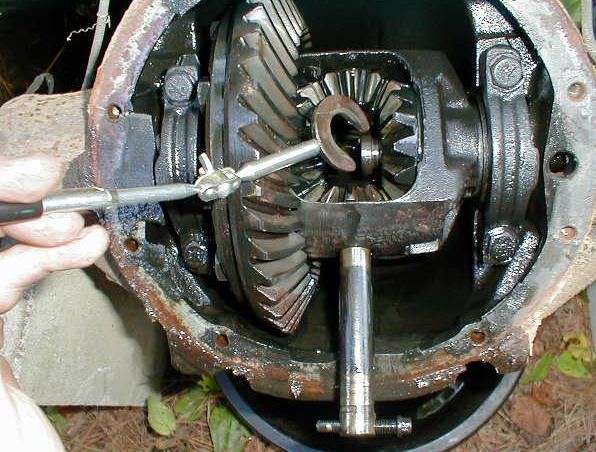
(4) Turn differential case to make differential pinion shaft lock screw accessible and remove lock screw and pinion shaft.
(5) Push axle shaft toward center of vehicle and remove the “C” locks from recessed groove of axle shaft.
(6) Remove axle shaft from housing being careful not to damage the axle shaft bearing which will remain in the rear axle housing.
(7) Inspect the axle shaft bearing surfaces for signs of brinelling, spalling or pitting. If any of these conditions are present both the shaft and the bearing should be replaced. The normal bearing contact on the shaft will be a dull gray and may appear lightly dented.
(8) Remove axle shaft seal from housing bore.
(9) To remove the axle shaft bearing from axle housing, use Tool C-4167. Attach Tool C-637 to end of selected remover, using a slide hammer motion, remove axle shaft bearing and inspect and discard if axle shaft or bearing shows any of the conditions. If axle shaft and bearing show no signs of distress, they can be reinstalled along with a new axle shaft seal. Never reuse an axle shaft seal under any circumstances once it has been removed. -
Restoring Rear Differential Order
-
After painting the differential, be sure to put on new brake lines and flex lines on rear differential before reattaching to car. Use mild steel versus stainless steel brake lines. Also add white tape on threads. Make sure you don't cross thread the lines.
-
Rear Differential Assembly and Installation
-
Housing, differential, cover, backing cover, brakes stuff then brake lines.
-
Rear end, then springs, add third member, bolt it on to carrier, it has sure grip and carriers in it.
-
When assembly, now is time to tighten everything down. New lines tend to want to leak pretty easy.
-
Press on bearings to axle, slide left axle in, then right axle, bolt it in and you have rear end assembly. Put on leaf springs, detail it and it's ready to bolt on car. Then get brakes done.
-
-
Assembly and Installation
-
(1) Wipe axle shaft bearing cavity of axle housing clean. The axle shaft oil seal bores at both ends of housing should be smooth and free of rust and corrosion. This also applies to brake support plate and housing flange face surface.
(2) Position axle shaft bearing onto pilot of proper Bearing Installer Tool C-4198 and handle C-4171. Insert axle shaft bearing into cavity making sure it bottoms against the shoulder and is not cocked in bore.
CAUTION: Under no circumstances should the seal be used to position or bottom the bearing in its bore as this would damage the seal. -
(3) Install axle shaft bearing seal using Tool C-4203 and handle C-4171, flat side of tool must be against seal, until the tool bottoms against housing flange face. This positions the seal to the proper depth beyond the end of the flange face.
(4) Lubricate bearing and lip seal. Slide axle shaft into place being careful that splines of shaft do not damage seal and properly engage with splines of differential side gears.
(5) With axle shaft in place, install the “C” locks in recessed grooves of axle shaft, and pull outward on shaft so the “C” locks seats in the counterbore of differential side gear.
(6) Install differential pinion shaft through case and pinions, aligning hole in shaft with lock screw hole. Install lock screw and tighten to 100 in. lbs.
(7) Scrape any gasket material from housing cover and thoroughly clean surface with mineral spirits or equivalent and dry completely. Apply a 1/16 inch to 3/32 inch bead of MOPAR Silicone Rubber Sealant, Part No. 4318025 or equivalent along the bolt circle of the cover.
Allow sealant to cure while cleaning carrier gasket flange with mineral spirits or equivalent. Dry surface completely. Install cover on axle and torque cover screws to 35 ft. lbs. Beneath one of the cover screws, install the ratio identification tag.
If for any reason the cover is not installed within 20 minutes after applying sealant, old sealant should be removed and a new bead installed.
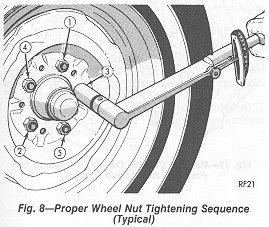
(8) Install brake drum and wheel and tire assembly, and tighten wheel nuts in the proper sequence (Fig. 8). Tighten wheel nuts to 85 ft. lbs.
(9) Adjust vehicle into a level position.
(10) Remove filler plug and fill with lubricant (see specifications for capacity). Replace filler plug.
(11) Lower vehicle and test operation of brake and axle assembly. -
Part Number Labels
-
Axle part number tag goes on the differential near rear brakes. It can be on different sides per car.
-
Paint mark white (X) goes on cover.
Rear Differential Gears
-
7.25" rear axle was one of two differential types used. The other being the stronger 8.25" unit. The measurement refers to the size of the ring gear. This gear, which is turned by the pinion gear, changes the direction of the power being transmitted to it. The pinion gear is turned by the driveshaft.
-
Rear Differential Ring Gear
-
The gear assembly is accessed by removing an inspection cover having either 9 or 10 bolts.
-
-
Be very careful with used gears. The drive side of the ring gear teeth will have a wear step. You *must* set them up with more backlash than their prior installation. If you set them with less backlash, the edge of the pinion tooth will be riding on top of the ridge, which will lead to breakage.
-
Get a Mopar FSM for most any rwd car and it will detail the gear set-up procedure.
-
Ken Mayer
Differential Cover Gasket
-
Use black, high temp silicone to apply the differential gasket. But smear it on VERY thinly onto both sides of the gasket. This will prevent any blob of silicone from dislodging into the differential. Although silicone isn't likely to hurt a differential at all, it is just good practice to always do it this way.
-
Nathan Nutthal
Axle Brake Line Junction Block
-
The finish should be Clear Zinc or Zinc (yellow) dichromate.
Rear Differential Repair Shops
-
The name of the company is "The Gear Man", located in Garden Grove on the Southwest corner of Stanford and Flower. Cross streets are Garden Grove Blvd and Brookhurst Ave.
-
"The Gear Man"
-
10382 Stanford Ave, Ste I, Garden Grove, CA 92840
-
(714) 537-9495
-
-
Sutton Engineering
-
Imperial Blvd. (just west of Harbor Blvd.) La Habra, CA
-
Sutton could be very slow on getting the work done.
-
Phil Saran
-
-
The Gear Man in Garden Grove takes his problem jobs to Ed Sutton. They are both good, and their pricing is about the same.
-
Phil Saran
-
You might want to contact Dr. Diff over on http://www.moparts.com/ he builds rear ends and suspensions out of his shop in Montana and is a wealth of information. Ron Evens on the BOG recently got his new Dana with disc brakes from him.
-
Phil Saran
Rear Axle Housing
-
Built by the Dana Corporation, the housing is cast iron with tubular steel axle tubes pressed and welded in to form a complete carrier and tube assembly.
-
-
Get familiar with the rear axle, so you know what parts to buy, what work needs to be done by a shop, what you can do yourself, etc. Removing the carrier from the housing while it is on the car isn't much fun.
-
-
4 speed car, you can choose between 2 axle packages:
-
A33 - Track Pak, 3.54:1 Gear Ratio Sure Grip (aka Powr-Lok or Trac-Loc) Dana Axle
-
A34 - Super Track Pak, 4.10:1 Gear Ratio
-
-
’69 Mopar with 440 engine, or 426 Hemi engine you would receive Hemi 4 speed which is a:
-
HD 4-speed 18 spline input shaft (Hemi 4-speed), you also would receive a mandatory Dana rear axle
-
Dana Axle = 9 3/4” Ring Gear (Removable Cover) Sure Grip (aka Powr-Lok or Trac-Loc) Dana Axle Dana has 10 bolts cover to remove, Bigger differential means drive shaft is shorter than on other cars
-
8 3/4” Ring Gear (Drop out carrier) has no removable cover, no bolts. You remove the carrier (pumpkin out the front)
-
-
’69-71 A33 or A34 = 26” Max Radiator Cooling package 7 - blade torque drive fan and H.D.
Suspension
-
’69 clutch diameter 11”’70 clutch diameter 10.5”
-
’69 cast iron bell housing ’70 aluminum bell housing
-
Restoring Rear Axle Housing
-
After sandblasting use a garden hose to clean the sand out of the axle housing.
-
Jeff Ramin - ’67 Coupe
Transmission Sure Grips
-
Clean up the exterior of the sure grip carrier. Use a screw driver to scrape off most of the grease/dirt/gunk. Then use a wire brush and Simple Green to get the rest off. It looks almost as good as media blasting, but a clean enough surface to paint. Use the wire wheel to clean up the left knuckle, as well as the pinion snubber that you remove from the carrier.
-
-
Read the service manual on sure grips before bolting it to the axle housing. Make sure the thrust spacers were in there, and that there wasn't any dirt/gunk in the case.
-
Jeff Ramin - ’67 Coupe
Removing Rear Seals
-
You use a slide hammer puller like this picture, only you need to turn the fingers around so that they grip on the outside instead of the inside. Stick that in the hole, tighten up against the fingers to push them outward against the seal, and then use the slide hammer to hammer them out.
-
Nathan Nutthall - ’67 FB
-
-
Just use a seal puller available at just about any parts store.
-
-
Mating the Carrier with the Axle Housing
-
It will be easier to do this before the axle housing is bolted on the car. It is wise to put the new axle oil seals in the axle tubes before installing the carrier. Use a piece of PVC pipe to drive them in. Try not to bend them. Scrape the old gasket off the carrier. Using a little lithium grease, place the new gasket on the axle housing, and then set the carrier down over the studs. Do this with the axle housing sitting in a milk crate. The axle housing will be nice and stable, as opposed to rolling around on the ground.
-
After securing the carrier with the nuts, you’ll have a really nice setup for detailing the carrier. Make another pass over the carrier with simple green, and then put a coat of POR15 on it. After that dries, a top coat of chassis black must be applied.
-
Jeff Ramin - ’67 Coupe
Reinstalling the Axle Housing
-
To get the axle housing back in the car, place it on a crawler, and wheel it under the car. By rotating the housing, you will be able to lift once end at a time up and on top of the springs. Using a floor jack and several trips from side to side, you will be able to get it located properly.
-
-
Get the U-bolts / shock plates in place and torqued down. This is a two man job. Now mount the shocks using the torque wrench and lying on the crawler under the car! Move the jack stands from the frame rails in front of the rear end to the axle housing. Greater distance between front and rear jack stands = greater stability. Properly torque the nuts on the spring shackles and the front eye bolts. The Factory Service Manual says not to do that until the weight of the car was on the springs.
-
Jeff Ramin - ’67 Coupe
-
-
-
Rear Axles
-
Different differentials, use different axles.
-
Axle Casting Numbers
-
These may not be all the casting numbers that were ever used on the various axles, but are a starting point:
-
7-1/4"
-
2070051
-
3507881
-
3723675
-
8-1/4"
-
2852905
-
3723598
-
3723599
-
8-3/4"
-
1820657 (small pinion shaft, up to 1964)
-
2070741 (small pinion shaft, 1965 to about 1972)
-
2070742 (large pinion shaft, 1957 to 1968)
-
2881489 (tapered pinion shaft, 1969 to about 1974)
-
9-1/4"
-
3507890
-
3507891
-
3723199
-
Removing Rear Axles
-
I am trying to remove the axles on an A-body 7 1/4 so I can swap brakes between them. I know that I need to remove the large pin in the center so I can get the C clips out, but what tool are you supposed to use to push out the cotter pin? You don't have a straight shot at it because of the bearing cap in the way. Is it a good idea to remove the bearing cap to get a straight shot to get it out? But I don't want to have to set preload or anything afterward. If I push it toward the ring gear, will it have enough room to remove the large pin? Then how do I push it back when I am done because the other bearing cap is right there in the way too?
-
Nathan
-
-
That looks like a roll pin in there. Mine had a pin that screwed out.
-
Jim Conner
-
-
In the Service manual on the 7 1/4 and it says to use a slide hammer to remove the axle shafts. It's not a c-clip rear. I was thinking of the 8 1/4 rears that I installed.
-
-
I assumed that it had C clips like the 8 1/4. But I guess not.
-
Nathan Nutthall - ’67 FB
-
-
Slide hammer? Just run the lugs off flush to the studs and use "The Force" of you trying to jerk the tire off the axle. Once it hits the lug nuts, its a 30 lb slide hammer. Don't pull the axles out riding over the axle seals or you'll damage them.
-
Steve Wander - ’68
-
Reinstalling Rear Axles
-
You can't install the axles if you don't have the foam gaskets that go between the axle flange and the backing plate.
-
Now put the axles back in the car. Reuse the metal gaskets that sit between the axle housing and the backing plates. They might be a little rusty around the edges, but they should do. Just followed the instructions in the Factory Service Manual. A little nerve racking, involves setting the axle end play. You may have to set it quite a bit deeper than what it was originally on the car. For a while I thought something was wrong, because I kept turning the adjuster and turning it, and the play of the left axle wasn't diminishing! But eventually it did tighten up.
Jeff Ramin - ’67 Coupe
Reinstalling Rear Axles Flange Gaskets
-
RockAuto carries the 4 hole flange gaskets. I posted the link on FB also.
-
Rear Axles Adjustment
-
Adjust end play on the axle. Adjust with nut behind axle. You want a little play because when metal heats it expands. So you want a little room in between them. Use a dial indicator at home.
Axle Bearings
-
Axle bearings are inside the housing once you pull the axles out. The axle bearings are held in place by a pressed-on sleeve. They must be repacked with grease at regular intervals to perform properly. To achieve proper axle endplay, Chrysler added an adjustor to one of the axles. This adjustor can be a problem, especially if you perform frequent gear changes. Factory axles and axle bearings still perform just fine in stock applications.
-
-
Factory axles were held in by five nuts and studs on the axle end tubes. With the brake drum removed, you can access the nuts through a hole in the axle flange. Note the factory adjustor on this axle.
-
Replacing factory axle bearings is a good upgrade.
Axle Bearings Problems
-
In 1992, I was driving my Barracuda and the left axle came out and the car came to an abrupt stop as the tire rubbed up against the fender wall. I was told that the old bearings on the axle were probably heated off and new ones were pressed on. The axle in some way was compromised.
-
Angel Garrido - ’69 Fastback
-
-
The wheel bearing probably burned up due to water contamination. A fresh pair of wheel bearings should solve the problem if your housing end did not get ruined.
-
Cass Eslick (Dr. Diff)
Replacement Axle Bearings
-
Make sure they use a good American brand bearing. National part number is something like A7, but the axle shop should know these by heart. Chinese bearings are crap. The cheap bearings I got from Currie made noise from day one until they came apart 30k miles later.
-
Nathan Nuttall - ‘67 Fastback
DIY Axle Bearing Removal
-
It is very difficult to replace the rear bearings yourself. You need a proper tool to avoid scoring the axle. You will need a slide hammer with outside fingers to get the old seal out. Never use heat to remove bearings. Now might be a good time to put in a limited slip if you feel inclined to do so, but it isn't real easy or cheap to do.
-
Nathan Nuttall - ‘67 Fastback
Shop Removal
-
I recommend taking the axles out of the housing and taking them to a competent shop to have them do the R&R of the bearings on the axles. A hydraulic press should be used to remove the old bearings, and is a necessity to install the new ones. Most of the less-competent shops will cut the old bearing off instead of pressing it off. Don't let them do it as it will mar up your axle and you can only do that 2 times at most before the axle is junk. Also, don't let them talk you into unnecessary "green" bearings. Just use the original tapered bearings and adjust them properly.
-
Nathan Nutthall
-
-
My advice....don't do it. I have seen them come off and it is quite dangerous. Most rear end shops now refuse to press them off and will cut them off instead. I don't like that idea either because it destroys the axle after the 2nd time. So I always take them to a shop that has the setup to press them. Best way to get it done in my opinion. I have a 20 ton press too, but I don't mess with them.
-
Nathan Nutthall - ’67 FB
-
-
Make sure you check your housing as well for any gouging or wear. If it is worn badly, you will have to replace (weld) a new end on the housing. This can be expensive & many shops will do the repair poorly so hope that isn't the case.
-
-
Cutting off the bearing may mar the bearing surface on the axle at the location of the cut. Since it is only in 2-3 places on the axle, the new bearing can still seat OK. But after the second time, you start to run out of good surface for it to hold properly.
-
Nathan
-
-
I would agree. I always press on and off. Harbor Freight does the job easily! Same for the center section! I have a couple bearing separators for use with my press and just got through with new carrier bearings on the carrier.
-
Gerald Drury
DIY Reinstall
-
Install it with a large socket & hammer or a seal installer. A hydraulic press should be used to install the new ones.
Alternative
-
As an alternative to changing the bearings on your axles is to replace the factory axles. New axles will save the hassle of pressing bearings on and off, and you won't have to wonder about them if your car is equipped with a powerful engine.
-
-
New axle kits can also be ordered from Strange. These axles are far tougher than factory units, and meet the aftermarket axle requirement of racing sanctioning bodies. They're available for all common Mopar rear ends, and can be made for custom narrowed applications as well. The axle bearing kit from Strange comes with new, non-adjustable, fully sealed bearings (commonly called "green" bearings), new axle retainers (to hold the axles in the housing), new press-on sleeves, and gaskets. These bearings are already pressed into place and never requiring maintenance. They also eliminate the factory adjustor.
-
-
Unlike factory axles which have pressed in wheel studs, the Strange axles utilize stronger, screw-in style wheel studs. These should be installed using Lock-Tite, and will take far more abuse than the factory studs. Once bolted in, you should never need to worry about the axles for the life of your car!
-
-
Strange Engineering
-
Most people eliminate all reverse thread lug nuts with regular thread.
Differential / Backing Plate
-
On the 7 1/4" and 8 3/4” diff, there is a metal plate that goes between the differential and the wheel. You can do a rear swap from a 7 1/4" to 8 3/4" axle and keep the brakes from the 7 1/4", bolt up everything and all is fine and functional.
-
The 10" backing plates will fit anything with small bolt brakes (assuming this is from a small bolt 7-1/4). Some of them did not have the lower stud hole, but it can be drilled.
Jim Lusk
Backing 8 3/4 A-body backing plates
-
The following list is for the rear brake support or "backing plate", all parts listed are A-body except where noted as B-body. All 8 cyl cuda's use 10" brakes regardless of rear axle and the backing plates are the same, also note B-body's w/ 10" brakes will have the desired backing plates.
>From '67 Parts Manual (revised Jan '68)
9" brakes 2533076-7
10" x 1 3/4" 2533840-1
10" x 1 3/4" w/ trailer tow 2534726-7
B-body
10" x 1 3/4", execpt station wagon, 2533840-1
----------------------------------------------------------------------
>From '68 Parts Manual (revised Jun '69)
9" brakes (6 cyl) 2880568-9
10" x 1 3/4" w/ auto adj 2880570-1
10" x 1 3/4" (8 cyl) 2880582-3
B-body
10" x 1 3/4" (6 cyl) 2880582-3
----------------------------------------------------------------------
>From '69 Parts Manual (revised Jan '71)
9" brakes (6 cyl) 2880568-9
10" x 1 3/4" w/ 7 1/4" axle 2880570-1
10" x 1 3/4" w/ 8 3/4" axle 2880582-3
B-body
10" x 1 3/4" w/ 7 1/4" axle 2880582-3
Differential / Backing Plate Gaskets
-
On the 8 3/4 diff, there is a metal gasket that goes between the differential and the backing plate. (Not the foam one between the backing plate and the axle flange).
-
-
On the 7 1/4, it didn't have one. (See drawing in the FSM Fig.1 - 7 1/4).
-
Angel Garrido - '69 FB
-
-
The FSM shows 2 gaskets -- one behind the retainer, and one on the end of the axle (this would be behind the backing plate). Don't know if either one is metal.
-
-
I am seeing only one type of gasket listed (composition). The other one is white foam. I know you can get that one from DMT.
-
Max Heim
-
-
I made a gasket from Fel-Pro Gasket Kit #13802. It is for dust protection for the rear axle assembly. Angel Garrido - ’69 FB
-
Drive Shaft
Drive Shaft Length
-
Driveshaft length is dependent on several different factors including transmission, rear end, wheelbase and even slip yoke. The standard 727 is longer than the 904. The 8 3/4 has a longer pinion snout than the 8 1/4 or the 7 1/4. The Dodge Dart and Charger both are longer wheelbases than the Barracuda (excluding the early Darts).
-
-
A drive shaft length that's out of a ’69 barracuda is supposed to be 44.88”. The shaft part number is on the shaft not the yoke. The part number for a ’68 barracuda drive shaft 340/383 auto with 8 3/4 is 2852216. The measurement is a little past 44 1/2. The 48.88 is listed for 68/69 Barracuda long tails and 8.75s with 7290 joints; that would be 340/383 with a 727. A ’69 Barracuda with a long tail and 8.75 is one of the shortest 67 up shafts out there.
-
-
YearPart #Length
-
’68285221644.5”
-
‘6944.88”
-
-
If you have a drive shaft made for your car, to measure, push the slip joint all the way into the transmission and then pull out approx 3/4 inch. With the car sitting at normal ride height, measure between u-joint centers. Measure from the slip yoke u-joint center to the pinion flange u-joint center.
-
-
Before shortening or purchasing a driveshaft, ALWAYS measure for the required length.
-
Jim Conner
-
-
Weights are used to balance the shaft.
U-Joint
-
All 7.25" axles use the "7260" style U-joint.
U-Joint Removal
-
The original U-joint may have to be pressed out of the drive shaft.
U-Joint Angles
-
Checking Drivetrain Geometry
-
Build a homemade tool as described in "Chrysler Performance Upgrades" to measure your u-joint angles. It works very well. If your out of wack, shim the tranny mount. Hopefully that will take care of the rear angle also.
-
Jeff Ramin - ’67 Coupe
-
-
Unbolt the tranny from the mount and jack up the tranny with the floor jack. Slide 3 washers between the mount and tranny on each side, which amounts to about 3/8". Lower the tranny back down, and check the angles again. You should have only .5 degrees difference at the tranny, and around 2->3 degrees at the rear end. Note: It’s probably better to use a plate of steel that runs the entire width of the tranny mount than using washers for shims.
-
Jeff Ramin - ’67 Coupe
-
Drive Shaft Restoration
-
There is a company that will balance your drive shaft and restore it to a factory look. That company is DriveLines in Mission Viejo, California. Here is mine after restoration.
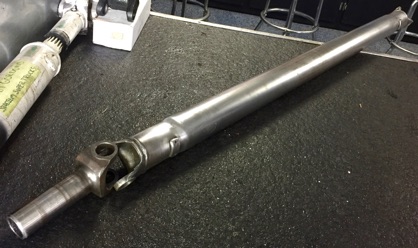
-
Drivelines Incoporated - A Custom Driveshaft Shop
DIY Drive Shaft Restoration
-
The drive shaft as it comes from the factory was natural metal in color. One way to get that appearance is to sand the shaft with 3M Scouring Pads, the kind you use in the kitchen.
-
Graveyard Cars
Installing Drive Shaft
-
There is a rubber seal called the Output Drive shaft seal that is between the drive shaft and tranny. It needs to be wet not dry or seal will leak transmission fluid. Grease that before you put it in.
Bolt & Pinion Shaft
-
You need to remove the shaft in the middle of the carrier too so that you can push the axles inward and get the clips out. The clips are sunken into the inside of the spider gears and that is what is keeping them in place. And the shaft keeps the axles from moving. Once you remove that shaft it should be clear. Only thing is, don't rotate the axles afterward unless you do them both at the same rate, or else you will have spider gears falling out.
-
-
I am a little concerned about your statement that you can turn the pinion without either axle turning. If you turn the pinion, there is a large gear on the inside of it that will turn the ring gear. Turning the ring gear should turn at least one axle.
-
Nathan Nuttall - ‘67 Fastback
-
-
Almost all the c-clip axles are the same. Whoever took the picture put the bolt back in the pin after they slid it out of the carrier. Just like the picture, you do not have to take it all the way out, better if you leave it slightly in the "bottom" spider gear to keep the gears from turning and coming out. Once the pin is clear of the axles shaft you push the axle in a little and the clip will all but fall out.
-
Michael Mosley - ’68 Cuda
-
-
Remove the bolt for the pinion shaft (spider gear shaft) and then push in on the axle slightly and you will then be able to remove the c clip.
-
-
Concerning the pinion and gears, put a clamp on one side to block the wheel drum from turning. The pinion will definitely turn the other wheel then. Let me get this straight. Turn the carrier so that the bolt is toward the diff opening (for easy access). Loosen the bolt and slide the pinion shaft out. Push the axle in toward the center to clear the spider gear. Then remove the clip. Don't turn the axles in the process, or if I do, make sure that they are turned equal amount. Is this right?
-
-
Is there anything else I should do while I have easy access to everything? For gear oil, I saw 85w90 recommended. I'm replacing brake shoes, hardware, springs and wheel cylinders. Do the outer axle bearings have seals? Guess I should go ahead and replace those if they are there.
-
Jim Conner - ’68 Cuda
-
-
You have it. Just if you keep the shaft inside one of the spiders, then you can rotate it a little without worrying about them coming apart. If you are going to weld on the perches, you should do it now without the axles installed. If you weld with the axles in place, the axles will prevent the housing from moving, and as it cools, it will warp. By welding without the axles, the housing can move as it needs to when hot and move back to where it was as it cools.
-
Nathan Nuttall - ‘67 Fastback
-
-
I would like to put in a SG and taller gears. This is a 3.55 and I would like to go higher for the gas mileage. I don't think there would be any way to find any used parts in this area for a Chrysler rear end. Possibly at pick-a-part, but I doubt it. I guess it would be much better to do the welding before installing new seals?
-
Jim Conner - ’68 Cuda
-
-
In '67 and '68 the only ratio from the factory was the 3.23. The rest had to be installed by the dealer or somewhere else.
-
Mike Jarvie - ’68 Fastback
-
-
3.55 and 3.91 were optional, at least in ‘68, but I'm sure in ‘67 too. You could also get a 2.94 (might have been 7-1/4 only in the A-body, though). I have also seen a 2.76 8-3/4 in other cars.
-
Jim Lusk - ’67 Cuda
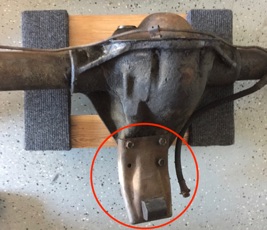
Pinion Stubber
-
The pinion stubber is a piece of rubber that prevents rear end from hitting undercarriage with torque of rear end. It sits on end of rear end by the u-joint. There should be at least an inch or so between snubber and floor when at rest. They come in 6 1/4”, 6 7/8”, and 8”. The medium is the most desirable for stock applications.
-
-
-
It wants to move up. Mopar suspension is designed in such a way to prevent axle wrap. You just need to make sure your bushings and everything are in good shape. If the snubber hits the floor it is usually because of a bolt broken off or the snubber is bent and twisted.
-
There are lots of replacement choices on eBay for around $30.
-
Tim Burrow
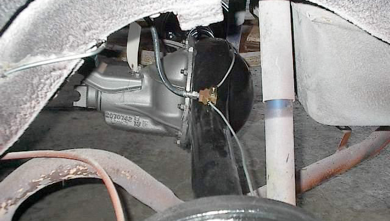
Pinion Seal
-
The pinion seal holds all the gear oil in the the rear end. If the seal is bad, it can rupture causing damage to bearings and the rear end itself.
-
Pinion Angle
-
Pinion angles can be referred to angles oriented from front to back. As an example, an engine centerline angle is 4* down. That is, negative four degrees going from front of engine to rear. You can determine this by placing a small piece of wood vertically against the front pulley and measuring with a dial protractor. Now, the simple solution says to orient the pinion 4* down. That's negative 4* starting at the front of the pinion and measuring going down. Refer to the first diagram on the Moparts link, parallel centerlines. The front of the yoke is higher than the back.
-
Jim Conner - ’68 Cuda
-
-
Don’t measure the pinion angle at the front pulley. Do it at the output shaft of the transmission. That is where the angle matters most. It is probably the same. If the angle measures 4 degrees down at the output shaft of the tranny, then you need the yoke to measure 4 degrees up. You want the output shaft of the tranny and the yoke to be parallel with each other (if you were to extend straight out from each).
-
Jonathan Lockhart
-
-
If you measure everything front to back, then both angles should be the same. As an example, if the tranny output shaft is 4 degrees down (measured front to rear), then the angle from the front of the pinion to the rear should also be 4 degrees down. But, that is NOT how they are typically measured. The angle should be measured towards the driveshaft - not front to rear.
-
-
Look at the VERY last picture on that URL posted from Moparts - called Driveshaft Phasing. It is exactly right on how to set them up. It is the simplest way to look at it. That pic has the tranny level and the pinion level. They have an angle of 0. If you drop the trail of the tranny down (say to 4 degrees), then you need to pick the nose of the pinion up to offset.
-
Jonathan Lockhart
-
-
Make the centerlines parallel to each other. And it is that simple. 4 degrees angled down toward the back is pretty standard. However, keep in mind that the pinion will angle up (more negative as you call it) under load, and will angle down under braking. If you have serious power in your drivetrain, you may want to offset the angle a little to account for the shift in pinion angle under load. The reason to do this is to make the centerlines more parallel under high load when you launch the car off the line. This will help race cars to prevent them from breaking U-joints and such. But most street cars don't need to worry about such things.
-
Nathan Nuttall - ‘67 Fastback
-
-
When you finished putting a 8 1/4 trac loc into the rear leave just a tiny bit of "slop" in it. Torque the side adjusters so can just barely hear a click when moving the pinion back and forth. Use a dial indicator with magnetic base to see how close you are. Put it on the gear. Put heavy grease on the threads. Put anti-seize on the adjuster threads and retainer bolt threads and it should work like a charm! Preload is 75 ft- lbs, backlash is .008". Perfect! As far as axle play, if it goes tink tink with no real movement you’re fine, as long as it's not jammed tight and as long as it's not really loose it should be OK.
-
Daty Rogers - ’67 Conv.
-
Lithium Grease
-
Put white lithium grease on the ring and pinion and check the contact pattern.
Lubrication
Differential Oil
-
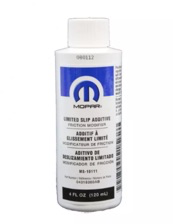
You’ll need a gear oil with limited slip additive. Look at the OEM lube recommendation for the vehicle it came from. It be synthetic limited- slip lube. Just about everything uses 85w90, and anything built in the last 15 years uses synthetic. Just have the right lube for the limited slip component, whether it's in the oil or a small tube of goose grease.
-
Max Heim - ’67 Fastback
-
Differential Fluids
-
Valvoline /Full synthetic gear oil SAE 75W-140 is for limited slip differentials. The Valvoline tech line [800-832-6825] sell a "high performance gear oil" that says on the label it's suitable for limited slip differentials. It has 4% frictions additive. If want to add some more frictions additive, it won't hurt up to about 2oz per 2 quarts (which is 1/32 or about 3% by volume) in addition to the 4% additive already in the product. Modern LSDs use the same modifiers as the older LSDs. Synthetic oils offer more protection but aren't compatible with any RTV and will cause leaks to develop.
-
Ed
-
-
I found a Quaker State 90 W product that says it has the additive for posi traction/sure grip.
-
Wiff
-
-
All of my research said that there's not quite enough friction modifier in any of the blends. I added a little bottle of the Chrysler sure-grip modifier. If you use the blend, you can always add modifier later if needed. The friction modifier is to actually lessen the friction in a sure grip rear so that it won't bind and "pop" going around corners.
-
Jim Conner
-
-
I’d be concerned it is for modern limited slip diffs, not vintage ones. I might use it with the factory-recommended additive.
-
Max
-
-
You can buy the additive at a dealer that sells to the drag racing or track racing crowds or try eBay.
-
Jeep Dodge Limited Slip Additive Friction Modifier Mopar #4318060AB $10
-
http://www.ebay.com/itm/Jeep-Dodge-Limited-Slip-Additive-Friction-
-
Modifier-MOPAR-4318060AB-/161898183385? hash=item25b1e23ad9:g:gT8AAOSwc0FUqo5b&vxp=mtr
-
Steve Toth
-
-
-
-
The 2 shops I've go to both use exactly the same thing: Lucas 85-140 with GM additive. One of those shops, Performance 4 Wheel Drive in Bellflower, is used by many of the local Mopar "hobby racers". The other shop is J&S Gear in Huntington Beach. J&S Gear does a lot of hot rod work, but they are more expensive.
-
Ron Evans
-
-
Synthetics may have other properties that aren’t compatible with older cars. But’s getting hard to even find non-synthetic gear oil at this point.
-
Max
-
-
Synthetic tends to be more slippery than traditional. That allows it to find a way out easier. As such, synthetics are much more prone to leak.
-
Jonathan Reck
-
-
Just add this to you favorite gear oil and Mopar-On!
-
http://www.ebay.com/itm/Mopar-limited-slip-additive-friction-
-
modifier-4318060AB-trac-lock-posi-trac-OEM/311480123772? _trksid=p2047675.c100005.m1851&_trkparms=aid %3D222007%26algo%3DSIC.MBE%26ao%3D1%26asc %3D20131003132420%26meid %3D34afb665e80f4b63a72a7284e98b3004%26pid %3D100005%26rk%3D2%26rkt%3D6%26sd%3D320949080974
-
Luke - ’69 FB
-
Differential Additives
-
As far as additives, some of them are pre-blended with the gear oil. Use an 85w-90 or such. Lean toward Valvoline synthetics - power steering, brake fluid, etc. Valvoline blended synthetic has about 3% friction modifier, equating to about 2 ounces of additive. Go with Valvoline with 2 ounces of Mopar additive. If you get the non-blended Valvoline use 4 ounces of Mopar additive. Chrysler had recommended NOT to use friction modifiers on cone style limited slip differentials. They had an old copy of a tech supplement to back it up. Seems the modifier is only for the clutches.
-
8 3/4 SG: I use Sta-lube limited-slip Hypoid SAE 80w90 gear oil API/ GL-5.
-
-
Some articles and such talk about staying away from the synthetic for posi rears (SG). The right synthetic is probably ok, but I'm happy with either Sta-lube or Amsoil (75W-90, not the synthetic). Another used by a lot of garages around the area: Valvoline High-Performance 80W-90 Gear Oil.
-
Tim Moller -’69 Cuda Conv.
-
-
Kendall Limited Slip Additive, or their gear oil with it already in there. It's the best stuff I've ever used.
-
Rob McCall - '68 Fastback
Changing Differential Oil
-
Changing the diff oil is messy and stinky, but it will go pretty smoothly. Use a suction gun to remove as much of the old oil as possible.
-
Jeff Ramin - ’67 Coupe
-

