
Radiator
-
The cooling system is designed to remove heat generated by the engine. Most muscle cars had adequate cooling systems.
’69 ‘Cuda Should Have the following Radiators:
-
2949067 1969 A 22" for a 273 or 318 engine with A/C
2949068 1969 A
Radiator Types
Radiator Sizes
-
Mopar primarily used 2 different sized radiators – 22” and 26” wide. Cars with Air conditioning or “max cooling” would get a 26” radiator. Cars without A/C generally got a 22” wide radiator – this includes big block engines. In other words, not all 383 HP engines had max cooling (and therefore didn’t get a 26” radiator). A 19” radiator was also available.
-
-
-
-
22” back (A body), 19” front (B body)
-
-
If you have a big block with a 22" wide radiator, you should first upgrade to a 26" wide one. The one you have in your car is too small for your needs. Then add a radiator shroud.
Phil Saran
Radiator Cores
-
The radiator core is mounted in a frame which is then bolted to the radiator crossmember. These different sizes came with a 2 core radiator which is marginal. Most people replace them with a 3 core one. Factory AC cars had 3-row rads.
-
-
Some say 4 rows blocks the airflow too much, and isn't an improvement.
-
Increasing the rows of tubes doesn't necessarily improve cooling....there is a limit to how many rows of tubes you can run and still increase cooling capacity. Unless they are staggered tubes, the air hits the front tube of the row, and then has to go around the remaining tubes in that row, with those remaining tubes transferring less and less amounts of heat. Too many tubes actually blocks airflow for optimum cooling. Sometimes a 2 row rad will cool better than a 3 or even 4 row one in the same application.
-
Tim Moller
Radiator Metal: Brass vs. Aluminum
-
My take on aluminum radiators is this: brass is actually a superior material. The reason aftermarket radiators have gone to aluminum is that the skills for working with brass are getting rarer and more costly, while the technology for working with aluminum is getting cheaper and easier.
-
-
And, of course, for high performance applications, you can get modern aluminum radiators in a variety of configurations which may provide superior cooling. But straight across, same layout and configuration, I’d go for brass.
-
-
Heat conductivity isn’t the only criterium. AL is lighter, too. But it corrodes faster than brass. Also, I believe that they use different tube sizes and spacing, which has other effects. And there is the issue of fatigue resistance (cracking).
-
Max Heim - ’67 Conv.
Radiator Inlet Location
-
Originally the ’69 and earlier ‘Cuda had the inlet hose on the driver's side. In 1970 the inlet hose was switched to the passenger side. The 1969 and earlier cooling system can be changed to the 1970 and later if everything is changed. This included the radiator, water pump, pulleys, and harmonic balancer and brackets to mount the alternator.
Radiator Identification
-
Mopar radiators can be identified by a mopar part number on the top of the tank. This is useful in figuring out why shrouds or hoses aren’t connecting to a radiator “when they should”. A build date concerns us as to which side of radiator the radiator tubes come out. Also it concerns us with a correct date coding for judging purposes.
Original Radiators
-
If you have the original radiator, DO NOT modify it. Under NO circumstances cut or move the inlet/outlet on your original radiator. That top tank is IMPOSSIBLE to find now and people will pay big dollars for a complete original V8 mopar A-body radiator. Get you a replacement radiator and sell that original on on ebay! Make sure to post the numbers on the top tank. You should be able to get at least $300+ for your original one if it is solid.
-
Rob Robinson - ’68 Fastback
-
-
A model 2949054 radiator is very rare. It came on a ‘69 Road Runner M code Super Bee.
-
Graveyard Carz
-
-
The part numbers for ‘67 Barracuda radiators (22" core) are - 2785 973 - Manual or auto transmission 2785 970 - Hi capacity 2785 971 - With air conditioning 2785 929 - With 383 cid V8 engine
-
This is a pretty good site for comparing stock radiators:
-
Ron Evans
-
-
The original factory tanks are attached to the core with no lips to grab, and are mainly relying on the solder to hold the tanks. Once they get a little age running a 16 lb cap will take the seal out. So run a 7lb cap. If that is too low go to 13 which is the next up.
-
Dana Price
Radiator Restoration
-
Have the radiator re-cored.
-
A radiator for a ‘68 has the lower hose on the passenger side, upper hose on the driver's side. Both are 1 3/4" size.
-
Jim Conner
-
-
If you have an original LA engine radiator laying around, you can just have the radiator outlet moved. Any decent radiator shop can move the outlets on your radiator and it’s a lot less $$$ than buying another radiator. I think it cost me about $45 the last time to have a lower radiator connection moved side to side.
-
Phil Saran
-
-
You could have your current 2 row converted to a 3 row by a good local rad shop. Cost is probably somewhere around $250+. I just had the original radiator reconditioned. The solder on the radiator had deteriorated from age. Following advice from FABO, I sent the radiator to Bob Shirmer at Glen-Ray Radiators in Wausau, WI. Bob is almost a savant with his knowledge of Chrysler radiators. What I received back is like a brand new part. They even included period- correct hose clamps, shroud bolts, and ribbed overflow tube. On top of that, they won't even charge you until you have the radiator back and are completely satisfied. Who does that! Just amazing.
-
Richard R. Kinkead
-
The first advise I would give is to move up to a 3 row if you're still running a 2. A good Rad Shop can modify your existing 2 row rad. Cost will probably be around $300.00. Obviously you can look at purchasing a new 3 row rad as well.
-
Tim Moller - ‘69 Conv.
Aftermarket Radiator
-
Aftermarket radiators are not aluminum because it is inherently superior — they are aluminum because with modern technology it is easier and cheaper to fabricate for specialty applications. 50 years ago, they couldn’t work with aluminum tubes in a cost-effective way, but there was a master brass worker on every corner. Times change.
-
Max Heim - ’67
-
Any radiator company can make you one. You may want to search A- bodies only.
-
Rob Robinson
-
-
US Radiator, makes the "old school" look of their upper tanks:
-
-
If you want to save money and are not averse to Chinese parts, people have reported very good performance from the Champion aluminum radiators.
-
http://www.ebay.com/itm/3-Row-Aluminum-Radiator-22-Inch-Core- Mopar-Small-Block-Configuration-CC2374-C-/151240721891? pt=Motors_Car_Truck_Parts_Accessories&hash=item2336a645e3&vxp=
-
mtr
-
-
http://www.ebay.com/itm/2-Row-1-Thick-Tube-MOPAR-Dodge-Plymouth-22-Small-Block-Radiator-/200867993414? pt=Motors_Car_Truck_Parts_Accessories&hash=item2ec4aa5746&vxp= mtr
-
Ron Evans - ’67 Coupe
-
-
Aluminum radiators would be a personal choice — it’s certainly not necessary. One local aluminum radiator supplier says Champion changed factories in China and now has a 60% failure rate! He says to avoid Champion. I've been reading on FABO about a lot of Champion radiators being warped or damaged and the shipping boxes show no damage.
-
Jim Conner - ’68
-
-
Champion radiator on the phone. Based on the stock Mopar radiator config for a 1968 Barracuda they gave me two different part numbers:
-
AE 1635 2 row, 1" tube - $209.95 shipped
-
CC 1635 3 row 5/8" tube (3 1/2" thick) - $234.95 shipped
-
And the Champion radiators have a lifetime warranty according to the website.
-
-
Champion placed the core too far towards the rear which takes up valuable clearance between the core and the fan. Monster Cooling provided a fan shroud that fit the Champion radiator like a glove. It bolted on exactly as designed. I only had to center the electronic fan in the hole, mark and drill holes, and all was fine. I did use RivNuts to provide threaded holes (available from Harbor Freight and others) and used studs in the RivNuts so that I didn't wear out the aluminum. This is a good way to go but time consuming. I used RivNuts to mount my electronic ignition on the firewall as well as self-tapping screws either rust or pull out over time.
-
Bob Freeks
-
I found Radiator Express (www.radiatorexpress.com) and they sell 3-row $230 and 4-row $305 aluminum radiators with AT cooler.
-
Ed Lexus
-
-
Glenn Ray makes brand new radiators. Complete with original numbers, cap, multi-rib overflow hose, correct brackets, correct shroud brackets, correct nipples for cooling lines. Graveyard Cars
-
-
The Glenn Ray is more expensive than the Griffin, but probably the best you can get for a Mopar copper-brass piece. Customers who use Glenn Ray can have copper-brass radiators built for their cars.
-
Rob McCall - '68 Fastback
-
-
Griffin has been the best, but expensive. But their aluminum stock appearing radiators have been great.
-
-
The radiator from Autozone, NAPA and Car Quest is a Spectre/Premium. The Spectre is a single core aluminum with plastic tanks, but it is the stock replacement for my engine. Plus I'm not running air conditioning. It looks like it will mount with no problems. Their products are made in Canada.
-
The same radiator at RockAuto goes for $116. You can order radiator, top hose and new cap for $145.
-
Jim Conner
-
-
The aluminum ones are made quite a bit different than the stock tanks. A radiator cap with a 16 is great, but puts undue stress on the tank. If you don't need the higher pressure, why run it. I'll see how it does with the 7 to see if it burps and needs a 13. But I hope not. I'm running a non pressurized system on my 24 and it's great.
-
Dana Price
Radiator Installation
-
Install the radiator. Remember there are 4 captive washer & bolts holding it to the radiator bracket.
-
-
You are going to have some issues with room for the bottom tank on an A-body. Consider one that fits a ‘71 and up small block A-body radiator. I know the bottom is on the opposite side on those.
-
-
Sometimes you have to drill two 7/8" holes in the valance pan below the radiator to get the hood to close. That also seems to be the way that the radiator is secured at the bottom. There are two plastic stubs that come down from the bottom of the radiator that rubber caps fit over. These rubber caps/grommets drop down into those 7/8" holes.
-
Jim Conner
-
-
After you install the radiator, then install the tranny cooling lines, then hoses. When attaching tranny cooling line, make sure line and radiator nipple is in line so you don’t cross thread brass nut on nipple.
-
Graveyard Cars
Radiator Leak
-
If the hole in the radiator is small, you could put a small amount of that radiator stop leak in your system and it will plug it up. Although if there is a actually bigger problem there, it could end up bursting later on. The best cheapie-fix was always AlumaSeal. Just follow the directions on the tube.
-
Leanna ~ The CudaChick
Mothballing your Radiator
-
If your going to leave your car setting for years, drain the radiator. Anti- freeze crystallizes and ruins the core. Flush it out and boil the core.
Radiator Cap
-
The new radiators are made of aluminum and are made quite a bit different than the stock tanks. A 16 lb radiator cap with is great, but puts undue stress on the tank especially if it’s old. If you don't need the higher pressure, why run it. See how it does with the 7 lb cap to see if it burps. If that is too low go to 13 which is the next up.I'm running a non pressurized system on my 24 and it's great.
-
Dana Price
Radiator Shroud
-
The factory stock fan shroud is an elusive part. If you don’t already have one...good luck.
-
Dana Price - ’68 Conv.
-
-
A shroud would particularly help in cooling at low speed operation. Get a plastic or aluminum one. The Fan shroud has (3 studs drivers side, 2 other side).
Radiator Shroud Installation
-
Shroud has to go over fan first, then drop in radiator. Not enough room to drop in shroud if radiator in first.
-
Graveyard Cars
Radiator Pulleys
-
Pulley were made of steel not aluminum. They were painted black.
Changing Radiator Pulleys Size
-
Sometimes if you change pulleys to speed up the water pump, you can worsen your problem. With a faster water flow, the coolant doesn't have time to release enough heat. Especially if you aren't using a thermostat!
-
Jim Conner - ’67
Radiator Fan Belts
-
The fan belt was date coded.
Radiator Hoses
-
There are different types of radiator hoses.
-
The fan belt hose was date coded.
-
Graveyard Cars
Radiator Hose (with A/C) Upper
-
Upper radiator hose for a car with A/C.
-
Gates 20594 Upper Radiator Hose
-
B000C2UAD8
-
-
The #20594 hose you linked doesn't show up under ‘67 Barracuda 273 4bbl (at least, Amazon says "does not fit"). The AC hose is setup to go around the compressor, the intake/t-stat housing are the same so the hose should work. Also the radiator fittings are in the same location AC vs non AC. The only difference on the ‘68 radiator is the upper fitting is about a 1/4" off, not enough to make a difference.
-
Alan
Radiator Hose (without A/C)
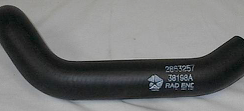
Radiator Hose (Lower with Coil Spring)
-
It helps prevent the auction hose from collapsing due to the suction force of the water pump. They rust over time in 100 degree tap water.
Radiator Hose (Lower without Coil Spring)
-
I have used many lower radiator hoses without a coil in them. As long as the hose is sturdy enough, you shouldn't need one.
-
Nathan Nuttall - ’67 FB
Wire Braid Radiator Hose
-
The wire braiding material is sold by Mcmaster-Carr. There are several to choose from. Some of the braiding has hints of color in
-
them. Usually they are black with some colored dots. Here's the link:
Radiator Repair Shops
-
If you are in the OC, try Mattison Radiator in Stanton, they should be able to tell you what is the best setup for you. Specializes in High Perform engines.
-
Mike Jarvie - ’68 Fastback
Painting Radiator
-
Use Rustoleum satin black on top tank, with a light dusting of flat black on fins. It will not interrupt cooling capacity.
Stock Engine Fan Blades
-
There are different engine fan blades. Some are for a/c and the others non-a/c max cooling. The Center Spring identifies it for A/C cars. Fan blades end in the number 215 or 216 are the ones mostly used by Graveyard Cars. The fan from a ‘68-69 318 or 340 with AC is Part # 2863215.
-
-
The stock engine came with a 7-blade fan.
-
On a '68 318, the 7-blade fan is 18” in diameter.
-
Jim Conner - ’68 Cuda
-
-
With cooling, they use a clutch fan, #2658456. There are different bolt patterns between straight fans and clutch fans. The bolts, however, are not the same bolts. The straight fan bolts directly to the water pump through the pulley (and sometimes a spacer).
-
-
On the fan clutch, the clutch unit bolts to the water pump. The fan blade has a different bolt pattern because it bolts to the back of the clutch unit. It has a large round hole in the center to clear the clutch mounting surface (the part that bolts to the water pump), and the four bolts that attach the fan to the clutch therefore have a much bigger bolt circle.
-
-
So you can't interchange the fans themselves, but the fan with the clutch unit is a bolt-on replacement. Which is obvious when you think about it -- they both go on the same water pump and pulley.
-
Max Heim - ’67 Fastback
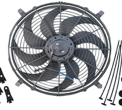
Electric Engine Fan
-
It's at hot idle where you most need cooling -- that's where an electric fan is superior. If you want to run a electric fan you would not be using the fan clutch or the fan. The electric fan goes in place of the other unit or you could possibly install an electric fan in front of the radiator if there is room between the radiator and the sheet metal/grills.
-
Phil Saran
-
-
Generally it's an either/or situation -- a water pump fan or an electric fan. Not likely to fit both.
-
Max Heim
-
-
If you're not concerned with the OEM look, then I would definitely recommend a 3 row alum rad and an electric fan with shroud.
-
-
The radiator does have an expansion tank, but it is smaller than most (small aluminum can a little under quart size). My other concern that would be solved by going electric is that the top of the fan blades are higher than the radiator so when people lean in to look at the engine they are a little closer than I like to getting their shirt or worse torn off.
-
-
If you get an electric fan or fans, make sure it has good radiator coverage and a shroud, and don't even look at ones rated below 2500cfm. With a 340 radiator and the big 7-bladed fan off a 383, even with no shroud it handles California summers just fine.
-
Tim Moller - ‘69 Conv.
Aftermarket Electric Fan
-
I installed the Maradyne MM12K Mach One 16" Fan. After seeing this fan on a friends Pontiac Coupe, I was sold. The Mach One is a good choice for small block engines and I also like the Maradyne fans because of the local reviews I got from many of the local (NW and CUP) racing shops.
-
-
I purchased it on-line from autoanything. (they'll usually have a discount code on their homepage, be sure to use it. Typically gets you at least 10% off if not better.)
Water Pump
-
Water pump housing is where heater hoses go onto the engine.
-
There are 2 types of water pump housings that have the same casting numbers.
-
Water pump housing - 1970 up 1/2” and 5/8” diam.
-
Water pump housing - 1969 downdouble 5/8” diam.
Pre 1970 Engines
-
1969 and earlier were made of cast iron. Early motors had the the water pump on the driver’s side. On the ’69 318, here are two spacers on the alternator - one between the bracket and water pump, one between the alternator and head. '68 water pump had the inlet on the driver side.
-
Jim Conner
Post 1970 Engines
-
1970 and newer were of aluminum construction. The water pump inlet on the 1970 Chrysler was moved to the passenger side thus the water pump for 1970 and later is different from the ones used in 1969 and earlier.
Stock Water Pumps: AC vs. Non-AC
-
The difference between the AC and Non-AC stock pumps is the number of internal blades on the fan.
-
From experience I can tell you that when I put the AC Pump on my Non-AC Fish small block, which at the time had the stock rad (two row), I was quite surprised that when the RPM went up the temp would also rise. This was most noticeable when cruising the Hwy at over 60 mph. It baffled me as it did seem to help in stop/go traffic on hot days. The explanation is that the AC pump was moving water too fast at higher rpms through the RAD and the fluid (water/antifreeze mix) simply didn't have sufficient time to cool down. Thus the rise in temp.
-
Tim Moller - ‘69 Conv.
Replacement Water Pump
-
Get a high flow pumps as overheating in older vehicles is deadly to heads and gaskets. Also, I have had cheap pumps last only days or weeks whereas good brand pumps from reputable suppliers last seeming forever.
Bob Freerks
-
A new water pump from RockAuto has plugs in the holes where the big pipe nipples go on top. These are countersunk hex drive pipe plugs. The smaller one was 10mm. But the big one is a 1/2" hex drive -- who the hell has a 1/2" allen wrench? All standard sets stop at 3/8. What an annoyance just to get the stupid shipping plug out. They could have just left the hole open. It's not like any water was going to leak out on the shelf. There is no application for this water pump that doesn't use a bypass hose.
-
Max Heim - ’67 Fastback
Hi-Flow Water Pump
-
High flow pumps are best! I am a BB guy so the the pump is pretty easy! Find the high flow pump for SB that has the outlet you need to match your radiator. Look at FlowCooler as well. Also make sure you use a high flow stat rated from 185-195.
-
Gerald Drury
-
Will the High Flow pump work better for you? Trial and Error will prove it out. The pumps aren't all that expensive.
-
Tim Moller - ‘69 Conv.
Water Pump Installation
-
Use a small amount of lithium grease on both sides of the gasket. A thin coat of lithium grease will make a good seal. Then replace the pump and torque down the bolts.
-
-
An alternate way to attach the water pump is to use Permatex Ultra Black.
Water Pump Installation Problems
-
Alum water pump won't work with early pulleys. Early pulleys won't work with cast crank harmonic balancers. Alum water pump won't work with the '68 radiator. On a '68, the water pump had the inlet on the driver side, but the cast crank balancer is thicker than the forged crank balancer so the parts don't just swap over.
-
Jim Lusk
Thermostats Housing
-
The standard is a straight up water neck that's on practically every Mopar. The only factory style replacement online is $59.99!!! You can get a chrome one for $12.95, or a polished billet one for $36, or a polished stainless steel one for $45.
-
Max Heim - ’67 Fastback
-
-
Try searching on 'water outlet'. O'Reilly's has this one:
-
http://www.oreillyauto.com/site/c/detail/MRY0/84830/01397.oap?
-
year=1968&make=Plymouth&model=Barracuda&vi=1494749&ck=Sea rch_thermostat+housing_C0420_1494749_3227&keyword=thermostat +housing&pt=C0420&ppt=C0331
-
Ron Evans - ’67 Coupe
-
-
Go with the stainless. Those things are always rusting themselves into oblivion. At least the stainless one will be the last one you need to buy.
-
Nathan Nuttall - ’67 FB
-
-
Someone posted a review that said the stainless steel one didn't actually have a flare to the outlet -- that would make it less likely to seal correctly.
-
Max Heim - ’67 FB
-
-
Whichever housing you end up getting, ditch the O-ring and fill that channel up with silicone instead. The chrome ones are most especially prone to leaks.
-
Leanna ~ The CudaChick - ’68 Fastback
-
-
O-ring? Never had one with an o-ring. But I see that Murray unit seems to
-
have a slot for one. Seems goofy to me -- you already have a rubber-to- metal
-
seal, with a hose clamp -- what do you need an o-ring for?
-
Max Heim - ’67 FB
-
-
If a thermostat has a hole, it may be heli-coiled.
Thermostats Housing Bolts
-
There is a debate about using lock washers or not. In my experience, the problem with these is getting them loose after they corrode. Loosening over time isn't the problem. But my dad believed in putting lock washers on almost everything. I don't see how it could hurt.
-
Max Heim - ‘67 FB
-
-
The correct bolts have that nylon insert that keeps them tight. As well the water pump bolts are the same.
-
Gerald Drury
-
-
Use stainless steel bolts available at Home Depot for a few bucks. Ed
-
Along with the lock washers, put on anti seize! Different metals produce galvanic action and corrode.
-
Mike Jarvie - ’68 FB
Thermostats
-
The thermostat job is to keep the engine at an efficient operating temp, which is around 180-200. Too cool and it cokes up.
-
Max Helm - ’67 FB
Thermostats Types
-
170º is a little low for a thermostat.
-
180º is more typical.
-
195º is a high thermostat.
-
-
The 170 will open earlier, and then after it’s open, if your flow is limited, it has to be either an inefficient pump or a blockage somewhere — the radiator seems a more likely suspect than a “rebuilt” block or head.
-
If it’s a colder one – 160-180 – try swapping it out for a 195 to see if a little more restriction early keeps the temps in check.
-
Clair Davis
-
I don't think you ever want a 160o thermostat. The engine won't run that cool, so it's wide open all the time. And if it did run that cool, it would be bad for the motor -- excessive wear and inefficient combustion.
-
Max Helm - ’67 FB
-
High performance engines run best with a 195 degree thermostat (of course you want to have a plastic spacer under your carb to keep the fuel cool).
-
Ron Evans - ’67 Coupe
-
-
People think if they put in a cooler thermostat the car will run cooler — that isn’t what the thermostat does, except under Arctic conditions. Under normal US 3-season conditions, your car should probably run warm enough for the thermostat to be wide open, so it doesn’t make any difference. Except when it’s cold out, and you wonder why the heater is so feeble.
Bad Thermostats
-
You can tell when you have a bad thermostat if your engine is overheating but your radiator is relatively cool.
-
Nathan Nuttall - ’67 FB
-
The time to worry about the temp gauge is when it hits the top line.
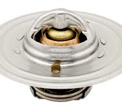
Testing a Thermostat
-
To check, take out the thermostat and put it in boiling water. The part that moves open on a thermostat should open about a half an inch.
-
You can help the flow of water by drilling a few 1/8" holes in the flat area of the base of the thermostat.
-
Phil Saran
Thermostat Manufacturers
-
If you can, get a Robert Shaw or Stant Thermostat. If they fail, it's in the open position so you can continue to drive the car. Robert Shaw also has a lifetime warranty.
-
Leanna ~ The CudaChick - ’68 FB
Water Temperature Sending Unit
Water Temperature Sending Unit Nuts
-
It is likely 8-32 which has the same thread pitch. If the thread is different, but the diameter is about right, then it is likely 10-24. Just a guess.
-
Nathan Nutthall
Overheating
-
Overheating can be caused by not enough advance at idle, so if you haven't already, you should check the ignition timing at idle. Also, can be caused by not connecting the vacuum advance:
-
Ron Evans - ’67 Coupe
-
-
Contrary to what we may think , pumping the water faster through the rad prevents the water/coolant from being properly cooled. If the water is passed through the radiator too fast, it doesn't allow cooler air to lower the temp. Obviously if the water passages are blocked or restricted the same can occur. (i.e. a thermostat not opening). You might want to also add a pressure gauge.
-
Tim Moller - ‘69 Conv.
Overheating and the Temperature Gauge
-
I’m driving yesterday and the gauge pins past 280o, then it drops 60o down to 190o and stayed there. On my engine I have two temperature gauges. the original electrical one and a mechanical one. The mechanical one is up front/top by the stat. It doesn't register until the thermostat is open. Before that it stays on the cold side.
-
-
The gauge goes to 280o? The coolant is never going to get that hot. If your engine was really running at 280o I think you would have other signs Boil, Boil Hisss, Hisssssssss. I would assume it's a stray reading.
-
190o is right where it should be.....cool, man, cool.
-
Max Heim - ‘67 FB
-
-
With a mechanical gauge, it shouldn't be an electrical problem. Try driving it a few more times to see if the problem repeats -- starting with a cold engine. It might be that your thermostat stuck closed and then opened.
-
Ron Evans
-
-
There might be some stray voltage going to the block and driving the sensor crazy. Or the sensor could be experiencing an air/steam pocket. This just makes me wonder if it's something as simple as the gauge malfunctioning. With it bouncing around like that it very well could be.
-
Dave
-
-
The best thing to do is to put the probe into a boiling pot of water along with a thermometer and see what it registers. Both should be close to
-
each other.
-
Mike J.
After Market Temperature Gauge
-
If you don't already have an aftermarket water temperature gauge, the very first thing you should do is install one, so you know exactly what the water temperature is, and can watch how it behaves under different driving conditions.
-
Ron Evans - ’67 Coupe
-
-
I’ve got this gauge:
-
http://www.speedwaymotors.com/Auto-Meter-5431-Pro-Comp-Liquid-Filled-Water-Temp-Gauge-140-280-Degree,7307.html
Radiator Coolant
-
All antifreeze is ~90% ethylene glycol. The balance is the additive package.
-
There are three basic chemistries of antifreeze additive packages:
-
-
The Conventional green stuff has a silicate based package. Conventional green silicate coolant becomes corrosive after a year. The downside to using this type of coolant is that it forms silicate crystals in the water pump seal. The crystals are extremely abrasive. Conventional antifreeze should be chemically tested with test strips for a quick go/no- go test. If you don't do any testing, plan to replace it once a year for a regular-use car, or 2-3 years for a garage queen. Your water pump will be leaking long before the bearings wear out.
-
-
There's also Organic Acid Technology (OAT), e.g. DexCool. DexCool is an excellent product but its problems are the result of drivers not maintaining their cooling systems. DexCool cannot be exposed to air in the cooling system. Any air will cause it to form a gel-like sludge. The recommended replacement interval is 5 years. Note: DexCool should not be used if you have brass in your cooling system (e.g. heater core). Brass is an alloy containing copper and zinc. The zinc is reactive with acids, and is corroded out of the alloy. What remains is a sponge-like structure of copper, which has no physical strength. This corrosion process is called dezincification. Put a pipe wrench on the pipe and it will crush and fall apart.
-
-
Finally there's Hybrid Organic Acid Technology (HOAT), which is what most of the auto makers are now using. HOAT is a good balance for a long-life coolant. Zerex G05 is a good choice. It’s OK for our older cars. It can be used with brass cooling system components.
-
-
In a newer car, follow the owner's manual instructions for coolant selection. Some vehicles require a specific coolant, or you may destroy the engine. Do not use antifreeze that says "Recommended for..." without listing the specific approval numbers; there's no way to know what additive package is in this stuff.
-
Ken Mayer
-
-
I buy the distilled water at the grocery store and mix 50/50 with full strength Prestone. When needed, I always top off with the reduced mixture, never just tap water. I drained the anti-freeze from my tractor and it looked like new and it's been over 10 years. I just run Prestone flush through the system, then flush with clear water and fill with Prestone 50/50 mix.
-
Jim Conner - ’68
Radiator Coolant Corrosiveness
-
The average car will have 80% or more of its additive package depleted after one year. Conventional green silicate coolant becomes corrosive after a year or two and has to be flushed and replaced. In a newer car, follow the owner's manual instructions for coolant selection. Some vehicles require a specific coolant, or you may destroy the engine.
-
Ken Mayer
-
-
Mixing colors is really bad for your block or radiator. Using anything other than the specified coolant will cause the cylinder walls to become eroded by cavitation, destroying the engine.
-
-
Conventional antifreeze can be used to top-off OAT and HOAT in an emergency, but you lose the long-life property. You will need to flush and replace it after one year. Use the correct antifreeze for best results.
-
Ken Mayer
Radiator Coolant Colors and Expiration Time
-
A colored dye is added to help identify it as something you should not drink. Color has nothing to do with the antifreeze chemistry. Ingesting less than a cup of ethylene glycol will kill you via kidney failure. The antidote for mammalian ingestion is ethanol (grain alcohol).
-
-
Green coolant lasts 3 yrs. It's environmentally bad. Orange DexCool lasts 5 years Red Zerex G05 HOAT lasts 100k miles / 5 yrs.
Aftermarket Coolant Additives
-
Good antifreeze should include enough corrosion inhibitors.They sell anti-corrosion additives alone in cans to add to your cooling system to replenish it. The thing with additives is, you have to drive the car to circulate them. Otherwise, it is just floating at the top of the radiator tank. Of course, drive it long enough to open the thermostat, and then run the heater to circulate that coolant.
-
-
Wixcool will neutralize the tap water and keep the minerals from reacting with the steel in the cooling system.
Replacing Coolant (when to change)
-
One would expect changing it every year would be plenty. But usually that explains why water passages are so gunky. The main deterrent is that it's such a pain to dispose of. The other hassle was draining the block, but now that I have new plugs in both sides that task at least will be simplified.
-
Max Heim - ’67 Fastback
-
-
To clean your cooling system in preparation for new coolant, first open the radiator and block drain(s). Replace them as necessary. Prestone used to make "Heavy Duty Radiator Cleaner" in a yellow cardboard tube. It’s discontinued, but GM lists it with a GM part number. The package contained oxalic acid in one end, and sodium carbonate in the other (Sodium carbonate can be found in the laundry soap aisle) . The oxalic acid has to be dissolved into hot water in a plastic bucket (wear a dust mask so you don't inhale the dust), then poured into the cooling system. Top off with clear water. Run the engine for an hour or two with the heater in operation, or take it for a drive if you can do it without overheating. Drain the acid solution and fill with clear water. Run the engine for a few minutes, then drain. Dissolve the sodium carbonate in water and pour into the cooling system. Top off with clear water. Run the engine until hot, then drain. Refill with clear water and run it again, then drain. You can use low pressure compressed air to blow out the heater core. Install the drains and fill with 50/50 or 60/40 concentration of antifreeze and distilled water. Install an overflow tank if you don't already have one. Install a new double seal radiator cap (it will have a rubber seal where it contacts the top of the filler neck). Keep enough coolant in the overflow tank so the system doesn't suck air when it cools. Make an entry in your maintenance log, with a reminder to change the coolant in 5 years.
-
Ken Mayer
-
-
When changing the coolant in your cooling system, refill using distilled water to prevent corrosion.
Testing Coolant
-
Most cars just sit parked all year. They say to test not only the freezing point of your cars coolant but also the acidity. Testing makes sense since they say if the pH stays above 10 no corrosion damage will occur.
-
Apparently, if you keep testing and it's ok, you don't have to change the coolant. Just change it when the coolant becomes too acidic. Amazon sells 50 test strips for $11. You can get a $3 hydrometer from any auto parts store.
-
Ed Lexus
-
-
Freezing is not really relevant here. But acidity is.
Drain Plug
-
There are drain plugs. Some have a square head while others have an allen head (hex socket). They are located in the center of each side of a V8. They may be near impossible to get out if they have been in there a long time.
-
Jim Lusk - ’67
Core Plugs
-
If you don't want your core plugs rusting out, there are two things you can do. When installing them, coat the entire inside surface with gasket shellac. Then maintain the coolant.
-
Ken Mayer
Draining Block
-
Removing the lower radiator hose will not drain out most of the coolant in the block. At least another gallon remains even after opening the drain plugs and even more when I rotated the engine on the engine stand.
-
Max Heim - ‘67 FB
-
-
If you disconnect the lower radiator hose at the water pump to drain the engine, that still leaves the block still half full. You can drain the rest from the drain plugs.
Radiator Flush
-
I have kinda a long ritual that I go through. It's because I normally don't flush very often. My belief is - if it's green and clean, it's OK. I know - supposedly the rust and corrosion inhibitors are all played out after three years.
-
-
First, I drain the old anti-freeze from the petcock. Then I drain the fluid from the bottom radiator hose. I capture all that for recycle.
-
-
Second, I run a bottle of CLR or Lime-away through with fresh water. I figure that's as good as the Prestone flush that costs about three times as much. Run the car at least 10 to 15 minutes to heat everything up. If you're not in a big hurry, give it a day to soak.
-
-
Third, I remove the heater hoses and backflush with clear water. I always heard you are supposed to backflush and not just run water through the normal circuit. I try to blow that out with air. on the third step I will take a single heater hose and connect from the water pump outlet straight back to the block. By that time the heater core is flushed and I don't want to pump water back in it. The residual water will dilute the 50/50 antifreeze mixture.
-
-
Fourth, I drain the cleaner out and run clear water. I usually run it for a while with the petcock open to flush the radiator and cycle the water through the engine.
-
-
Next, I drain the radiator and engine to get most of the water out.
-
-
I buy a gallon Prestone concentrate (the old style) and a gallon of distilled water. I always have empty containers, so I mix the anti-freeze and water 50/50. Then you get two gallons for about $10-12, depending on what WalMart is selling for at the time. I ALWAYS keep 50/50 in the garage in order to top any coolant off.
-
-
Last, fill the system and run it. Top it off as necessary.
-
-
That's my procedure. I never have cooling problems.
-
-
Since I don't flush mine all that often, I usually replace all hoses when I do a flush. I just keep the old hoses in a box in the trunk just in case. Never had to use one ,though. The only coolant failure I ever had was a tiny bypass hose on my 91 F-150. I always keep a good fresh bypass hose on a small block Mopar. I absolutely would not want to change one of those on the side of the road!
-
Jim Conner
-
-
Be careful. Some of those products really tear up the radiator and heater core.
-
Ken Mahan - ‘67-8-9 Cudas
Cooling System Troubleshooting
Overheating checklist
-
1. Low coolant
-
2. Incorrect coolant mix – should be 50/50 anti-freeze & water. The more anti-freeze you add, the less efficient the coolant mix will be in dissipating heat.
-
3. Loose or slipping belt – check for squeeling or glazing of the belt and correct tension on belt.
-
4. Radiator cap faulty
-
5. Thermostat stuck closed, or not installed.
-
6. Air trapped in coolant system – purge coolant system
-
7. Ignition timing to far advanced – over advanced engines cause the engine to run hotter.
-
8. Incorrect heat range of spark plugs.
-
9. Collapsed hose – typically observed when car is in motion, the water pump will suck the lower hose closed and block flow. To solve this you’d install a spring inside the lower hose.
-
10. Trash in between radiator/condenser – often times you’ll have a lot of leaves and other trash in between the condenser and the radiator – blocking air flow.
-
11. Inadequate airflow through radiator (missing baffling, shroud).
-
12. Insufficient cooling from radiator (either too small, clogged up or fins bent) - have radiator serviced and make sure it’s in good condition and correct for the application.
-
13. Fan Clutch (if equipped) faulty – a fan clutch will allow the fan to free wheel when it’s not needed. When the car is sitting still and the engine is hot, the clutch should engage and drive the fan.
-
14. Impeller or pulleys incorrect for application – under drive pulleys will turn the water pump slower – and reduce the amount of cooling. Aftermarket water pumps may spin the impeller slower as well. If you overheat in traffic – this may be the culprit.
-
-
Blown Head Gasket or cracked head – leaking exhaust into water jacket – You can check for hydrocarbons in the coolant and perform a compression test to determine if the head gasket is blown. Also, your oil may have coolant in it turning it into what looks like chocolate milk.
Cooling system Tech:
-
The more pressure the system is under, the higher the water can get before boiling.
-
-
With a 0 PSI cap water will boil at 212 degrees. For each PSI you raise the cap, you raise the boiling point temperature about 2 percent. So typically with a 15 PSI cap you boil at 252 degrees.