
General Information
-
Removing rust, straightening body panels, and correcting body lines and gaps are difficult and important steps to restoring a car. This aspect of the restoration can be the longest, most expensive, and most frustrating.
-
-
You can choose to have a shop complete all the work, or you can do some of the work yourself and have someone else paint, or you might be able to do it all yourself. This can be the most rewarding. Before jumping feet first into a project of this magnitude, think through the key components to this task: materials, available tools, and most important, your skills.
-
-
Whatever path you choose, begin by taking time to evaluate the rust areas that need to be addressed. The extent of rust you find on one of these cars varies depending on the life it led and whether it came from the “rust belt” or the “desert.”
Body Restoration Shops
-
Recommended by Mike Jarvie and Ron Evans.
-
-
Victor Rivera Restorations
-
5031 Lincoln Ave.
-
Cypress, CA 714 527-4463
-
-
He is next to the Alberto's on the corner of Lincoln and Moody in Cypress.
-
-
He is old school and uses lead rather than putty. He is the one that did my '68 Cuda and now is working on Ron Evans’ Cuda. Victor does great work but don't hold you breath as far as getting it back in six months. But you do have the advantage of this being his second ‘Cuda in his shop so he knows how they go back together. Victor’s Body shop is a 2 year wait.
-
Mike Jarvie - ’68 Fastback
-
Recommended
-
Gilbert's
-
Hayward CA.
-
Gilbert is a cool guy, a real car nut, but he himself admits that the business end is not his thing.
-
-
Kool Kars LA Body Paint
-
Recommended by Mike Jarvie, belongs to same club.
-
-
MoTech Performance
-
Murrietta, California
-
-
Here is where I took my ’69 Cuda is. Chris is the owners and is very knowledgeable. It took a year and a half and it is correct and beautiful. I highly recommend them.
-
Angel Garrido - ’69 FB
-
-
Chisum Collision
-
Tony Chisum
-
Bellflower
-
562-925-7111
-
-
Bob Perrine
-
Torrance
-
310-936-2550
Rust Spots
-
But all Barracudas have several common rust issues, and the front floorpans are near the top of the list. The driver’s side is usually the worst, but both front pans are highly susceptible to the ravages of rust. Other areas include rusted floorboards, trunk, quarter, and Dutchman panels. Additional places to look for rust are under the battery tray, including the inner fender under the tray. Examine all the doors, their front and rear corners, and the rocker panels. When you have it though, the only option is to cut it out. Otherwise the cancer spreads. Replacing rusted metal panels and patching rusted sections must be done.
-
-
Good, original body panels and NOS (new original stock) panels are difficult to find and very expensive when you do find the right ones for your specific application. Fortunately more good metal replacement panels are being produced now than ever before.
-
-
Auto Metal Direct (AMD) is a great place to acquire panels to replace all those. Often it is faster and much better to replace an entire panel rather than cutting out and replacing a section of an existing panel. It is a worthy goal to keep as much of your original sheet metal as possible. So even if you are not going to do the work yourself, you need to evaluate and document all of the rust problems that need attention and how much of these areas need to be replaced.
-
-
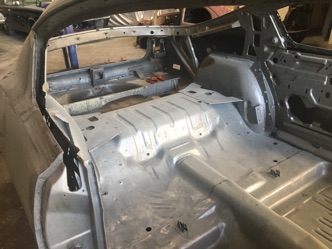
After removing all the seats, door panels, windows and mechanisms, and carpet, you can access any problems with rust-through or damage to the metal sub-structure.
z
-
Steel will rust and chances are your 50 year old ‘Cuda suffers from a rust hole or two in one of the body or floor panels. Water migrates to the metal, causing rust, and when left untreated, leads to panel rust-through. You have to remove rust spots, especially on the rocker and quarter panels. There are several ways to do it and this section explains how it’s done, either by you or your body shop.
-
To repair rust the right way, the rusted area must either be cut away completely and replaced, or ground down and treated. Minor scaling and pitting can generally be removed with a grinding stone on a power grinder. Major areas of rusted frame and body require completely removing the affected area and welding in new steel.
-
-
The surrounding area must be chemically treated with a rust neutralizer like OSPHO that contains phosphoric acid to ensure any remaining surface rust doesn’t reappear.
-
-
Areas like the lower rear quarter panels are welded to an inner quarter panel, which might be rusted as well. If the rusted area you’re repairing is small enough, it’s fairly easy just to cut the section out and weld in a new piece of steel. Another way is to repair it with a manufactured patch-panel. This saves some time because your body contours and lines line up properly. Welding will be needed to fix the hole. Use a wire feed mig-welder, set on a low voltage and wire-speed to create less heat. Use Vice-Grip style clamps to hold the repair pieces in place. Tack the patch and stitch-weld the panel around the perimeter so the heat generated by the welding process doesn’t warp the patch or the adjacent metal. The welds can now be ground flush. The patch will need a skim coat of body filler with block sanding before being primed and painted.
-
-
But a decision has to be made if it is worth replacing the entire panel.
-
-
Auto Metal Direct and YearOne offer new panels for our ‘Cudas.
Prep Work
-
Typical places for body repair:
-
engine bay
-
left front floor & right front floors
-
rear floor
-
trunk extension repair
-
quarter panels
-
-
The quarters or fenders might not be salvageable. After blasting the rust off the interior side of them, there might not be enough metal left. Not only will he have all the rust damage to fix, but he also will have collision damage from 30 years ago to deal with. The biggest surprise will be the number of patches your car needs. Probably a dozen or so in the floor pan, rocker panels, wheel wells and engine bay. And leave the K member and transmission mount with your body shop, as there are probably a couple broken welds he's gonna have to fix.
-
Jeff Ramin - ’67 Coupe
-
Sandblasting
-
I’m getting ready to begin stripping my '69 fish fb to get it sandblasted. I've got the engine in with the engine compartment already painted. I don't want to start over. So can I wrap my engine and take off the front fenders, strip the interior and sandblast and primer the body with out problems? A sandblaster in Long Beach says he can do it for $1200 and another $600 to primer. What do ya think?
-
Angel Garrido - '69 Fastback
-
-
If you sand blast the car with the engine in it, guaranteed that that motor WILL be toast in no time after you start it up. Pull the motor and any other part that moves under power.
-
-
If you are going to have it sandblasted remove everything you can. I had mine done and can tell you you will find sand for years to come.
-
Carl - ‘68 Conv.
-
-
Here is mine after media blasting:
-
http://www.forabodiesonly.com/mopar/showpost.php?p=1970197720&postcount=133
-
Michael Mosley - ’68 Cuda
-
-
You'll find that with sandblasting, it will get into every little crevice, crack, hole, etc. But yes, you can definitely cover/seal any area you want. Price seems fair as well.
-
Tim Moller - ‘69 Conv.
-
When they sandblast ask that they use a ROTISSERRE.
Sandblasting (Shot Peen)
-
The company I worked for was producing aluminum rims for the auto manufactures. I use to clean aluminum molds at one place I worked with shot peen. Anything that I could fit under my coveralls and carry it in to the shop got cleaned as I was cleaning the molds. I even cleaned the fender tag on the Barracuda with this. If I had used sand the fender tag due to the heat would have been destroyed. It would take approximate 4 hours per mold to fully clean it and was very important that no residue was left on it and shot peen worked very well
-
Darrell Stephens
Sandblasting (Dry Ice)
-
News from an industrial show in Orlando say that parts cleaning with the use of dry ice has gained some significant credence in the industrial world simply because it leaves no residue. It also has been used for mold removal in the construction field. I wonder of this might be the future replacement for sand and soda blasting. The dry ice generators were pretty compact but pricey, but could be a huge labor savings in body prep.
Sandblasting (Plastic Media Blast)
-
Consider a plastic media blast, it is less aggressive and does not heat the metal anywhere near as much thus reducing the chances of warping panels. Mine was about $1100.
-
Michael Mosley - ’68 Cuda
Rotisserie
-
When they sandblast ask that they use a ROTISSERIE.
Convertible on a Rotisserie
-
If you take the door off you have to make a brace to go in the door frame to hold it so your doors will fit. One side would attach where the hinge bolts to the body. Where do you attach it on the other side? Do you tack weld it somewhere?
-
Pat Faley - ‘69 Vert
-
-
You should brace the Vert with the doors off and on a rotisserie. 2x4s, work just fine.
-
Tim Moller - ‘69 Conv.
-
-
Use the hinge mounting points and the striker. You can add some other braces that just contact the rear part of the opening, too.
-
Jim Lusk - ’67
Transferring Car for Sandblasting
-
Take the doors, trunk lid, hood and front clip parts to the media blaster.
-
To transport the shell to the media blaster, you need a car trailer. Within a couple hours you’ll have the shell on the trailer! It really wasn't too difficult; we raised the tongue of the trailer as high as we could, to get the rear of the trailer just a few inches off the ground. Even though the height of the dolly is only 10 or 11 inches, that was enough clearance to winch the car up onto the trailer. Make sure you have a box of assorted chains and tie-downs. Once there, unloading the car took all of 10 minutes.
-
Jeff Ramin - ’67 Coupe
-
Sandblasting Shops
-
High Performance Industrial Coatings | Sandblasting | Powder Coating | Metallizing
-
Santa Fe Springs, California
-
Orange County Sandblasting
-
Orange, California
-
(714) 532-4633
Air Blow Out
-
Tip of the day: After the car is media blasted and primed, have the shop blow it out thoroughly with air to get the media out WITH THE CAR UPSIDE DOWN ON THE ROTISSERIE.
-
-
I had to blow out/vacuum mine four or five times after it came back from the shop to get the media to stop the media from falling out of crevices and body spaces when I started reinstalling stuff. I've heard stories from guys who put their cars back together and have had media falling onto new carpet for six months after the car was done every time they took it out for a drive.
-
Nathan Nuttall - ‘67 Fastback
Acid Stripping
-
The car body can be dipped in acid and all traces of factory paint, primer, tar, etc. are removed.
-
The car is stripped completely removed down to the metal. It is a 3 or 4 step process. The results are exceptional. After it is washed down to remove the acid, it can be sent to a body shop. Strip Clean in Santa Ana, California can do this procedure. Below is my car right after being dipped.
-
Angel Garrido - ’69 FB
-
Caustic Dipping Shops
-
Strip Clean, Santa Ana, CA (California) | Upspring
-
http://www.jalopyjournal.com/forum/threads/has-anyone-ever-used- strip-clean-co-in-santa-ana-ca.370651
Seal Coat
-
After metal sanding, spray on DP90. Designed to go directly over are metal.
-
And it steals the filler.
-
Next you can spray on primer filler K-38.
Body
Sheet Metal Work
-
Good sheet metal fabricators are scarce and Victor has a good one. The sheet metal fab doesn't sound very difficult.
-
Ron Evans - ’67 Coupe
Aftermarket Body Parts Prep
-
Most aftermarket body parts come with a black coating. That black coating is intended to remain, and should. Wipe it with wax and grease remover, scuff it with a 3M scuff pad if you think it needs it, rewipe, prime and paint.
-
Michael Mann
-
-
That black coating does very well to protect the metal, however you do need to sand it off anywhere you'll be welding. To protect those areas you should use a weldable/ "weld-through" primer. Several types are available both in spray on or brush on applications. I would scuff and prime over the rest of the panels.
-
Adam Guzicki - '68 Fastback
-
-
You only need to sand to metal where you'll be welding. Weld bare metal, or metal primed with weld-through primer. After, ordinary primer is OK, but epoxy primer (over the bare metal areas only) will give you added peace of mind. The epoxy primer should go on very smooth, but thin, and easy to sand through. Avoid sanding it. You can spray over it with regular primer if it needs worked.
-
Michael Mann
Aftermarket Body Parts Shipping Costs
-
Shipping is too expensive and would not be worth it. Buy from a local distributor so you do not have to pay shipping because a local place does a bulk order every couple of weeks. You may have to pay sales tax though.
Front Nose
-
Remove grille and front body nose as one unit. 4 bolts at center middle, 2 bolts each on each side going into chassis and fender and bolts underneath.
-
Max Heim - ’67 Convertible
Fenders
-
Fenders do come off with a few bolts. But also remember that taking it off requires taking off more of the front end parts also.
-
Mike Jarvie - ’68 Fastback
-
Consider putting sheet metal over the battery mounting area in the left inner fender (so left and right inner fenders will have the same shapes).
Fenders Removal
-
Remove fender by removing bolts over wheel well. Glue of some type is on fender between it and chassis over wheel well. Cut glue or pry away to separate body parts.
-
-
Remove fender bolts under fender at door. Another bolt or two is under hood hinge going from fender toward door. Small tight space.
-
-
Remove fender bolts from from chassis near radiator bracket.
-
Alan Erland - ’67 FB
Aftermarket Replacement Fenders
-
All 2nd gen fenders are scarce and expensive.
-
You can get complete fenders from YearOne.
-
Max Heim - ‘67 Fastback
-
-
Your only other options for fenders are: Venders at swap meets/online wrecking yards like Wildcat in Sandy OR. About 4-5 years ago I sold avery nice set of ‘68 Cuda fenders for $400 EACH!!
-
Phil Saran
-
-
Fiberglass replacement fenders:
-
You may have to weld up the marker light holes and redrill for ‘68 marker lights. Also may have to patch those fenders.
-
-
Front Fender Braces
-
The fender braces look like straps with the ends bent over. The front fender braces might be a rust problem, if it is the one directly and in front above the front wheels.
Aftermarket Front Fender Braces
-
The only place I've been able to find them, aside from take-offs, is below. The owner of the company used to own one of our model barracudas, so he made himself some, because he couldn't find any:
-
Ron Evans - ‘67 Coupe
Fender Splash Guards
-
Splash guard were made of metal or plastic. The purpose of the guard is to keep mud, water... out of the fender area, door jamb, door hinges and eventually the car interior.
-
Graveyard Cars
Fender Splash Guards Removal
-
The inner fender splash shields are bolted in. You can take out inner fender splash shields without taking off the fender. However, removing them also let's you get to the emblems to remove them real easy. I was trying to get to the emblems through the door jamb until I pulled the splash shield.
-
Dana Price
Fender Splash Guards Restoration
-
Clean and put a coat of rust inhibitor on the fender splash guards. Later put a couple coats of undercoating on the fender splash shields. After they dry,
-
re-apply the weatherstripping to those shields so they're ready to bolt in the car.
-
Jeff Ramin - ’67 Coupe
-
-
They make a plastic version if you don’t want to restore them. Dana Price
Fender Splash Guards Installation
-
On to the passenger side install the antenna and emblems before the splash shield. It would be difficult / impossible to install the antenna with the splash shield in place.
-
On to the drivers side, install the emblems before the splash shield.
-
The inner fender splash shields bolt in. You can replace them without removing the fender.
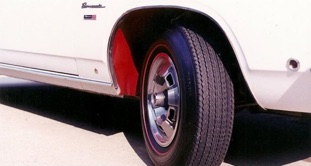
Red Wheel Well Liners
-
The Red plastic wheel well liners were a rare factory option adding $46.55 to the sticker price on the white ’68 fastbacks. They were for looks only on our ’68 Barracudas.
-
Bob Johnson
-
-
-
Chrysler did learn from it though. On the rusty Volare and Aspen, on the recall for the front fenders, they replaced the fenders and added black wheel well liners to keep the salty slush out.
-
-
They prevented the front fenders from rusting. They didn't protect the rear quarters behind the wheel wells though. Some rust may accumulate behind them on the car.
-
Jim Coalville
-
-
A bitch to keep clean on a daily driver of the day.
-
Dana Price
Front Fenders Rubber Seal
-
There is a seal for the area where the fenders sit on top of the inner fenders. The factory just used pookie (seam sealer).
-
Daty Rogers - ’67 Conv.
-
There is a long rubber seal that goes on the long edge of the rear splash shield for the fender. Steele Rubber Products on the East coast makes the rubber seal.
Front Fenders Splash Shield Gaskets
-
Originally it was an odd looking three cornered rubber seal that clips into the rear splash shield and fills the gap to the outer fender.
-
Stephen ‘Catfish’ Parker - ’67 Conv.
-
-
Splash shield gaskets are available from Detroit Muscle Technologies. I bought their "67-69 Barracuda MEGA Splash Shield Set" last year and am very pleased with it. There are 2 gaskets for the rear fender splash shield, top and outer. The outers are $24 pr. Their A-body catalog is at:
-
-
Ron Evans - ‘67 Coupe
Front Fender Bolts
-
Fender bolts should be the same as body color. If you put tools on them after painting it will damage the paint. It is especially noticeable on light colored cars. when I’m SURE the fenders are fitted correctly I’ll go in and touch up the scratches with a small brush.
-
Yes, bolts were body color. Look at my website. Particularly the Finding page and the Painting page. Although there are no photos of the fender bolts, there are a few other pictures with the original white that may show you some of the other details you may need (such as the blackout in the grille and valance tabs).
-
Rob Robinson - ‘68 Fastback
-
An option that doesn't look to bad is polished or zinc chromate bolts.
Quarter Panel
-
If you have damage up high, or intend to replace the subtle bends at the top/front of the quarter, I wouldn't recommend using them there because that portion is not as well detailed as the originals. If you do intend to cut your quarter up high and you want to use these panels, just cut and weld below those bends.
-
Nathan Nutthall - ‘6
-
-
When replacing your muscle car's quarter panel, you'll need trunk floor extensions.
-
Aftermarket Quarter Panels 3 companies that sell reproductions quarters made in Taiwan:
-
1)Sherman (makes patches and full panels)
2) Goodmark (makes full panels)
3) AMD (makes full panels)
-
Prices range from about $600/side to about $200/side, for essentially the same part. Some people swear by AMD, but other people have had good luck with the others depending on who you talk to. AMD sheet metal is good, but it is made in Taiwan. Classic Industries sometimes has sales giving up to 20% off. For quarters, AMD (Auto Metal Direct) has the full quarters out there. They are advertised as Sherman/Goodmark/Legion. AMD does make a full quarter for the fastback but not for the notch yet. AMD costs about twice as much as the others.
-
Ron Evans - ‘67 Coupe, ‘67 Conv.
-
-
AMD Part Description Part No.
-
1967 LH Quarterpanel Skin KQ167LH
-
1967 RH Quarterpanel Skin KQ167RH
-
1967 (Pair) Quarterpanel Skin KQ167LHRH
-
1968 LH Quarterpanel Skin KQ168LH
-
1968 RH Quarterpanel Skin KQ168RH
-
1968 (Pair) Quarterpanel Skin KQ168LHRH
-
1969 LH Quarterpanel Skin BN51LH
-
1969 RH Quarterpanel Skin BN51RH
-
1969 (Pair) Quarterpanel Skin BN51LHRH
-
-
You can get complete full quarters from YearOne.
-
Max Heim - ‘67 Fastback
-
-
Sherman and Goodmark panels are made by the same manufacturer. Some Sherman and Goodmark parts have fitment and other quality problems. Sherman or Goodmark products might be OK for patches. I have used Sherman panels to patch the lower rear quarter of my '67 fastback and it worked out very well.
-
Nathan Nutthall
-
-
Skins and are imported by Goodmark and sold through many various distributors including local bodyshop supply houses. If you have one local you may want to check if they would order them with their next stocking order thus saving you some if not all of the shipping charges. The skins are made by Legion in Taiwan. The body likes are not as sharp and the panels will takes some work to get straight. My best advice is only use as much of them as absolutely necessary.
-
Carl - ‘68 Conv.
-
-
The cheapest are at a place called C2C Fabrication out of Detroit. You can get a pair of quarters shipped to my door for $350 after applying a discount they are currently offering. They also offer fender patch panels and they were the cheapest on this part as well. The patches are the skins only.
-
Jaden - ‘67 Coupe
-
-
I couldn't imagine what C2C quarters look like or even the extensions. I got a trunk pan from them for my Polara (a very simple panel) and it was garbage, one step away from bare stock sheet metal. The reliefs were barely more than a scratch.
-
-
The C2C quarters are the same ones sold by Sherman as the part #'s are identical (250-50L and 250-50R). The brand C2C are selling aren't the Goodmark brand. They are all coming from the same place in Taiwan under the Legion namesake.
-
-
Left rear patches alone would cost another $199 + $60 shipping from Auto Body Specialties. I think I'll just get a complete skin from Classic Industries for $210 + tax (local pickup, so no shipping cost). Last year, Classic gave 15-20% off over the Veteran's Day weekend.
-
-
I bought a bunch of panels from CARID and I think I got 5% off for jumping through some hoops or simply asking the sales rep for a discount -- he did give me a % off when my order total was like $800. Most of the panels were Goodmark. I haven't installed them yet.
-
Ed
-
-
I have one AMD rear quarter on the Cruiser - the comment from the body shop was that the body contour line was not as sharp as it could have been, but other than that it was a good quality piece.
-
Steve Toth
-
-
I have both new full AMD quarters on my fastback and have got overwhelming responses on the fit, finish and body lines. Who installs and finishes them are as important as the metal itself!
-
Gerald Drury
Floor Pan
Floor Pan Replacement
-
It depends on your ultimate goal. If it is to be a stock restoration for show, you would want to replace the whole pieces and install in the same manner as factory if at all possible. For trunk floor, that would mean cutting out the quarters and possibly the rear deck/taillight panel to get that one-piece floor in there. For floor pans, it means carefully grinding the front flange free of the old pan material or drilling out those spot welds especially. Both panels are spot welded at factory so this makes for best stock appearance. The sides of the factory style floor pan isn't visible from underneath, but that flange is and needs to be spot welded for real or carefully drilled and MIG welded such that the welds look like spot welds. I use and prefer a Lenco panel spotter but it isn't the only choice. If original appearance isn't of prime importance, then the floor pan can fit over the remaining edges of the cut out original, which is easier. Seal the bottom so water doesn't get in between old and new and it lasts, but is obvious from underneath.
-
Bill & Kathi Parker
-
-
If the tunnel is good, I would just replace the sides separately, but if the tunnel is bad, you are better off just swapping out the whole thing. Just be sure to take all the weight off the T-bars and support a lot of the weight under the K-frame to reduce stress on the floorpan area before you cut the old one out.
-
Nathan Nuttall - ’67 FB
-
-
There are two good ways to do it. One, you replace the entire panel and cut out the spot welds. Then plug weld the new panel back in. For the floor, this is difficult and expensive because the entire floor is probably the largest piece of sheet metal on the entire car and is tied to the structural t-bar mounts etc. So most people just replace them 1 section at a time. If you do it this way, then it is best to cut it evenly and butt weld it into place. After grinding the welds down, you can hardly tell it was replaced, except that it can be difficult to grind all the welds down on the underside of the car. You end up doing all the welding, cutting, and grinding in very close quarters under the dash so be sure to wear full protective gear including ear plugs. Warning, it is hard on your back, so it can help to jack up the car first.
-
Nathan Nuttall - ’67 FB
-
-
I had someone else do but this is what they did for my notch: 1. removed door so they could get in floor as 1 piece 2. cut welds and repaired floor supports 3. treated metal that stayed on car
-
painted all metal
-
Omar Lehr
-
-
Also, here are some pretty good articles on it:
-
http://www.hotrod.com/how-to/paint-body/1506-how-to-replace-a-
-
rotted-out-floor/
-
-
http://www.hotrod.com/how-to/paint-body/1510-1967-plymouth-belvedere-how-to-replace-the-floor-in-a-classic-mopar/
-
-
http://www.hotrod.com/cars/project-vehicles/1401-1969-dodge- charger-project-50-floor-replacement/
-
-
This link is essentially on how I do it.
-
http://www.hotrod.com/how-to/paint-body/hrdp-1007-how-to-replace- floorpans/
-
-
One of the articles says to just mig weld through the electro-deposited coating on the new floor pans, but industry practice is to clean any mating surfaces to be mig welded down to bare metal, and then apply weld-thu primer to those bare metal areas. After welding, all seams should be covered with seam sealer. Any rusty surfaces not replaced should be cleaned, coated with rust converter coating, then coated with a top coating.
-
Ron Evans - ’67 coupe and vert
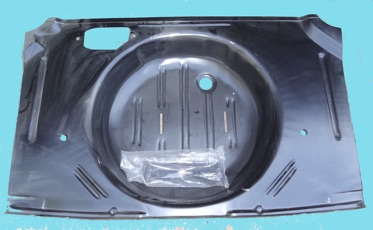
Aftermarket Floor Pan
-
You can get the entire floorpan for about $360 plus a boatload for shipping. You can also get just the separate sides to save some money. They are made by AMD. Depending on where you are located you can get them directly from AMD or on the East Coast YearOne and on the West Coast Classic Ind. in Huntington Beach, CACheck out ebay or even Summit Racing.
-
AMD (Auto Metal Direct)
-
Buford Georgia 866 591-8309
-
You can get complete floor pan from YearOne. Max Heim - ‘67 Fastback
-
Part DescriptionPart No.
-
1967-'76 A-Body Front Floor Pan (LH) 1967-'76 A-Body Front Floor Pan (RH) 1967-'76 A-Body Front Floor Pan (Pair) 1967-'76 A-Body Front Floor Pan (LH, Hi-Quality) 1967-'76 A-Body Front Floor Pan (RH, Hi-Quality) 1967-'76 A-Body Front Floor Pan (Pair, Hi-Quality) 1967-'76 A-Body Rear Floor Pan (LH)
-
1967-'76 A-Body Front Floor Pan (RH) 1967-'76 A-Body Front Floor Pan (Pair)
-
JS6002LH JS6002RH
-
JS6002LHRH M224LH
-
M224RH M224LHRH
-
JS6001LH JS6001RH
-
JS6001LHRH
-
Year One P.O. Box 129 Dept. MM1202
-
Tucker, GA 30085-0129 800/YEAR-ONE www.yearone.com
Taillight Bucket
-
The taillight buck aren't part of the repro quarterpanels so you would have to fabricate a set from scratch.
-
-
http://www.ebay.com/itm/1967-68-69-Plymouth-Barracuda-P-S-QUARTER-PANEL-TAIL-L
Trunk Floor
-
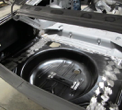
The AMD trunk floor would have to be modified some to work where the filler neck goes through, it is correct for later A body cars, not for our cars, especially the fastback. Trunk Floor | AMD 840-1267-L
-
Michael Mosley
-
-
-
-
You can get complete trunk floor from YearOne.
-
Max Heim - ‘67 Fastback
-
-
Part Description Part No.
-
1967-'74 A-Body Trunk Floor (LH) M217LH
-
1967-'74 A-Body Trunk Floor (RH) M217RH
-
1967-'74 A-Body Trunk Floor (Pair) M217LHRH
-
1967-'74 A-Body One Piece Trunk Floor M216
Trunk Extensions
-
The trunk extension are available. AMD just did come out with the trunk extensions in late 2012. The AMD's are the only ones built specifically for the ‘67-’69 Barracudas. They fit nicely without much effort.
-
Gerald Drury
-

-
Aftermarket Trunk Extensions:
-
-
67-69 Barracuda Trunk Floor Extension - LH
Trunk Channel
-
Rust on a car usually is found in the trunk area. The trunk is supposed to be body color. The factory applied a seam caulking.
-
Jim Conner - ’68 Cuda
Trunk
Trunk weatherstripping
Trunk weatherstripping Installation
-
Start at the lowest point, (middle rear, not middle top near window). Don’t want water to drip into trunk at joint of stripping.
Outer Wheel House
-
The outer wheel house are available.
-
-
Outer wheel house:
-
http://www.autometaldirect.com/body-components-outer-wheelhouse-c-23_111.html
-
-
You can get complete trunk floor from YearOne.
-
Max Heim - ‘67 Fastback
-
-
Part Description Part No.
-
1967-'69 Outer Wheelhouse Panel (LH) BN35LH
-
1967-'69 Outer Wheelhouse Panel (RH) BN35RH
-
1967-'69 Outer Wheelhouse Panel (Pair) BN35LHRH
Sealing in Channels
-
I'm cleaning and repainting the underside, and am trying to figure out ways to get rust sealant inside the channels.
-
Ron Evans - ‘67 Coupe
-
-
After blowing out the channels really well I shot Fluid Film through my old Rusfre undercoating gun with the 30" long extension tube and nozzle attached to it. Poked it through any channel holes I could and it seemed to work well for me. I think Eastwood may have a similar gun for about $100, or they have some aerosol can stuff now too. (Eastwood has a 60" extension). I'm not sure anyone really knows if they got 100% coverage on rails, but anything is better than nothing and I have had vehicles undercoated with Fluid Film with great success. My ‘97 Ram has had multiple treatments and has virtually no rust anywhere on the body or frame.
-
-
Seam Sealer
-
The black tar like substance around seat belt holes and floor pan joints is sealer. It was used to keep water from entering around bolt holes and to seal joints.
Seam Sealer Removal
-
The seam sealer maybe tacky or hard. Mine was hard after 50 years. I just pryed it off with a scrapper. If they sandblast or dip your car, then there is no need to remove it yourself.
Seam Sealer Restoration
-
Use seam sealer (brushable or in tube) around the panel laps/joints to just make sure no water comes in if you run through puddles and/or get caught in rain. Better safe than sorry and it will be hidden under carpet anyways. With the new molded carpet kits I haven't found really much need to "glue" the carpet down. Others may disagree.
-
Rob Robinson - ‘68 FB
-
-
Yeah, no need to glue down carpet. You could a layer of sound deadener while you are at it.
Aftermarket Seam Sealer
-
I have remnants of a can of MarHyde brushable seam sealer I bought and used on some welded in patches (trunk and floor) on my Dart project over 15 years ago. No cracking or shrinking that I can notice, but the car is still undriven. I found the can and used some on a small patch in the Dart vert's floor about five years ago, and it was thicker but still usable - maybe smearable instead of brushable.
-
Find a good local autobody supply shop. They will know, and will probably be happy to help.
-
Michael Mann
-
-
I used Lord Fusor HD Seam Sealer over sheet metal seams.
-
http://www.ebay.com/itm/Lord-Fusor-HD-Seam-Sealer-Black-9-5-oz-
-
Cartridge-805HD-/141037077569? hash=item20d6770441:g:uxcAAOSwq7JT9NPo&item=141037077569 &vxp=mtr
-
-
803 is thicker, for filling bigger areas. Can be brushed to whatever height you want. It can be applied both direct to metal (after cleaning) and over primer (after scuffing and cleaning).
-
Ron Evans - ‘67 Coupe and Conv.
Valence
Front Valence
-
The front valence has tabs. They were there to beef up the corner area — the valance is a little bit flimsy as it is.
-
Max Heim - ‘67 Fastback, ’67 Conv.
Valence Installation
-
Bolt on the front valence. If not you will hear the fenders rattle without any lateral reinforcement.
Valence Paint
-
They were flat black from the factory, presumably to make them disappear. Tabs are normally blacked out on lighter color cars. It follows the same convention for the blacked out areas behind the grilles. My car was white originally and was blacked out.
-
Rob Robinson - ‘68 Fastback
-
-
Note that the "tabs" on the lower valance are also painted black on light color cars. I also reshot those to give that valance a more smooth feel.
-
Ron Evans - ‘67 Coupe
-
-
I actually think they were black on all cars. It’s not really the same situation as the blackout behind the grill. That was so the random- shaped areas of bright color on either side of the radiator wouldn’t show through the grill mesh and look awkward (and it definitely looks awkward when people forget to do it). The valance tabs were equally visible on all cars regardless of color. And they were masked and sprayed, not just quickly shot with a gun freehand.
-
Max Heim - ‘67 Fastback, ’67 Conv.
Rear Valence
Exhaust Cutouts
-
On the ’67, they had double little circle cutouts for the 383 cars with dual exhaust. They weren’t as large as the one side resonator cutout or the ‘68 dual exhaust cutouts, but they were there. Only the 383s had duals. The 273 had a single exhaust only.
-
Rob Robinson - ‘68 Fastback
-
-
People don’t think they had cutouts because they are tucked up so far under the curve. When you are standing up, you can’t see them until you back off a
-
considerable distance.
-
Max Heim - ‘67 Fastback
-
-
You could tell if it was a factory Commando 273 by the rear valance — it would have a single rectangular cutout. The regular 273 would have a single half-round cutout, like the slant six. A 383 would have dual round cutouts.
-
Max Heim - ‘67 Fastback
-
-
The factory ’68 had a single exhaust cut out on the driver's side.
-
Michael Mosley
Spoiler
-
Some of us placed a lower lip spoiler (air dam) that I think adds to the look in a positive way.
-
Dr. Bob - ’67 http://www.forabodiesonly.com/mopar/showpost.php?
-
p=1970541645&postcount=309
Aftermarket Spoiler
-
Spoiler is from "Spoilers by Randy", a company in Arkansas. Some people have had issues with fit, but probably because their lower valance was a bit tweaked. Randy now has a "warning" on his site and shows you how to check the valance.
-
http://www.spoilersbyrandy.com/Pages/6769BarracudaSpoiler.aspx
-
Michael Mosley - ’68 Coupe
Spoiler Installation
-
You can install it by yourself. You’ll have to remove the valence to do it. After that, the valence will then have the same contour as the spoiler and requires some "effort" to get the holes in bumper to align the way they did. Getting the valence to match the contour of spoiler requires drilling holes and bolting it together using 10-28 cap screws and nylock nuts. This eliminated gaps and made the whole install look pretty good.
-
Dr. Bob - ’67
Front License Bracket
-
The license bracket is a piece of metal that attaches to the body of the car to hold the front license frame. There are two bolts at the top on the bumper tabs, bottom to the support brace that runs to the K. The brace I am referring to goes from the K forward to the radiator support. The bracket goes on top of the tabs.
-
Michael Mosley
Rear License Plate Bracket
Rear License Plate Bracket Restoration
-
Clean up the plastic nuts that are used to mount the rear license plate. The license plate light bracket has a lens. Replace if it is missing.
License Plate Bracket Reinstallation
-
Clean up the plastic nuts that are used to mount the rear license plate. Then install them in the rear valence and bolt on the license plate.
-
Hood-to-Cowl Seal
-
Install the hood-to-cowl seal. That will keep water off the firewall.
Body Plugs
-
There are body plugs right behind the rear wheel facing towards the inside of the body. These are special plugs that allow water to drain. Might not be a bad idea to remove them and flush the crevices if your car ever sat for any amount of time.
-
Jim Conner - ’68 Cuda
-
-
There is a factory 1" hole and plug in the front of the rockers, and I am thinking about punching a similar hole in the rear, and maybe a couple underneath, and then plugging them.
-
Ron Evans - ‘67 Coupe
-
-
At the rear of the channel there is a plug like the front one but it is on the inside edge, not underneath. It's right in front of the rear wheel well.
-
Steve “Catfish” Parker - ‘67 Conv.
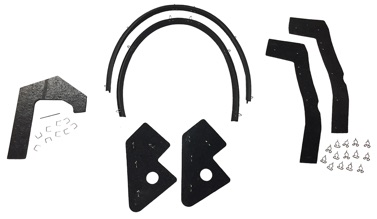
Splash Shield Set
-
Without these you will have road dirt getting into your door jambs.
-
You need them! The long skinny ones seal the splash shield to the fender in front of the door hinges. The triangular? shaped piece goes at the top of the rear splash shield the hole is for accessing a bolt. The j shaped ones seal the back side of the head light bucket area from road dirt and splashes.
Jim Hagan
Aftermarket Splash Shield Set
-
DMT (Detroit Muscle Technology) sells them. Included in the set are:
-
Headlight splash shields, 2pcs (behind headlights under front fenders)
Door hinge top splash plate shields, 2pcs (top of metal splash plate in frt of door hinges)
Door hinge splash plate edge seal, 2pcs (clip onto edge of metal splash plate in frt of door hinges)
Starter area splash shield with stainless clips and drill bit, 1pc (on auto cars only)
Filler Neck
Filler Neck Gasket
-
An issue with the filler pipe gasket is the new floor has a much wider hole, so the old gasket won't cover it. Presumably there is a gasket that fits this hole, but my question is, is this a year to year change, or a fastback vs sedan thing?
-
Max Heim - ‘67 Fastback
-
-
If you plan on reinstalling the rear storage deck, it appears you are going to have to go with the original gasket and hole shape, unless you modify the rear deck support to accommodate the later gasket.
-
Steve
-
-
There were two gaskets. The one I had is listed for 67-69 A-body (9096008), and there is a wider one listed for 70-74 A-body (9096008A, annoyingly photographed from the wrong direction -- 180 degrees compared to the other one). The repro floor seems to have a 70-74 cutout (something to look out for). Since there doesn't seem to be a difference in the tanks, the floors, or the gaskets between fastbacks and non-fastbacks, I don't see why this later one wouldn't fit my filler tube. Otherwise, they said they could add metal to make the hole the right shape, but that seems like a lot of work, and could distort the floor.
-
Max Heim - ‘67 Fastback
-
-
It's a little more complicated than that. That bump near one end is a tight fit into the gasket, but I don't think the old bump was in the same place as the new bump, comparing the gasket profiles. It doesn't line up the same with the filler neck hole, and the filler neck is the fixed point, not the "bump".
-
So you'd have to cut the bump out, and fill the hole with flat stock, then figure out where to splice the bump in, and cut out a new hole the correct shape in precisely the right location, and drill the bolt holes. I'm not even sure that the "bumps" are the same size/shape, now that I look at the gaskets again.
-
The tank and filler neck are out of the car, obviously, so you can't take the alignment from them.It's a pain getting the tube aligned with that gasket -- the newer design was intended to create more flex at that point so it's easier to install, and more likely to seal properly.
-
-
Another argument is that over the life of the vehicle, it's better to have fewer seams in the trunk floor. And it's not like I would be pretending it hadn't had major bodywork.
-
The repro trunk floor is correct only for 70-up; it can be used as-is for notchbacks and convertibles, with the appropriate gasket, but requires modification back to the original hole layout for fastbacks.
-
Max Heim - ‘67 Fastback
-
-
I said "disassembled", so I thought I'd show you what I meant. Here's my photo album. The shop photos start about halfway down.
-
Looks like the correct one for the AMD floor pan. https://www.yearone.com/Product/1966-74-a-b-e-body/a0710 List as 71-74 A-body #A0710.
-
Gerald Drury
Aftermarket Filler Neck Gasket
-
Jim's Auto Parts has the same piece for $29. I just put one in my ‘67 Barracuda and it works great. Save a few dollars!
-
Dr. Bob Breed - ’67
-
-
R/T Specialties has it for $25.
-
GT-2883A or GT-2883 both are more than $33.00. The GT-1831 would be the same he and I have.
-
Gerald Drury
Frame Connectors
-
Frame connectors add stability to the chassis frame. Given a choice, for any car, do both the sub frame connectors and the torque boxes. The combination greatly increases the rigidity of the platform. This will result in a car that is quieter, handles better, rides better and is more durable. The door gaps do not move. The difference in flex is quite noticeable.
-
-
If the connector is wimpy enough to bend when jacked, it’s too wimpy to do the job — what’s the point? The reason to continuously weld it is that it is much stronger that way. It’s like plywood sheathing on the studs of your house, making it earthquake-safe. If it’s only welded on the ends, it’s like a fire block nailed between two studs, it’s strong for push and pull, but not for twist or skew.
-
Max Heim - ‘67 Fastback
-
-
Yeah, it's the twist and skew reason that the torque boxes work well. They tie the front & rear frame rails to the strong rocker panels that act as a mid-section frame. And because they are wider apart, they offer more stiffness control for twisting. They are also a lot easier to install and less intrusive. So I would put those in if you haven't already before putting in frame connectors.
-
Nathan Nutthall - ‘6 Fastback
DIY Frame Connectors
-
I made my own with 1.5” square tubing. They are very solid and we actually look for them to put the jack under when lifting the whole car from the side. A little prep work using some cardboard for a template makes the fitment very simple. Then you can weld them out and rock and roll. They aren’t the best, but all I have. I ran them at a little angle so the line up with the frame on both ends. We installed these after we welded in the new torsion bar crossmember.
-
-
They are welded to the rear floors, and stand proud of the front floor.
-
Max Heim - ‘67 Fastback
-
-
Basically drew a line from the bottom of the rear frame to the bottom of the front frame and cut them to fit inside that.
Aftermarket Frame Connectors
-
US Car Tool makes a nice set for $169 a pair.
-
I have the US car tool continuously welded-in connectors that are contoured to the floorboards plus their torque boxes installed in my FB. After they were installed I could actually feel that the frame was stiffer when I drove down the road, especially on the freeway when I came to a dip. And I didn't think the car had body flex before the install.
-
Steve Toth
-
-
I prefer the kind that does not continuously weld onto the floor pan. The reason I don't use US Car Tool is because I am concerned they might bend the floor pan if someone mistakenly uses them to jack up the car, or if I hit a bump.
-
-
I have the Auto Rust Technician (ART) connectors on the dark blue notch, and am very pleased with them. Classic sells them for $129 a pair, so you would have to buy some other stuff to get the 15% off. The ART connectors are beefier, and won't bend if someone inadvertently uses them to jack up the car, or if they hit a bump. The ART part is very stout. I'm not at all worried about it being more susceptible to twist or diamond than those connectors that weld to the floor pan. The ART material is box tubing, not bent sheet metal. We did stitch it to the rear part of the pan, because it comes very close to the pan in the rear, but it isn't stitched in the front. The ART boxes are thicker than stock, and the ART connectors are pretty stout also.
-
-
Torque boxes should go in first. I used ART boxes, but had to do a lot of trimming to get them to fit right. If I ever put in torque boxes again, I'll try the boxes made by US Car Tool.
-
Ron Evans - ’67 Coupe, ’67 Conv.
-
-
I installed the Hotchkis connectors on my primered car, and now wish I had not, because they are intentionally made from a thin material to save weight, so it's just a matter of time before they get creased.
-
Ron Evans - ’67 Coupe, ’67 Conv.
Sub-Frame Connectors (Torque Boxes)
-
All convertibles have subframe connectors torque boxes). There is a right and left hand version. These tie the front frame rails to the rockers. In the back you have the same thing. These tie the rear frame rails to the rockers.
-
Graveyard Cars
Cowl Drains
Cleaning Cowl Drains
-
Stick a bent coat hanger into the nickel sized drain holes to stir stuff up and a vacuum cleaner to suck stuff out. Clear out the junk down where the fenders drain, too. You can see into there if you open the doors half way.
-
Ed
-
-
Remove the splash shield and work at it. As it gets cleaner run water through the cowl. I did my Barracuda with the fenders off, but they were coming off anyway.
-
Jim Lusk
-
-
This Australia Valiant Charger image shows the inside of that vent really well.
-
As you can see, rust is a common problem in the cowl area. If you have the heater box and/or vent removed already, you can put your hand up inside from the bottom and grab large handfuls of stuff if yours is really packed. Otherwise, those two drain holes on the sides will be the best way to clean it out. Also check the lip of the vent area to make sure that they don’t leak.