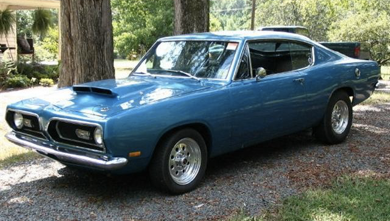

General Information
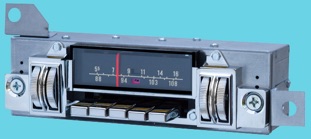
Radio
-
Keep the thumb wheel radio in the car to keep it authentic, and to listen to your favorite radio stations.
-
-
-
Things to Consider When Setting Up a Radio/Sound System
-
The main question is the radio.
-
- Do you want one that looks stock but has all the upgrades?
-
- AM/FM stereo with 100 amps or more output?
-
- Or do you plan on modifying the dash to install the radio?
-
- How many speakers, 4, 6 , 8?
-
- Where do you plan on mounting the front speakers?
-
- Where do you plan on mounting the rear speakers?
-
- Do you plan on doing this yourself or have someone do it?
-
Max Heim - ’67 FB
Radio Power
-
On the lower side of the dash (just in front of the shifter), the wires run from the trans to the bulkhead and into the cabin (purple and white wires). The radio power wire from the fuse panel also powers the reverse light circuit (at least for manual cars). You can trace the wires from the fuse panel to the bulkhead and into the cabin (purple and white wires).
-
jbeintherockies
-
-
In a convertible, you need serious power and lots of speakers to hear anything with the top down.
-
Max Heim - ’67 FB
-
-
The radio dial light is supposed to come on with the interior lights. The radio power should be from “ACC”. The dial light and power lead are hooked up to the same wire.
-
Max
-
-
There will be two coming out of the radio. One of those wires will be for power. The other one will go to the light in the radio. This wire will only have power when the light switch is turned on. The power wire for the radio is usually red.
-
Darrell Stephens
AM Thumb Wheel Conversion (Retro Radio Restorations)
-
There are several companies that will convert stock radios.
-
Retro Radio Restorations, Secret Audio and Antique Auto Radio.
-
-
Antique Auto Radio
-
Check the Antique Auto Radio website for an authorized dealer. I retired an am no longer a dealer. You get 45 watts rms per channel and the use of the standard wiring harness connections for power and dial light. You can add an auxiliary stereo input jack for Ipod and preamp output jacks if you want to run a power amp or subwoofer. Also you AM/FM stereo radios can come with MP3 input as well as Bluetooth for streaming audio or hands free cel phone operation are available options. Comes with a one year warranty.
-
-
The features and specs on the converted and repop radios are the same with a few minor differences:
-
On repops the speaker arrangement is switch selectable on the back of the radio, the repops have an AM/FM dial on conversions. The conversion converts a standard AM radio into AM/ FM. It is programmed in ahead of time and is set, and the converted AM radios still have the AM dial. Both sound great: 40hz - 20,000hz response with 45watts continuous per channel (180 watts total). With good speakers you get home quality stereo in your fish.
-
Steve Toth
-
-
Base conversion price is $395 includes the MP3 input. They refurb any defects such as the infamous split nylon tuning gears, slipping tuning clutches, faded dial indicators, burned out dial bulbs, etc., AND find replacement parts for any broken controls, AND add components to make the volume and tone control response linear (so all the change doesn't happen at one end of the control rotation), AND do a complete operation check and 4 hour burn-in prior to delivery noted on an included completion checklist signed by me.
-
-
Plus you get back a nice, shiny, new looking radio. Totally stock appearance. The price does not include rechroming.
-
-
Check it out at:
-
-
-
Old Car Radio
-
(423) 785-6333
-
(423) 653-3054
-
-
-
Retro Radio Restorations
-
I had my radio internally retrofitted by Retro Radio Restorations for about $350 and allows for MP3, iPod, etc. Still looks original and thumb wheels still work as designed.
-
David Martin
-
-
I had my original AM Thumb Wheel converted to AM/FM, 85 Watts RMS, with a CD input. I've got a Panasonic 8 CD changer mounted in the trunk. But these days I rarely use the CDs. I just plug in the IPOD and Rock.
-
-
Secret Audio
-
The only guy I know of that's used the secret audio stuff was Tim Moller.
-
Famous Frank is a distributor for Secret Audio.
-
One Secret Audio lasted for one year and shorted out the electrical system.
-
-
Actually, what we listen to is our satellite radio and the only reason I want the Secret Audio is to hook it up to the satellite. What I had thought of doing was to hook up an amp to the speakers and then connect the satellite radio to that bypassing the whole radio thing. But I can't seem to get that across to some of these kids at the audio shops around here.
-
Mike Jarvie - ’68 Fastback
-
-
Even easier than you think. I am assuming your satellite radio is portable, has something like a 12V power adapter you plug into a cigarette lighter and a headphone output.
-
-
http://www.pyleaudio.com/sku/PFA100/30-Watt-Class-T-Hi-Fi-Stereo-Amplifier-with-AC-Adapter-Included
-
-
All you need is something like this and a matching pair of 6x9 speakers for your package tray. They also make a version for USB input.
-
Michael Mosley - ’68 Coupe
-
-
Classic Industries
-
Classic now sells new radios for our cars for about that same price.
-
Mike Jarvie
-
Radio Reproductions
-
You can get radio reproductions for 1967 - 1969 Mopar A body cars.
-
-
Pros: AM FM Stereo Radio KHE300-USB RCA PRE-OUTS
-
FRONT AND REAR AUXILIARY INPUTS 200 WATTS (50 X 4) AVAILABLE IN BLACK OR CHROME
-
-
Cons:
-
The digital displays can be hard to see in the sunlight especially in a convertible.
-
Buy them from Vintage Auto Radio. http://vintagecaraudio.com
-
http://www.vintageautoradio.com/index.php? page=shop.product_details&category_id=3&flypage=flypage_new.tpl&
-
product_id=360&option=com_virtuemart&Itemid=67
-
-
The K & C Harrison Radio is similar to the old Custom Auto Sound radios. The Custom Auto Sound has a disappointing tinny sound and poor quality. Much better sound with an amp to boost the bass. Hopefully the K & C Harrison Radio is better. One thing I do know about them is that you MUST use a good solid state voltage regulator in your car, or the radio will cut out because of the voltage spikes. It shuts off with any voltage above 15 volts which is really close to the 14.0 volt average. It might be wise to filter the power going into it with a large cap just to be sure.
-
Nathan Nuttall - ’67 Fastback
-
-
Retro Sound makes one. This is the one you will want. They have thumb wheels available too. The revolutionary new Redondo radio brings modern technology to your classic Mopar. With Bluetooth®, SiriusXM®, iPod® and iPhone® compatibility, Redondo is the most technologically advanced car stereo ever produced for your classic Mopar. Redondo is the only radio to feature both period-correct thumb rollers and a separated push-button assembly specially designed for Mopar cars. The face of the radio can mount independently of the radio body, allowing for easy installation at any angle – even in the tightest spaces.
-
Rob Robinson - ’68 Fastback
-
FM Converter
-
You can buy an fm converter that'll plug into your existing radio and come up as a radio frequency. You connect the radio antenna to the unit and the unit to the radio antenna input on the radio. Don't really need to pull anything, just need to feed the unit juice.
-
-
Maybe something like this will work:
-
http://www.forabodiesonly.com/mopar/showthread.php? t=152662&highlight=radio
-
I am also still considering this option: http://www.wardsclassiccarradiorepair.com/id17.html
-
Michael Mosley - ’68 Coupe
-
-
I now use a JVC CD/AM/FM/HD receiver with remote under my passenger seat. Just aim the remote at the front floor and you can control volume and source. If you look for any receiver with an RF remote it would work even better. Only problem, is you cannot see what channel you are listening to, I have thought about rigging a cable that would allow me to mount the faceplate somewhere, but it is not a big deal as I only tune into one local station usually.
-
Eric Valentin- ‘69 B5 408 FB
-
I have a "period" FM adapter (underdash tuner) that can play my iPod through FM with a little gadget I got.
-
Max Heim - ‘67 Fastback
DIY Radio Conversion (Accessing MP3)
-
For radio conversion people who want accessing MP3 miniature stereo jack inputs on the rear of their car stereos try this simple solution:
-
Drill a hole in the back of the ashtray, put a rubber grommet in it, plug a standard plug-to-plug stereo MP3 cable into the back of the radio, insert the other end through the hole in the ashtray, and coil up the Mp3 cord in the ashtray for storage and ready availability.
-
When you want to use your MP3 player, just pull out the ashtray, and use the cord to plug in his Ipod. No holes in the dash or radio, everything looks stock, easy to access and easy to use.
-
Steve Toth
Radio Speaker Wire
-
The red wire on the AM/FM radio speaker wire is positive.
-
-
Typically in a non-bi-wire system the Red is positive ands the black is negative. If you were to reverse them there would be no damage but also no sound.
-
Robert Minor
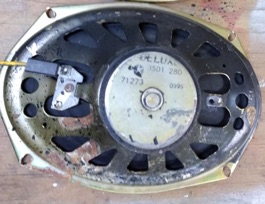
Speakers
Dash Speakers
-
Originally there was one mono speaker under the dash.
-
People now put speakers in various places: kick panel, cargo panels, trunk divider, under the front seats, etc.
-
The dash speaker comes with a metal bracket that surrounds the speaker. Two screws attach it to the dash. 4 screws attach the speaker to the bracket.
-
-
It is recommended to get an 8 ohm speaker (OEM) if you are going to use the original radio.
-
-
Some center speakers are made up of 2 separate speakers, it just doesn't sound that good because they are too close together to get much sound separation.
-
Nathan Nuttall
Retro Dash Speaker
-
S/M Electro-Tech, Inc
-
-
4 x 10" Slimline Oval - Used extensively in many GM, Ford and Mopar products starting in 1959. This is probably the most common car front dash radio speaker size used in the 1960's by all manufacturers. This speaker will fit in all 4 bolt oval 4x10 applications. Required for original Delco radios.
-
Fabric cover on all 4 x 10 speakers.
-
Price - $49.95 8 - 10 Ohm Size: 4 1/8"W x 10"L. 1 1/2" deep. 3 1/4" x 6 7/8" mounting centers
-
In case anybody is interested in replacement speakers:
-
Here's what I'm considering for the dash:
-
Steve Toth
-
Dash Speaker Wire
-
Early 70's AM/FM Mopar radios have one has a black with green stripe and a solid green and the other has a solid black and a solid green that go to the speaker. Each has a different type of connector at the speaker end so that you can't put them on the wrong terminal...IF you're using and original OEM spec speaker I'd bet. In any case the blacks are positive and the greens are a protected ground.
Kick Panel Speakers
Front (Kick Panel) Speakers
-
Kick panels speakers sound a lot better than the single/dual speaker in the center of the car.
-
Nathan Nuttall
-
-
I used those molded kick panels for the front speakers but upgraded them to a set of Infinity plate speakers.
-
Rob Robinson
-
-
I went with the kick panel type. They fit fine and when I bought them they had a couple of choices of wattage.
-
Dave
-
-
Contact Famous Frank, he sells kick panels with speakers already mounted, sounds great and fit my vert well. He also provides a discount to BOG members.
-
Daty Rogers
-
-
I'm putting in Custom Auto Sound kick panels with 4x6 speaker cutouts (Classic Industries #MA1540, $74.99) with Infinity Reference 4x6, 120 watt, 2-way speakers, #6432cf, $53.90/pair at Amazon.
-
Nathan Nuttall - ’67 FB
-
-
You can just purchase these panels with speaker mounts already in them. Makes it fit better and looks good.
-
-
I'm putting in Custom Auto Sound kick panels with 4x6 speaker cutouts (Classic Industries #MA1540, $74.99) with Infinity Reference 4x6, 120 watt, 2-way speakers, #6432cf, $53.90/pair at Amazon.
-
In the rear we are going to make 6x9 speaker openings in the metal side panels and mount the speakers behind the panels with speaker grille lattice protecting the cones. The side panel carpeting is just going to cover the speaker openings with no insulation in front of the speakers. Speakers are Infinity Reference 6x9, 300 watt, 3-way speakers, #9633cf, $76.31/pair at Amazon. The guy I'm working with is a perfectionist and has installed stereos and speakers in a dozen Barracudas. He claims the speakers that come with the kick panels are crap and he used the Infinity's instead. I've heard his speakers (AC/ DC - Hells Bells) and they sound great, so since I'm an inveterate rock and roll junkie I'm following his advice (and so far he's been correct about everything else we've done too).
-
Steve Toth
-
I used the aftermarket front kick panels and installed plate speakers in them. I used some padding on the back of the magnet because they would hit.
-
Rob Robinson - ’68 FB
Rear Speakers
Original Dealer Speakers
-
These Chrysler stamped speakers were dealer installed. Usually because the car had an R21 AM/FM radio car. Some were mounted under the dash, others in the rear cargo area on the back trunk separator. The wires to the speakers used old style connectors like the ones on horns, solenoids etc...
-
-
Aftermarket Speakers
-
I used an already cut up set of rear cargo panels for the rear 6x9 Infinity speakers with a rear spacer and a set of Chevy grilles.
-
Rob Robinson
-
-
I bought 2 Alpine 6x9's for the rear.
-
Jim Conner
-
In the rear we are going to make 6x9 speaker openings in the metal side panels and mount the speakers behind the panels with speaker grille lattice protecting the cones. The side panel carpeting is just going to cover the speaker openings with no insulation in front of the speakers. Speakers are Infinity Reference 6x9, 300 watt, 3-way speakers, #9633cf, $76.31/pair at Amazon. The guy putting in the stereo claims the speakers that come with the kick panels are crap and he used the Infinity's instead.
-
Nathan Nuttall - ’67 FB
-
Mounted on Wheel Well Cargo Panels
-
I used Infinity Kappa 693.7i speakers that had a smaller magnet on the back. That gave me a little bit more room.
-
Rob Robinson - ’68 FB
-
Crutchfield Auto Speakers
-
Mounted on Rear Trunk / Wood Drop Down Panels
Radio Antenna
-
Radio Antennas were either fixed or telescoping. Remember the manufacturer would have used what would have been available to keep the assembly line moving.
-
Darrell Stephens
-
Generally the ’67 antenna was a telescoping and is fixed, not a screw in.
-
Generally the ’68 antenna was a telescoping and is fixed, not a screw in. All of the antennas in 1968 were the same 3 piece sectional jobs. They are retractable to the 15"-18" stub.
-
-
The ’69 antenna is a solid piece of metal and does not collapse.
-
-
All the A body cars for sure used the same antenna for AM radios and AM/FM. Apparently the appearance of the bezel changed after ‘67, but the function is the same.
Rear Antenna
-
Rear mounted antennas were rare. Some ‘67 383-s fastback had it factory installed. Some Canadian cars had them. The antenna is different from the fender style as well. It is long with a grey covering over it, much like a power antenna but not power.
-
Antenna Fender Hole
-
The fender hole diameter is just less than 1 1/2".
-
Ed
-
-
-
-
'67 and '68 used different sized fender holes (The '68 IS smaller). My 69 1 1/4" hole.
-
-
Read the owners manual. It has instructions for adjusting the antenna to the correct length for best reception on both type of radios.
Antenna Removal
Antenna removal tool
-
‘69 - ‘78 Antenna socket Tool Mopar Charger Cuda Dodge Chrysler Plymouth hemi dart
Antenna Restoration
-
Clean up the antenna and related parts with steel wool and WD40.
Antenna Installation
-
On the right side, install the antenna before the splash shield. It would be difficult/impossible to install the antenna with the splash shield in place. The original gasket between the antenna base and fender is probably toast, so replace or use some strip caulk. Once installed, bolt in the splash shield.
-
Jeff Ramin - ’67 Coupe
Aftermarket Antennas
-
Layson’s sells the ‘68-69 for $119, ‘67 for $169. Their photos are horrible, but all the 60s antennae seem to be 1-piece masts. None of them are telescoping.
-
Year One shows a telescopic replacement mast for ‘68-71, but it looks like one of those not completely retractable ones, that leaves a 15-inch stub sticking up. There was no intention of it being retractable in any useful sense.
-
Max Heim - ’67 Conv.
Power Antenna
-
These antennas are fully automatic power antenna with a remote motor located in the fender. You should wire them for manual use, as this saves the remote motor and extends its life.
-
A generic power antenna works fine. They have adjustable bezels so you can get the angle just right. They just only seem to last about 10 years before they strip out the toothed drive.
-
Max Heim - ’67 Conv.
-
I put one on it from a '88', Fifth Avenue. It retracks completely into the fender when the radio is off. Only real problem is snow/ice buildup preventing its function. The bottom bezel needs some adjustment to fit our fenders, but it has worked for me so far.
-
Barry - ‘68 Conv.
-
Some people install a manual retractable one taken from another type of car. I had planed in a electric antenna, but the stereo place said it was to tight a fit. The antenna delete plug I found from someone here on the BOG.
-
Dave Dalmas
Aftermarket Power Antenna
-
If your thinking about putting in a power antenna, try RetroSound. Use part number pm 6874-19 for the ‘68 Plymouth Valiant. (They do not have a listing for 68 barracuda). The parts that attach the antenna to the fender looks correct. This is fully automatic but can be wired to make it manual or full automatic.
-
-
Cost is 179.99. It does not come with a manual switch. When you have the antenna installed and ready to hook the wires up let me know. Also the radio you will be installing make sure there is a power antenna lead coming from the radio. Most radios will have this wire.
-
Darrell Stephens
-
Most aftermarket antennas are designed to fit a 1 inch diameter hole. The bezel include with these antennas are designed to cover a 1 inch hole. The hole for the factory antenna on the Barracuda is a larger diameter than 1 inch.
-
Use a toggle switch so that the power to the relay can be turned off, on the generic power antenna the bezels will not be big enough to completely cover the hole in the fender. I have installed generic power antenna on a ‘68 Barracuda. Install the fully automatic relay. Install a toggle switch on the power line going to the relay. This gives a choice of having a fully automatic antenna or being able to turn off the power to the relay. The height of the antenna can be adjusted this way. If the antenna is a full automatic, the radio will have a wire that goes to the relay + wire that has 12 volts when the radio is turned on.
-
Darrell Stephen
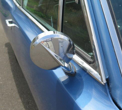
Side Mirrors
-
There are two potential "pairs" of mirrors. Remote and non-remote. The reason for separate LH and RH mirrors is because the mirror body is offset from the base, so there is both a left and right hand version of each style.
-
Max Helm - ’67 FB
"non-remote"
-
The "non-remote" are the same mirror left hand or right hand. If your car has the standard driver side mirror (which has a different base, obviously), there is a matching RH mirror for this one, too.
-
The manual type gives you better adjustment.
-
Mike Jarvie - ’68 Fastback
"remote style"
-
If your car has the "remote control" mirror, there is a RH mirror that matches it in appearance. This is often called the "remote" passenger mirror, but it does not have the remote control cable, and there is no need to put a hole in the inner door panel for the control. It just has the larger housing to make it look the same.
-
-
The "remote style" drivers side has the remote cable. The base is angled. The passenger side "remote style" is a "mirror image" or the drivers side mirror.
-
Max Helm - ’67 FB, ’67 Conv.
MIrror Mounting Location
-
The '67 remote mirror is mounted in a different location then the '68 and '69. With that the cable is shorter on the '67s then the other 2 years. The '67 mirror is more toward the front of the door.
-
Dave Dalmas - ’67
-
-
On the ‘67, it doesn't seem to be in any danger of interfering with the vent window. They mirror comes apart. Don't think the cable is interchangeable. The cables are attached by being pinched in place. The squished metal would not budge. Replacing the cable is a PITA.
Mirror Mounting
-
Install the side mirrors before installing the side windows. It would be difficult (impossible?) to get at those bolts in with the window in the car.
-
Jeff Ramin - ’67 Coupe
-
-
Use Nutsert to attach mirrors to the door.
-
Better solution for the mirror is to use the kit by Dynamic Renovations. It comes with a through bolt and a backing plate to make the whole thing more rigid.
-
-
There are advantages to both methods, The inserts, if you already have mounted the mirrors and don't want to go to the trouble of taking off the door panels. The plate and nuts and bolts if you have your door panel off and are going to mount the mirrors and don't want to go to the trouble of buying the kit for four screws.
-
Mike Jarvie - ’68 FB
Mirror Restoration
-
Mirror when rechromed may have little pits. They are made of pot metal base and are made to be chromed only once, but will still have little holes when rechromed. Better to have that than a reproduction one.
Passenger Mirror Adjustment
-
No matter how many times you try to set it, you can't see to the rear of the car. My passenger mirror on my '68 is pretty much decorative. If you rotate the mirror so it's closer to the body and keep messing with the angle it will be almost useful. I've had it adjusted twice where I could see anything out it. But it is easily bumped when walking past. I gave up using it.
-
Rob McCall
-
-
The mirror position on these cars is a chronic problem. Mopar moved the position over the years based on customer complaints. The biggest problem is the fact that for symmetry, the passenger side mirror is mounted in the same relative location as the driver side mirror. For most people, this means that if they can use the driver side mirror, the other one is in the wrong place for viewing. They tried moving both mirrors, but then people complained about the driver side mirror. It just so happens that because I am tall and push the seat all the way back, I can use both mirrors in the stock ‘67 position. But that is an exception, and even from my point of view the LH mirror is partly blocked by the vent window post.
-
Max Heim - ’67 Conv.
Bumper Jack
-
You need the jack assembly to look complete at car shows! If you use one, the bumper will twist and flex. Buy a small scissor jack.
-
Max Heim - ‘67 Fastback
-
-
The wire loops or springs are on ebay.
-
-
The jack bracket kit from Year One is "pre-bent". The spring hold-down loop is repro'ed.
-
-
The brackets aren't part of the repro quarterpanels. Also the little bracket on the floor that holds the end of the jack. You should also replace the little loop or hook for the jack.
-
Bumper Jack Mounting Parts
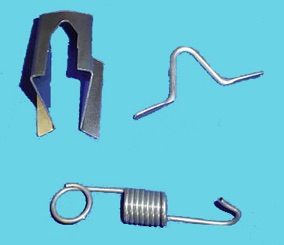
Bumper Jack Hook
-
There are 3 jack hooks. #2461125, #2533424, #2931100
-
#2533425 jack hook is for 1967 to 1970 A-body.
-
#2533424 jack hook also is correct for 70-1 Duster.
Notes: This is a non-removable Jack Hook.
Bumper Jack Hold Down
-
The spring hold-down loop is repro'ed.
Bumper Jack Base
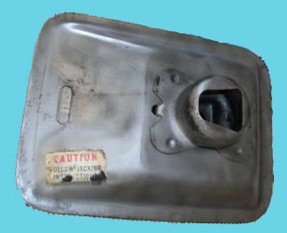
-
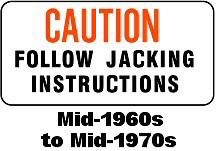
The Jack Base Plate Caution Decal
-
This was found on the base. The decal is located on the flat area of the top of the base plate, and is readable from the front of the jack.
-
The decal is not visible when the jack is stored with the spare tire in the trunk.

Bumper Jack Restoration
Depending on the condition of the parts,
1. Soak the base and jack mechanism in Evaporust for a few days.
2. Cleaned with soap, water and a toothbrush.
3. Then removed remaining scale with a soft wire wheel on bench grinder.
4. Use a soft wire wheel on the jack to get into the catch grooves.
5. The base and mechanism should be painted with rust inhibitor primer, then black paint.
6. Do the same to the jack pole. When clean, shoot the jack pole with dull aluminum paint to
get close to the original look.
7. Add the “Caution” decal to the base. (see above)
Proper Bumper Jack Mounting
Commonly installed incorrectly. Correct order from bottom up: spare, jack base, large wing nut, then the board, cup and finally a small wing nut.
Alan Erland - ’67 Coupe
Keys
The keys from 1966-84 were nickel plated copper. Original keys have a Pentastar" and "Chrysler Corporation" logos. The vehicle keys from the assembly plant consist of a round and Pentastar shaped key and a destroy tag (Key ID number) for each key. The oblong one is ignition and door code. The circular one is the trunk code.
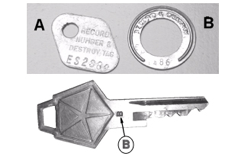
Part No. Key Code Tag shape Tumbler Type Application
2802403 CB62 Diamond Trunk lid 67-71
2802403 CB384 Diamond Trunk lid 67-71
2802403 CB184 Diamond Trunk lid 67-71
Trunk Key
Trunk lock is operated by the trunk key which is round headed with an "I" and stamped keyway. However, the "I" is the most common but "A" has also been found. The original destroy tag for this key is a small circular "washer type" steel tag with the stamped key code.
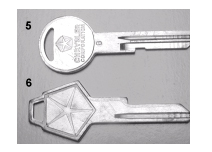
Door / Ignition Key
The ignition key is rectangular and typically has a "Y" and stamped keyway. However, the "Y" is the most common but "I", "H" and "B " have been found. The original destroy tag for this key is a small rectangular aluminum tag with the stamped key code. Driver’s side door locks by rotating clockwise; passenger door, by rotating counter clockwise.
There are some key shops that have a computer program that can reverse engineer the code from the shape of your original key.